🎓 Start Here — No Server Experience Required
New to servers? This section uses analogies you already know. By the end you'll understand what you're actually building before touching any real config.
🚀 The path · 5 pages, top-to-bottom
First-time visitor? Open these in order. Each page links to the next. You can always jump around using the persistent Capstone nav at the top of every page.
📚 Reference tools — bookmark these
Self-contained pages you'll keep open in tabs while working through the phases. Each is reachable from the Resources ▾ dropdown in the top nav of any page.
Complete beginner's walkthrough
Three-phase text guide. Plain English, every acronym defined, troubleshooting per phase.
Data flow animation
Watch a packet travel through the lab. Encapsulation/decapsulation animated, layer by layer.
Topology presentation
13-slide deck. Network diagram + zone breakdown + traffic-flow example. For class.
LAMP + LEMP install
Click-to-copy commands. NGINX :80 · Apache :8080 · shared MariaDB. 10 phases.
Verification (screenshots)
Phase-by-phase build proofs with embedded screenshots. Lab-report deliverable evidence.
Glossary · 50+ acronyms
Every networking acronym spelled out and explained. Search-friendly card grid.
Think of a server as an apartment building
That one big metal box in the rack isn't really "a computer running one thing." Modern servers run many separate "tenants" at once. Here's the mental model:
The blade server
One physical box with lots of power (CPU, RAM, disk). Just like a building has plumbing, power, and walls shared by all tenants.
Proxmox (the hypervisor)
Software that decides which tenant gets how much CPU / RAM / disk. Hands out "apartments," keeps tenants isolated, collects rent in the form of resources.
A Virtual Machine (VM)
Feels like its own complete computer — has its own OS, IP address, users, files. But it's actually just a slice of the big building.
A virtual bridge (vmbr1, vmbr2...)
A hallway lets tenants on the same floor talk to each other. A bridge lets VMs on the same "floor" exchange network traffic.
The firewall (OPNsense, iptables)
Checks every person entering or leaving. "You can go to the lobby, but not the residential floors unless you're on the list."
The DMZ (vmbr1)
Anyone from outside can walk in. That's where your public website lives. Designed to be safely exposed.
The Private LAN (vmbr2)
No guests allowed. Your databases, AD, file shares live here — the stuff you absolutely don't want a random internet stranger reaching.
DNS + Active Directory
DNS says "the apartment called mailserver.local is at unit 192.168.0.10." AD keeps the list of who's allowed in each apartment.
Backups
If an apartment burns down (server crash, ransomware), you can rebuild it exactly from the copies.
IDS / IPS (Snort, Suricata)
Watches all traffic. Alerts if someone jiggles the locks or carries something suspicious. IPS goes further — it physically blocks them.
The whole building, at a glance
Here's the apartment-building analogy as an actual picture. Every room has a real counterpart in what you're building.
Why bother with all these zones?
Imagine a thief breaks the lobby window. If the lobby connects directly to the vault, game over. But if the lobby is walled off and every door between lobby and vault has a guard checking IDs — now the thief is stuck in the lobby.
That's what segmentation is: making it so one compromise doesn't become total compromise.
The 4-week journey, in 4 sentences
Watch a request travel through the system
Click the button. You'll see exactly what happens when someone from the outside internet visits your web site.
🔍 How a name becomes an IP (DNS explained)
When you type mail.capstone.local, your computer has no idea where that is. It asks DNS. Watch how the lookup unfolds:
Still fuzzy on a word?
Jump to the Glossary tab — every acronym and jargon term explained in plain English. Or check the Learn tab for YouTube videos.
Goal
In 4 weeks, your team builds a standard Server+ enterprise environment on a physical blade server. You will install, configure, secure, monitor, back up, and present a complete server environment.
What you'll build
- A Proxmox hypervisor on real hardware
- Virtual networks: Mgmt / DMZ / Private LAN
- OPNsense firewall controlling traffic
- Windows Server (AD, DNS, DHCP, IIS, SQL)
- Linux server (NGINX, MongoDB, cron, logs)
- Backups, IDS, monitoring, and docs
Skills you'll practice
- Hardware troubleshooting
- Virtualization & bridge networking
- Windows + Linux administration
- Firewall rules & segmentation
- Backup / restore / DR procedures
- Documentation & presentation
Two difficulty tracks
Level 1 — Server+ Core install + services. Enough to pass the Server+ outcomes.
Level 2 — Advanced Adds AD, Docker, Wazuh, SIEM, Suricata IPS, full audit trail.
Start at Level 1. Add Level 2 bonuses once core works.
📅 The 4-Week Timeline
Each bar is a team role. Diamonds are milestones / weekly deliverables.
🛠️ Every service you'll touch, at a glance
This is every real piece of software that lives somewhere in your build. Hover for a one-line reminder of what it does.
The 4-Week Flow (Big Picture)
Choose Your Role
Pick one. Every team needs all four roles filled. Click a card for what you'll own.
Windows Specialist
Windows Server, AD, DNS/DHCP, IIS, file shares, backups
- Install Windows Server
- Configure Active Directory, DNS, DHCP
- Stand up IIS web sites
- Create file shares with NTFS permissions
- Install SQL Server Express
- Configure Windows Server Backup
- Harden with Group Policy
Linux Specialist
Linux installs, NGINX, MongoDB, services, scripts, monitoring agents
- Install Debian / Ubuntu
- Configure NGINX web server
- Install MongoDB
- Manage systemd services
- Schedule cron jobs
- Collect and rotate logs
- Write rsync / tar backup scripts
- SSH hardening (port, key-only, no root)
Networking Specialist
Proxmox networking, DMZ/Private LANs, firewall, IDS
- Build Proxmox bridges (vmbr1, vmbr2)
- Configure firewall — OPNsense or iptables NAT/PAT on the host
- Create DMZ + Private LAN segments
- Set up routing between subnets
- Deploy Snort / Suricata IDS
- Test segmentation with a matrix
- Configure Cisco switch gear
- Level 2: VPN (WireGuard)
Team Lead / Analyst
Docs, diagrams, reports, presentation, audit evidence
- Coordinate the team, run standups
- Maintain the documentation folder
- Build network topology diagrams
- Populate the IT Asset Tracking spreadsheet
- Write weekly integration reports
- Collect screenshots as evidence
- Draft the security assessment
- Prepare and run the final demo
Who does what, by week
Network Architecture
Everything runs inside your blade server. Four Proxmox bridges (vmbr0–vmbr3) split traffic into safe zones.
vmbr0 — Management
Proxmox web UI (:8006), SSH to host. No VMs serve traffic here.
Why: if an attacker pops a web server, they should NOT be one hop from the hypervisor.
vmbr1 — DMZ
Anything reachable from outside lives here: NGINX, IIS, jump box, monitoring dashboards. Range 172.16.0.0/24.
vmbr2 — Private LAN
Crown jewels: AD, DNS, DHCP, SQL, MongoDB, file shares. Never talks directly to the internet. Range 192.168.0.0/24.
vmbr3 — Physical
Bridges Proxmox to the Cisco switches for real-world VLANs and uplinks.
🗺️ IP subnet map — what lives where
Three address ranges, three very different trust levels. Memorize these — you'll type them a hundred times.
🏫 School LAN
The school's existing network. This is where laptops, the school switch, and your Proxmox management IP live. Treat like "the outside world" from your VMs' point of view.
🛎️ DMZ (vmbr1)
Publicly-exposed services — the hotel lobby. If one of these gets compromised, the firewall still stands between the attacker and the vault.
🔐 Private LAN (vmbr2)
Crown jewels. Never directly reachable from outside. All internal VMs point to the Windows Server's IP as their DNS.
🧱 Firewall rule matrix — who can talk to whom
Read it as: "from the ROW to the COLUMN, is traffic allowed?". This is the stance you want your OPNsense / iptables rules to enforce.
| → School LAN | → DMZ | → Private LAN | → Internet | |
|---|---|---|---|---|
| From School LAN | — | LIMITEDonly published ports (80/443) | DENYnever direct | ALLOWnormal browsing |
| From DMZ | DENYno calling back out | — | LIMITEDonly the app's DB port | LIMITEDupdates only |
| From Private LAN | DENY | ALLOWfor monitoring | — | DENYproxy only |
| From Internet | ALLOWit IS the internet | LIMITEDpublished services | DENYabsolutely not | — |
🎯 How a firewall actually matches a packet (live demo)
Rules are evaluated top-to-bottom. The first match wins — remaining rules are skipped. This is why rule order matters: a broad "allow all" at the top will make every rule below it useless.
🟦 Week 1 — Hardware, Install, Network Setup
Server+ focus: Hardware → Virtualization → OS Install → Basic Networking
Goal by Friday: Proxmox runs, three bridges exist, OPNsense filters traffic, one VM of each OS boots with a static IP.
Inspect and repair the blade server
Pop the chassis. Document every component: CPUs, RAM sticks, drives, NICs, PSU, serial numbers. Reseat RAM, verify drives pass SMART, replace bad thermal paste if needed.
Install Proxmox VE
Download Proxmox VE ISO, flash to USB (balenaEtcher or Rufus). Boot the server from USB. Accept licenses. Pick a static mgmt IP on the school LAN (e.g. 10.10.10.50). Set a strong root password.
# After install, from any browser on the school LAN:
https://10.10.10.50:8006
# Login as root / password you set
Create the three virtual bridges
Datacenter → Node → System → Network → Create → Linux Bridge.
Click Apply Configuration when done. Bridges only take effect after apply.
Deploy OPNsense firewall
Download OPNsense ISO, upload to Proxmox local → ISO Images. Create a VM:
- 2 vCPU, 2 GB RAM, 20 GB disk
- Three NICs: one on vmbr0 (WAN), one on vmbr1 (DMZ), one on vmbr2 (LAN)
- Boot the ISO, run the installer, assign interfaces in that order
Install one VM of each OS
Windows Server 2022 on vmbr2 (Private LAN). Debian 12 or Ubuntu 22.04 on vmbr1 (DMZ). Give each a static IP.
# Example static IPs
Windows (vmbr2):  192.168.0.10 / 24   gw 192.168.0.1  (OPNsense LAN)
Linux   (vmbr1):  172.16.0.10  / 24   gw 172.16.0.1   (OPNsense DMZ)
Draw the topology + organize docs
Open draw.io or Lucidchart. Re-create the diagram on the Network tab of this guide. Create a shared Google Drive / OneDrive folder:
Capstone/
├── 01-Hardware/        # inventory, photos
├── 02-Proxmox/         # install screenshots
├── 03-Network/         # topology, IP plan
├── 04-Windows/         # AD, IIS configs
├── 05-Linux/           # NGINX, scripts
├── 06-Security/        # hardening evidence
├── 07-Backups/         # restore proof
└── 08-Reports/         # weekly write-ups
Week 1 Checklist
- Blade server powered on, hardware inventory saved
- Proxmox VE installed, reachable on https://IP:8006
- vmbr0, vmbr1, vmbr2 created and Applied
- OPNsense VM running with 3 NICs
- Windows VM boots with static IP on vmbr2
- Linux VM boots with static IP on vmbr1
- Can ping from Windows → Linux through OPNsense
- Topology diagram committed to docs folder
Level 2 Bonus Promote Windows to a domain controller (dcpromo era command is now Add Roles → AD DS → Promote). Install MongoDB on Linux. Create first VLAN tags.
🟩 Week 2 — Core Services Deployment
Server+ focus: Server Roles → Web / File / DB Services → Basic Monitoring
🔍 Build verification — captured 2026-05-05
Full step-by-step procedure to verify every VM's actual config, with embedded screenshots, verified-state tables for each VM, and the outstanding-tasks punch list. Use this as your Week 2 deliverable appendix and demo-day reference.
Open verification walkthrough →
What's inside: Phase 1 host inspection · Phase 2 jumpbox · Phase 3 pfSense2 (router/DHCP/DNS) · Phase 4 WinSrv · Phase 5 Linux-Ubuntu (pending) · verified-state summary · 7-item to-do list (most urgent: change pfSense default password).
DNS + DHCP roles
Server Manager → Add roles and features → DNS Server and DHCP Server.
After install:
- In DNS, create a forward lookup zone (
capstone.local) - In DHCP, create scope
192.168.0.100 – 192.168.0.200, router192.168.0.1, DNS192.168.0.10 - Authorize DHCP in AD (right-click server → Authorize)
IIS web server
Add the Web Server (IIS) role. Drop an index.html into C:\inetpub\wwwroot. Test from the Linux VM:
curl http://192.168.0.10
File shares + SQL Express
Create C:\Shares\Team. Right-click → Properties → Sharing → advanced sharing → share as Team$ (hidden share) → permissions: Domain Users read, Admins full. Set NTFS ACLs to match.
Install SQL Server Express + SSMS. Create a test DB CapstoneDB.
NGINX site
sudo apt update && sudo apt install -y nginx
sudo systemctl enable --now nginx
# Replace default page
echo "<h1>Capstone DMZ - $(hostname)</h1>" | sudo tee /var/www/html/index.html
Visit http://172.16.0.10 from your laptop (you may need a firewall rule in OPNsense first).
MongoDB + cron + logs
sudo apt install -y mongodb-org
sudo systemctl enable --now mongod
# Simple cron job: log disk every 10 min
(crontab -l; echo "*/10 * * * * df -h >> /var/log/disk.log") | crontab -
Confirm logs rotate via /etc/logrotate.d/.
Routing + segmentation check
In OPNsense, open Firewall → Rules → LAN and DMZ.
- Allow LAN → DMZ port 80/443 (for monitoring)
- Block DMZ → LAN by default (default deny is enough)
- Allow DMZ → WAN 80/443/53 (DNS + web updates)
Test: from Linux, curl 192.168.0.10 should fail. From Windows, curl 172.16.0.10 should work.
Integration report
Write a 2-page doc with screenshots of: DNS console, DHCP scope, IIS default page, NGINX page, segmentation test results. Save to 08-Reports/Week2.md.
Week 2 Checklist
- Windows DNS zone resolves
capstone.local - DHCP hands out IPs to a test client
- IIS default page visible from another VM
- File share accessible with correct ACLs
- SQL Express running, test DB created
- NGINX serves a page on DMZ
- MongoDB reachable on localhost
- OPNsense rules enforce LAN/DMZ separation
- Integration report submitted
Level 2 Bonus Dockerize the NGINX site, deploy a Wazuh agent, export Prometheus metrics, enable NetFlow on OPNsense, stand up WireGuard VPN.
🟧 Week 3 — Security & Monitoring
Server+ focus: Hardening → Permissions → Backup Scripts → Logs
NTFS permissions + Windows Firewall
Review share + NTFS on Team$. Apply least privilege. In Windows Defender Firewall, block all inbound except SMB (445) from LAN only, and RDP (3389) from the jump box IP only.
Windows Server Backup
Install the feature, schedule a nightly backup of C:\Shares and System State to a second disk. Test a one-file restore to a temp folder — screenshot the result.
Backup scripts (rsync / tar)
#!/bin/bash
DATE=$(date +%F)
DEST=/backups/$DATE
mkdir -p $DEST
rsync -aAX --delete /etc /var/www $DEST/
tar czf $DEST/mongo-$DATE.tgz /var/lib/mongodb
find /backups -type d -mtime +14 -exec rm -rf {} +
Save as /usr/local/bin/capstone-backup.sh, chmod +x, add to root's crontab at 0 2 * * *.
SSH hardening
Edit /etc/ssh/sshd_config (use nano):
Port 2222
PermitRootLogin no
PasswordAuthentication no
AllowUsers capstoneadmin
MaxAuthTries 3
Restart: sudo systemctl restart ssh. Test from another VM before closing your current session.
Snort IDS + segmentation re-test
Enable Suricata/Snort in OPNsense (Services → Intrusion Detection). Subscribe to the ET Open ruleset. Point it at the WAN and DMZ interfaces. Watch the alerts tab while your Linux specialist runs curl loops.
Re-run the segmentation matrix — document every src/dst/port and expected result.
Security assessment
Produce a short report listing every hardening step: firewall rules, account lockouts, password policy, SSH keys, backup schedule, IDS alerts observed. Rank residual risks High/Med/Low.
Week 3 Checklist
- NTFS + share ACLs audited, least privilege applied
- Windows firewall rules restrict SMB/RDP
- Nightly Windows backup runs + tested restore
- Linux backup script installed and cron-scheduled
- SSH on port 2222, key-only, root disabled
- Snort / Suricata alerts visible in OPNsense
- Segmentation matrix documented with pass/fail
- Security assessment submitted
Level 2 Bonus WSUS patch server, advanced GPO baselines (CIS), Bacula CE scheduled backups, SIEM rules in Wazuh, Suricata in IPS mode.
🟪 Week 4 — Backup Validation, Audit, Demo
Server+ focus: Backup → Restore → DR → Documentation → Demo
Full restore dry run
Pick one VM. Snapshot it. Delete a file or a DB row. Restore it from backup. Record time-to-restore (RTO) and what data was lost (RPO). This is your DR evidence.
Final firewall + routing review
Export the OPNsense rule set to PDF. Walk through each rule — if you can't explain why it exists, delete it. Re-run the segmentation matrix one last time.
Final report
Stitch all weekly reports into one PDF. Structure:
- Executive summary (1 page)
- Architecture overview with diagram
- Services deployed
- Security controls
- Backup + DR test results
- Residual risks & recommendations
- Appendix: screenshots, configs, scripts
Live demo
15-minute walkthrough. Suggested flow:
- Show topology slide
- Log into Proxmox, show the VMs running
- Open the DMZ web page from outside
- Show segmentation: attempt DMZ → LAN, watch OPNsense block it
- Show an IDS alert
- Restore a file from backup live
- Q&A
Week 4 Checklist
- Windows restore dry run — RTO/RPO documented
- Linux restore dry run — RTO/RPO documented
- Firewall rule review complete
- Routing tests pass
- Final report PDF compiled
- Demo rehearsed at least once
- Docs folder is the single source of truth
Level 2 Bonus Full DR simulation (power off a VM, rebuild from backup on a fresh VM), MISP → OpenCTI threat intel flow, audit log exports.
🧪 Hands-On Lab Guide — Server+ Week 1–5
This is the actual click-by-click walkthrough from your instructor's config guide. Follow it in order. Screenshot every major step for your docs folder.
📸 Inside-the-chassis reference diagrams
These are the service labels printed inside your ML350p Gen8. Keep this tab open while you're working with the hardware — the diagrams tell you exactly which slot goes where.
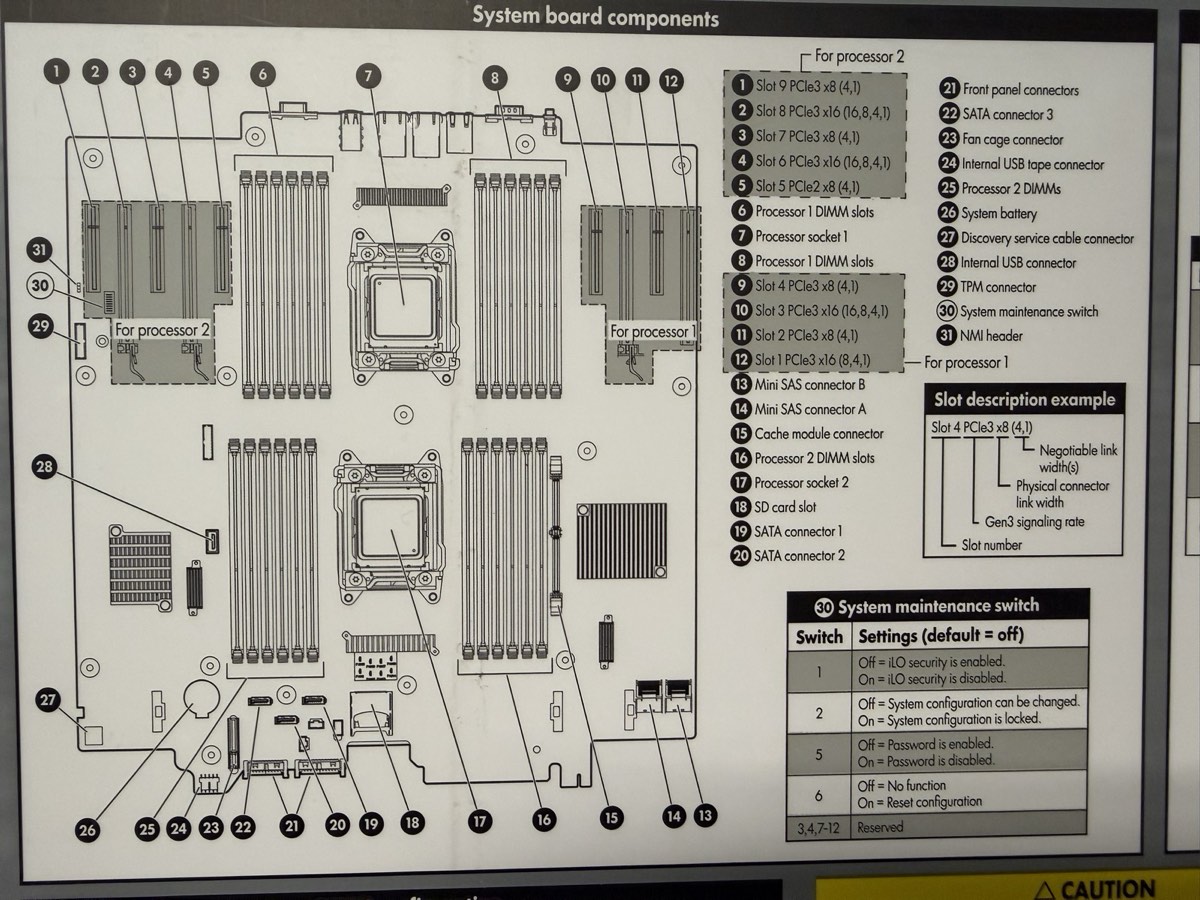
System board layout
31 numbered components: PCIe slots (1–12), DIMM slots, both processor sockets, Mini SAS connectors (A, B), cache module slot, SATA connectors, SD card slot, TPM connector, iLO connector, and the system maintenance switch (30) — the one you flip to disable iLO security or clear passwords if you're ever locked out.
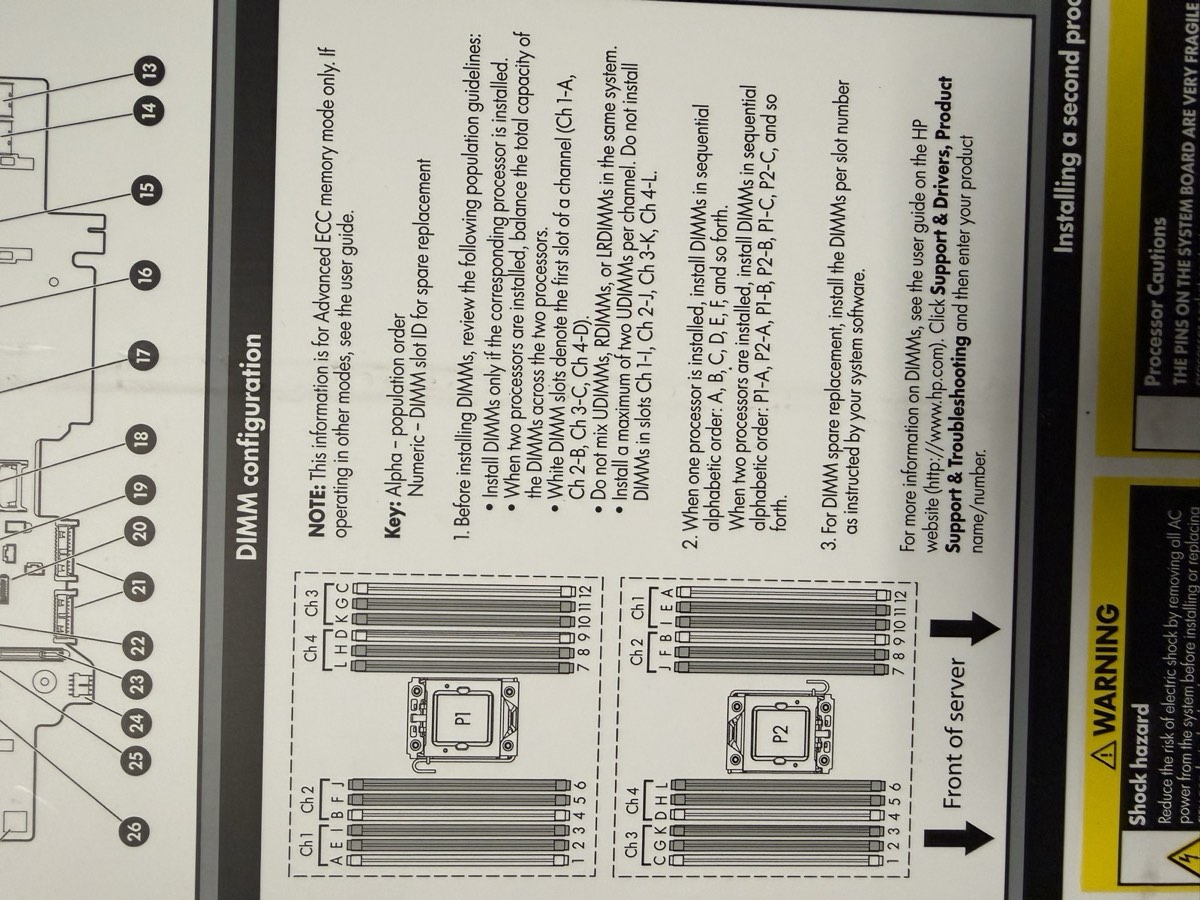
DIMM (RAM) population order
Critical when adding or reseating RAM. Rules at a glance:
- White DIMM slots = first slot of each channel — fill these first
- 1 CPU installed? Alphabetical:
A, B, C, D, E, F - 2 CPUs? Alternate:
P1:A, P2:A, P1:B, P2:B… - Don't mix UDIMMs, RDIMMs, LRDIMMs in the same system
- Max 2 UDIMMs per channel
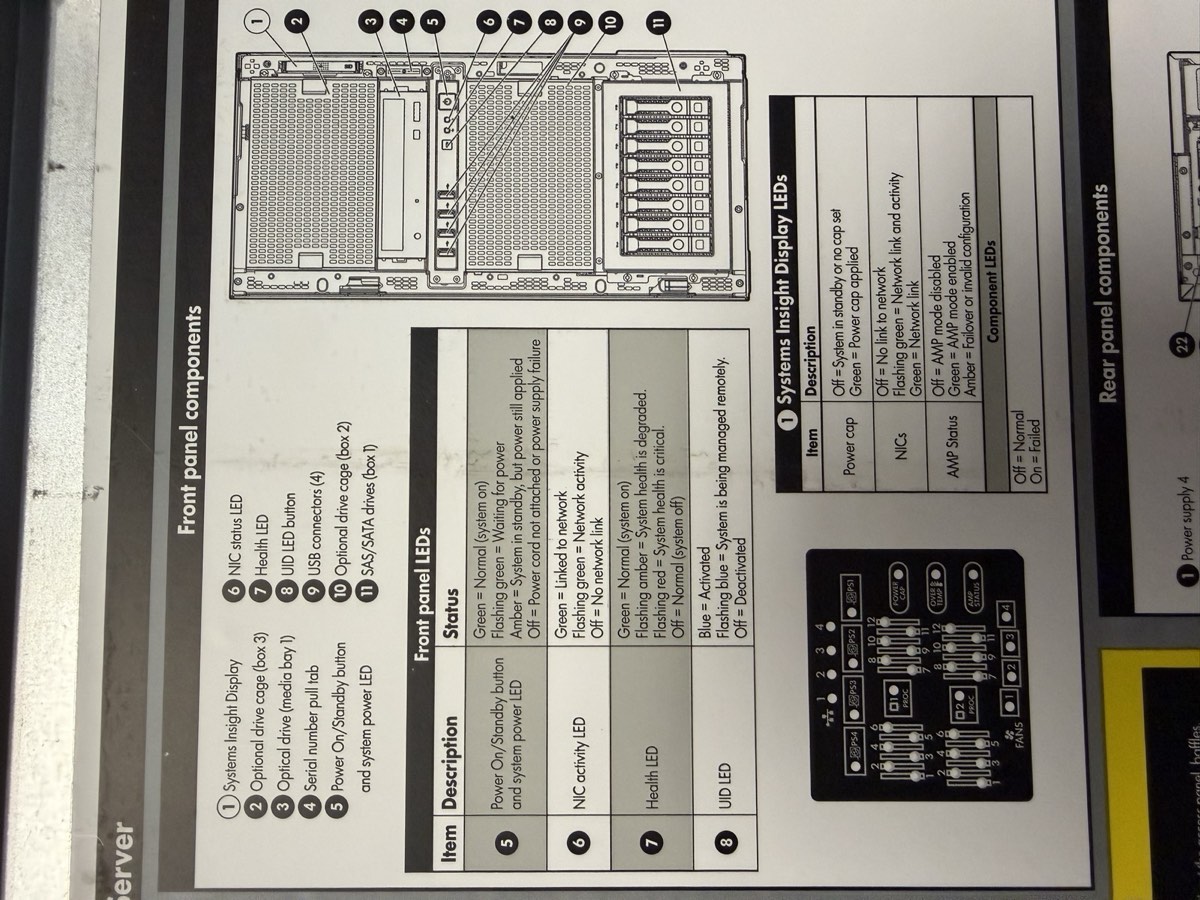
Front-panel components + LED meanings
Systems Insight Display, drive cages, USB, serial number pull-tab, power button. LED color legend:
- Green = normal / link up
- Amber = degraded / attention needed
- Red flashing = health critical
- Blue (UID) = server is being managed remotely via iLO — useful for locating in a rack
🖥️ Your server, simplified
Here's a stylized front + rear view of the ML350p Gen8 so you know what each port does before you touch a cable.
Part 1 — Flash a USB drive with the Proxmox ISO (Rufus)
What you'll need
- USB drive, at least 2–4 GB
- Rufus installed on your Windows PC
- Proxmox VE ISO from the official Proxmox download page
Flash the USB
- Plug the USB drive into a school computer.
- Open File Explorer and type
\\itsdc3\itsin the address bar. - Open
Rufus-4.7. - Under Device, select your USB drive (check the box to list USB devices if needed).
- Click SELECT, navigate to
\\itsdc3\its, pick the Proxmox 6.4-1 ISO. - Partition scheme: MBR for BIOS or GPT for UEFI (depends on target).
- File system: FAT32.
- Click START. When prompted, choose DD mode (required for Proxmox).
- Wait for Rufus to finish.
Part 2 — Access BIOS & set USB boot (HP ProLiant ML350p Gen8)
F9 for BIOS (not F2), F8 for the RAID Option ROM (not Ctrl+R), and has an extra F10 "Intelligent Provisioning" menu that can do most of the install for you.HP POST key cheat sheet
Watch the bottom of the screen right after power-on — HP shows which keys do what for a few seconds. Tap the key you want as soon as you see POST:
| Key | What it opens | Use it for |
|---|---|---|
F9 | System Utilities (RBSU) | BIOS settings, boot order, date/time |
F10 | Intelligent Provisioning | Guided RAID + OS install in one place |
F11 | One-time Boot Menu | Pick USB for this boot only |
F8 | Smart Array Option ROM | RAID configuration (see Part 3) |
Enter BIOS / System Utilities
Plug in keyboard and monitor. Power on. When you see the HP splash screen, tap F9 repeatedly until you see "System Utilities" load. (On older firmware you'll see "ROM-Based Setup Utility" — same thing.)
Configure boot order
- In System Utilities: System Configuration → BIOS/Platform Configuration (RBSU) → Boot Options → Standard Boot Order (IPL).
- Move USB DriveKey (or your USB stick) to the top with the
+/-keys. - Press
F10to save, then Exit.
F11 at POST, pick the USB from the one-time boot menu, and keep your normal boot order intact.Bonus — configure iLO (do this once)
The ML350p Gen8 has iLO 4 (Integrated Lights-Out) — a tiny computer inside the server that lets you power it on/off and see the console remotely, even when the OS is dead. Worth setting up.
- During POST press
F9→ System Configuration → iLO 4 Configuration Utility. - Under Network Options, set a static IP on your school LAN (e.g.
10.10.10.51). - Under User Administration, set a strong password for the default user.
- Save. Plug the dedicated iLO RJ-45 port into the school switch (it's a separate NIC labeled iLO, not one of the four data NICs).
- Reach it from any school laptop:
https://10.10.10.51
Part 3 — Configure RAID (HP Smart Array P420i)
On the ML350p Gen8 you have two ways to configure RAID:
- Option A — F8 Option ROM (ACU/ORCA): quick text menu at POST. Good for simple arrays.
- Option B — F10 Intelligent Provisioning: friendlier graphical wizard. Walks you through RAID + OS install together. Recommended if this is your first time.
Before you pick — what each RAID level actually does
RAID 0 — Stripe
Pro: fastest, 100% capacity usable
Con: ONE disk fails → ALL data gone
Use for: scratch space only. Not for this lab.
RAID 1 — Mirror
(copy)
Pro: full redundancy, simple
Con: only 50% capacity usable
Use for: OS / boot drive on a 2-disk setup. Great default.
RAID 5 — Stripe + Parity
Pro: survives one disk failure, ~67% usable
Con: slow writes, rebuilds are risky
Use for: 3+ disks, balanced cost / safety. Good for data drive.
RAID 10 — Mirror + Stripe
Pro: fast + redundant, survives multi-disk failures
Con: only 50% capacity, needs 4+ disks
Use for: databases. Best if you have 4+ disks.
Option A — Smart Array Option ROM (F8)
Enter the RAID utility
Reboot. During POST watch for: "Slot 0 HP Smart Array P420i Controller — Press <F8> to run Option ROM Configuration for Arrays Utility." Tap F8 as soon as you see it.
Delete old logical drives (if any)
From the main menu pick Delete Logical Drive. Highlight an existing drive → press F8 to confirm delete → Enter. Repeat until the list is empty.
Create a new logical drive
- From the main menu: Create Logical Drive.
- Under Available Physical Drives, select disks with the arrow keys +
Space. - Under RAID Configurations, pick a level:
- RAID 1 (mirror, 2 disks) — simple redundancy, good for an OS drive
- RAID 5 (striping + parity, 3+ disks) — capacity + one-disk failure tolerance
- RAID 10 (4+ disks) — best performance + redundancy, uses 50% capacity
- Accept the defaults for stripe size and sector size.
- Press
Enterto create →F8to save.
Exit and reboot
Press Esc → confirm exit. No separate "initialize" step is needed on the HP controller — the drive is ready once created. If asked, let a quick format run.
Option B — Intelligent Provisioning (F10)
Launch Intelligent Provisioning
Reboot → at POST, tap F10. First launch asks for basic setup (language, date, network, admin contact). Fill it in and continue.
Perform Maintenance → Smart Storage Administrator
From the main menu: Perform Maintenance → HP Smart Storage Administrator (SSA). Pick your Smart Array P420i controller on the left.
Create the array
- Click Create Array.
- Check the boxes for each physical drive you want in the array.
- Pick a RAID level (same options as Option A above).
- Accept defaults on strip size / cache.
- Click Create Logical Drive → Save.
Exit SSA, then from IP's main menu pick Configure and Install — it can drive the Proxmox install next if you want a one-shot flow.
Part 4 — Install Proxmox
Run the installer
- Insert USB into the server.
- Reboot, hit
F11for the boot menu, pick the USB. - At the Proxmox VE Installer menu: Install Proxmox VE.
- Select the RAID virtual disk as the target (will wipe it — expected).
- Set username, password, hostname.
Network settings
Hostname:   [your team hostname]
Static IP:  10.10.10.X/24   # ask instructor for your assigned X
Gateway:    10.10.10.1      # school router
Verify web UI
Remove USB, reboot. From a school desktop browser:
https://10.10.10.X:8006
Log in with your Proxmox credentials.
Part 5 — Upload ISO images to Proxmox
Upload flow
- Open dashboard:
https://10.10.10.X:8006 - Left sidebar: Datacenter → TeamX → local (teamx).
- Center panel: ISO Images → click Upload.
- Click Select file, navigate to
\\itsdc3\its, pick the ISO. - Repeat for every ISO you'll need (Windows Server, Ubuntu Server, etc.).
Part 6 — Create two virtual bridges (vmbr1 & vmbr2)
vmbr1 — Jump Box / DMZ bridge
On the Proxmox host CLI (use nano):
nano /etc/network/interfaces
Add:
auto vmbr1
iface vmbr1 inet static
    address 172.16.0.X
    netmask 255.255.255.0
    bridge_ports none
    bridge_stp off
    bridge_fd 0
This establishes the 172.16.0.0/24 subnet for your Jump Box zone.
vmbr2 — Private LAN bridge
In the same file, add:
auto vmbr2
iface vmbr2 inet static
    address 192.168.0.1
    netmask 255.255.255.0
    bridge_ports none
    bridge_stp off
    bridge_fd 0
This establishes the 192.168.0.0/24 subnet for internal-only VM traffic.
Apply changes
systemctl restart networking
# or full reboot
reboot
Part 7 — Deploy and harden the Jump Box VM
Create the VM
- Proxmox GUI → Create VM.
- Ubuntu Server (lightweight).
- 2 vCPU, 2 GB RAM, 25 GB disk.
- NIC on vmbr1.
- Static IP
172.16.0.X, gateway172.16.0.1.
101, name jumpbox, Ubuntu Server installed, hostname tctmachine, admin user tct_jumpbox. Shell prompt reads tct_jumpbox@tctmachine:~$. Note: hostname matches the Proxmox host name — works fine, but keep that in mind when reading prompts in screenshots.Install SSH
sudo apt update
sudo apt install openssh-server
sudo systemctl enable ssh
sudo systemctl start ssh
Harden SSH access
Create a non-root admin:
sudo adduser <username>
sudo passwd <username>
Edit the SSH config (use nano):
sudo nano /etc/ssh/sshd_config
Find and change these lines (remove the leading # if present):
PermitRootLogin no
PasswordAuthentication yes
Save: Ctrl+O then Enter. Exit: Ctrl+X.
Firewall rules (UFW)
Restrict SSH to trusted subnets (example values — adjust to your setup):
sudo ufw allow from 10.10.10.0/24 to any port 22
sudo ufw allow from 192.168.0.0/24 to any port 22
sudo ufw allow from 172.16.0.0/24 to any port 22
sudo ufw enable
Part 8 — Enable routing between subnets (iptables NAT + PAT)
Turn on IP forwarding
echo 1 > /proc/sys/net/ipv4/ip_forward
echo "net.ipv4.ip_forward=1" >> /etc/sysctl.conf
Add NAT / PAT / forwarding rules
iptables -t nat -A POSTROUTING -s 172.16.0.0/24 -d 192.168.0.0/24 -j MASQUERADE
iptables -A FORWARD -s 172.16.0.0/24 -d 192.168.0.0/24 -j ACCEPT

# Port-forward 2222 on the host to the internal SSH jump target
iptables -t nat -A PREROUTING -i vmbr0 -p tcp --dport 2222 \
  -j DNAT --to-destination 192.168.0.2:22
iptables -A FORWARD -p tcp -d 192.168.0.0/24 --dport 22 -j ACCEPT
iptables -A INPUT -p tcp --dport 2222 -j ACCEPT

iptables -t nat -A POSTROUTING -o vmbr1 -j MASQUERADE
iptables -t nat -A POSTROUTING -o vmbr0 -j MASQUERADE
This lets traffic from the School LAN and Jump Box subnet reach the internal network.
Persist the rules
apt install iptables-persistent
netfilter-persistent save
# or:
iptables-save > /etc/iptables/rules.v4
Test connectivity
# From Proxmox host → Jump Box
ssh [email protected]

# From the Jump Box → internal VM
ssh <user>@192.168.0.X

# From the Jump Box → outbound (proves vmbr1 → vmbr0 NAT)
ping -c 3 google.com
ping -c 3 1.1.1.1
tct_jumpbox@tctmachine on VM 101, both ping google.com and ping 1.1.1.1 returned 0% packet loss with ~9–10 ms RTT. DNS resolves (google.com → 173.194.208.x), proving outbound NAT through vmbr0 and DNS reach are healthy.10.1o.10.10 (letter o instead of zero) gives Could not resolve hostname. Always copy/paste IPs or double-check zeros vs. o's when SSH'ing to the host.Part 9 — Deploy Windows & Linux servers on the Private LAN
Windows Server VM
- Proxmox GUI → Create VM → Windows Server ISO.
- 2 vCPU, 2 GB RAM, 25 GB disk.
- NIC on vmbr2.
- Static IP
192.168.0.X, gateway192.168.0.1.
Linux Server VM
- Same shape: 2 vCPU, 2 GB RAM, 25 GB disk.
- Ubuntu Server ISO, NIC on vmbr2.
- Static IP
192.168.0.X, gateway192.168.0.1.
192.168.0.10). That box will become your AD / DNS server.Add static route back to the Jump Box
So internal VMs can reach the Jump Box at 172.16.0.X:
Windows (PowerShell as Administrator):
route add 172.16.0.0 mask 255.255.255.0 192.168.0.1
Linux:
sudo ip route add 172.16.0.0/24 via 192.168.0.1
Lab Guide Checklist
- ✓Part 1 — USB flashed with Proxmox ISO (DD mode)
- ✓Part 2 — BIOS (F9) set to boot from USB
- ✓Part 2 — iLO 4 static IP set, web UI reachable at https://10.10.10.X
- ✓Part 3 — Smart Array P420i logical drive created (F8 or F10/SSA)
- ✓Part 4 — Proxmox installed, web UI reachable at :8006
- ✓Part 5 — ISO images uploaded to local storage
- ✓Part 6 — vmbr1 (172.16.0.0/24) and vmbr2 (192.168.0.0/24) created
- ✓Part 7 — Jump Box (VM 101) deployed, SSH installed, outbound NAT verified (harden + UFW = pending)
- ✓Part 8 — IP forwarding on, MASQUERADE rules persisted (jumpbox → internet works)
- Part 9 — Windows + Linux server VMs created (102, 104) — install + static routes still pending
100 PFsense (template), 101 jumpbox (running, DHCP 172.16.0.100), 102 WinSrv (running · now static 192.168.0.15), 103 PFsense2 (running, all routing/DHCP/DNS), 104 Linux-Ubuntu (install pending · planned static 192.168.0.25 · GUI client tester), 105 LinuxServer (Ubuntu 26.04 installed · static 192.168.0.20 · SSH up). Topology is pfSense2-routed; LAN firewall is hardened 9-rule defense-in-depth. Still to do: SSH hardening on jumpbox · WinSrv timezone Pacific→Central · run Windows Updates · install AD/DNS/IIS on WinSrv · install NGINX/MariaDB on VM 105 · install Ubuntu Desktop on VM 104. Critical: change pfSense admin password (still default pfsense). See Week 2 Verification page for full details.🔧 ML350p Gen8 — Quick Reference
Distilled from the official HPE ProLiant ML350p Gen8 User Guide (Part 661082-008R, Edition 9). Every table here is the answer to a question you'll have during the lab — what does this LED mean, which key do I press, how do I populate RAM, etc.
📄 Full manual (139 pages): ML350p-Gen8-User-Guide.pdf — open in a new tab, searchable.
Your unit's serial #: 2M251705M9 — printed on the pull-tab at the front of the chassis; record this on every deliverable (Week 1 report, asset sheet, iLO config).
⌨️ POST key reference
Watch the bottom of the screen right after power-on. These keys are only active for a few seconds during POST.
| Key | Opens | Use when you want to… |
|---|---|---|
F9 | RBSU / System Utilities | Change BIOS settings, boot order, configure iLO, re-enter serial # |
F10 | Intelligent Provisioning | Guided RAID + OS install, run SSA, view Active Health log |
F11 | One-time boot menu | Boot once from USB without changing boot order |
F12 | PXE network boot | Net-install without any media |
F8 | Smart Array Option ROM (ORCA) | Create/delete logical drives on the P420i from text menu |
🚥 Front-panel LED decoder
Four LEDs on the front bezel tell you the server's health without you having to plug in a monitor. Memorize these — when something's wrong, this is the first thing a technician reads.
| LED | State | What it means |
|---|---|---|
| Power | Solid green | System is on and running |
| Flashing green (1 Hz) | Performing power-on sequence | |
| Solid amber | Standby (plugged in, not on) | |
| Off | No power — check cord, PSU, power button cable | |
| NIC | Solid green | Linked to network |
| Flashing green | Network activity | |
| Off | No network activity | |
| Health | Solid green | Normal |
| Flashing amber | System degraded — check Systems Insight Display | |
| Flashing red (1 Hz) | System critical | |
| Fast-flashing red (4 Hz) | Power fault | |
| UID | Solid blue | Activated — lets you find this server in a rack |
| Flashing blue (1 Hz) | Remote mgmt via iLO OR firmware upgrade in progress | |
| Off | Deactivated |
🔌 Rear panel port map
| Port | Purpose |
|---|---|
| NIC 1 – 4 | Four 1 Gbps data NICs (HP 331i or 361i embedded). These carry your vmbr0/1/2 traffic. |
| iLO | Separate dedicated NIC for remote management. Not one of the four above — it's labeled with the iLO icon. |
| Video (VGA) | Plug in a monitor directly. Also available virtually via iLO Remote Console. |
| Serial | DB-9 serial console port — old-school admin, still useful when nothing else works. |
| USB × 4 | Keyboards, boot media, licensing dongles. Front has 4 more. |
| PSU 1 – 4 | Up to four hot-swap redundant power supplies. 460W / 750W / 1200W options. |
| PCIe slots 1 – 9 | Slots 1–4 belong to Processor 1, slots 5–9 to Processor 2 (slots 5–9 only work with 2nd CPU installed). |
| Kensington lock | Physical theft deterrent. |
⚙️ System maintenance switch (SW 30 on the board)
A bank of DIP switches on the system board. Defaults are all Off. You flip these only to recover from being locked out or to force firmware recovery.
| Switch | Off (default) | On |
|---|---|---|
S1 | iLO 4 security enabled | iLO 4 security disabled (recovery) |
S2 | System config can be changed | System config locked |
S5 | Power-on password enabled | Power-on password disabled |
S6 | No function | ROM reads config as invalid = clears CMOS + NVRAM |
S3, S4, S7–S12 | Reserved — do not change | |
🧠 DIMM population rules
Your ML350p has 24 DIMM slots total — 12 per processor. Populating them wrong = the server won't POST or runs in degraded mode.
- Install DIMMs only if the corresponding processor is installed (slots 13–24 stay empty unless CPU 2 is in).
- White slots = first slot of each channel. Fill white slots before black.
- 1 CPU: alphabetical
A, B, C, D, E, F, G, H, … - 2 CPUs: alternate
P1:A, P2:A, P1:B, P2:B, P1:C, P2:C, … - Don't mix UDIMMs, RDIMMs, or LRDIMMs in the same server.
- Max 2 UDIMMs per channel. RDIMMs allow up to 3.
AMP modes (Advanced Memory Protection) — set in RBSU:
- Advanced ECC (default) — corrects single-bit + some multi-bit failures
- Online Spare — reserves memory; auto-fails-over on degraded DIMM
💾 Hot-plug drive LEDs
Each drive caddy has 4 LEDs. When you're troubleshooting a RAID issue or swapping a failed disk, this is your decoder.
| LED | State | Meaning |
|---|---|---|
| Locate (1) | Solid blue | Drive being identified by a host app (e.g. SSA "locate") |
| Flashing blue | Drive firmware update in progress | |
| Activity (2) | Rotating green | Drive is active (I/O happening) |
| Off | No drive activity | |
| Do not remove (3) | Solid white | Do not remove — pulling this drive fails a logical drive |
| Off | Safe to remove | |
| Drive status (4) | Solid green | Member of one or more logical drives |
| Flashing green | Rebuilding / migrating / expanding / erasing | |
| Flashing amber/green | Drive is active but predicted to fail soon — replace proactively | |
| Flashing amber | Unconfigured, predicted to fail | |
| Solid amber | Drive has failed | |
| Off | Not configured by a RAID controller |
🩺 Systems Insight Display (SID) LED combinations
When the front Health LED goes amber or red, the SID tells you which subsystem is unhappy. Common combinations:
| SID LED | Health LED | Power LED | Condition |
|---|---|---|---|
| Processor (amber) | Red | Amber | CPU failed / not installed / unsupported |
| Processor (amber) | Amber | Green | CPU pre-failure |
| DIMM (amber) | Red | Green | One or more DIMMs failed |
| DIMM (amber) | Amber | Green | DIMM pre-failure |
| Overtemp (amber) | Amber | Green | Cautionary temperature |
| Overtemp (amber) | Red | Amber | Critical temperature — server may shut down |
| Fan (amber) | Amber | Green | Fan failed but still meets minimum redundancy |
| Fan (amber) | Red | Green | Fan failed, no longer meeting minimum |
| PSU (amber) | Amber | Green | Redundant PSU failed (server still runs) |
💨 Fans
- 4 hot-plug fans total (numbered 1–4).
- Fans 2, 3, 4 = primary (always required).
- Fan 1 = redundant only when Processor 2 is installed.
- Fan louvers must be present for redundancy to work. Missing louvers = all fans treated as non-redundant.
🧰 The HP software stack — what each tool does
| Tool | When it runs | What it's for |
|---|---|---|
| iLO 4 | Always (independent of OS) | Remote power, remote console, virtual media, Active Health System log, SNMP alerts. Reach via https://iLO-IP. |
| Active Health System | Continuous | Passive monitoring. Records model, serial, CPU, storage, memory, firmware changes. Log can be exported via iLO or IP. |
| Integrated Management Log (IML) | Continuous | Event log with 1-minute timestamps. View from iLO web UI or HPE SIM. |
| Intelligent Provisioning (IP) | Offline (F10 at POST) | Guided OS install, RAID setup via SSA, maintenance tasks. Replaces old SmartStart CD. |
| RBSU (ROM-Based Setup) | Offline (F9 at POST) | Traditional BIOS — boot order, AMP memory mode, primary controller, serial # re-entry. |
| Smart Storage Administrator (SSA) | Online or offline via IP | Graphical RAID config. Online array expansion, rebuilds, SmartSSD wear gauge. |
| ORCA (Option ROM Config for Arrays) | Offline (F8 at POST) | Text-menu RAID — create/delete logical drives, set boot controller. |
| Service Pack for ProLiant (SPP) | Online or offline | Bundled firmware + drivers update for the whole server. Run once a year. |
| HP Smart Update Manager (SUM) | Online | Deploy firmware/drivers across many servers from one place. |
| Automatic Server Recovery (ASR) | Always | Watchdog timer. If OS hangs, server auto-restarts after a timeout. |
| ROMPaq | Offline | System firmware (BIOS) upgrade from USB. |
⏻ Safe power procedures
Power up
Press the front Power On/Standby button. System goes from standby → on. Watch the power LED: flashing green = boot sequence running, solid green = running.
Power down (soft)
- Shut down the OS (gracefully —
shutdown /sorsudo systemctl poweroff). - Press and release the front Power On/Standby button.
- Wait for power LED to turn amber (standby).
Emergency power down
Hold the Power On/Standby button for 4+ seconds. Only use this when the OS is frozen — data loss possible.
📊 Key specifications
CPU
Up to 2× Intel Xeon E5-2600 v1/v2
Up to 8 cores per socket
LGA 2011 socket
RAM
24 DIMM slots total (12 per CPU)
DDR3 ECC, up to 768 GB
AMP modes in RBSU
Storage
Up to 24× 2.5" SFF or 18× 3.5" LFF
Smart Array P420i onboard
SAS / SATA hot-plug
Network
4× 1 Gbps embedded NICs
Dedicated iLO 4 management NIC
PCIe expansion available
PSU
Up to 4 hot-swap PSUs
460 W / 750 W / 1200 W options
92–94% efficiency (Gold/Platinum)
Form factor
5U tower
Rack-convertible (rails available)
4 hot-plug fans
🛟 Troubleshooting cheat sheet
- Server won't POST → check PSU LEDs (rear), reseat RAM following the population rules above, clear CMOS (S6 on → boot → off).
- Forgot iLO password → set S1 On to disable iLO security → boot → log in without password → reset password → power down → set S1 Off.
- Health LED amber → open the chassis, check SID LEDs for which subsystem. Cross-reference SID table above.
- Drive predicted to fail → drive status LED flashing amber/green. Order a spare and swap proactively.
- OS hung → iLO Remote Console → Power → Cold Boot, or short the NMI header for a crash dump.
- Firmware feels old → download SPP, boot from it, let SUM update everything.
📋 IT Asset Tracker
The Team Lead owns this spreadsheet. Populate it with host + VM info in Week 1; update every time hardware or software changes. Export a snapshot for each weekly report.
/Users/haktang/Downloads/IT-Asset-Tracking-Spreadshee.xlsx. Three sheets: Hardware Vendor List, Hardware Asset, Software Asset Installation.Sheet 1 — Hardware Vendor List
| Vendor | Product | Description | Cost | Contact | Address |
|---|---|---|---|---|---|
| CISCO | 2960 | Switch | — | Anthony Pena [email protected] |
6300 La Calma Dr Ste 350 Austin, TX 78752 |
| HPE | ProLiant ML350p Gen8 | Tower server (Proxmox host) | $300 | Anthony Pena [email protected] |
6300 La Calma Dr Ste 350 Austin, TX 78752 |
Sheet 2 — Hardware Asset (current inventory)
Total asset value: $710
| Item # | Name | Type | Location | Qty | Unit $ | Total $ | Condition |
|---|---|---|---|---|---|---|---|
| 100 | Cisco 2960 | Switch | Storage Room | — | — | $0 | Poor |
| 101 | TP-Link TL-SG1024D Main class switch |
Switch | Server Room | 1 | $110 | $110 | Normal |
| 102 | HPE ProLiant ML350p Gen8 Proxmox / web server (2x Xeon E5-2600, Smart Array P420i, iLO 4) |
Server | Server Room | 2 | $300 | $600 | Excellent |
Sheet 3 — Software Asset Installation
| Host Item # | Hardware | OS | Program | Version | Remarks |
|---|---|---|---|---|---|
| 102 | HPE ProLiant ML350p Gen8 (Web) | Fedora 39 | NGINX | 1.72.2 | NGINX Plus R33 |
| 102 | HPE ProLiant ML350p Gen8 (Web) | Fedora 39 | MySQL | 1.0.1 | Internal database |
What to add to the spreadsheet for your team
- Hardware Asset sheet: add one row per VM you create — Proxmox host, Jump Box, Windows Server, Linux Server. Assign item numbers sequentially starting from 103.
- Software Asset sheet: every time you install a service (DNS, DHCP, IIS, NGINX, MongoDB, etc.), add a row with host item #, OS, program, version.
- Vendor list: stays as-is unless your team buys new gear.
📝 Week 1 Report — Form & Deliverables
This mirrors the Capstone Week1.docx form. Fill it in as you go; submit as PDF or Word.
Date: ___________ Team: ___________
Team members & roles:
- 🪟 Windows Specialist: ___________
- 🐧 Linux Specialist: ___________
- 🌐 Networking Specialist: ___________
- 📋 Team Lead: ___________
🎯 Objective
Physically inspect and assemble the server, install Proxmox, create foundational VMs, and produce a network diagram reflecting a small-school IT environment.
🔧 Phase 1 — Hardware Inspection & Proxmox Install
Step 1: Examine server hardware
System Utilities (F9) → System Information, or look at the front pull-out tag for model / serial.| Component | Expected requirement | Actual spec | Notes |
|---|---|---|---|
| CPU cores | ≥ 4 virtualizable cores | 4 cores · 1× Xeon E5-2609 v2 @ 2.5 GHz | Single CPU; socket 2 empty |
| Virtualization support | Intel VT-x / AMD-V | Intel VT-x + VT-d ✓ | Confirmed in BIOS |
| RAM | ≥ 16 GB | 32 GB · 4× 8 GB DDR3L-1600 ECC RDIMM | Quad-channel; 4 of 24 slots used |
| Storage | ≥ 200 GB local | 3 TB total · 3× 1 TB SATA in RAID 5 | Hardware RAID via Smart Array P420i; 1 drive of capacity reserved for parity |
| NICs | ≥ 2 (1 mgmt, 1 VMs) | 4× 1 GbE · HP 331i (Broadcom BCM5719) | + iLO 4 dedicated RJ-45 for remote mgmt |
Step 2: Install Proxmox VE
- Set up RAID: RAID 5 · 3× 1 TB SATA · ~3 TB total (built in HP ORCA via
F8) - Rufus ISO used: Proxmox VE 8.2.2 (DD mode, FAT32, MBR)
- Partition scheme (BIOS / GPT / UEFI): Legacy BIOS · MBR
- File system: ext4 on
/dev/sda(LVM thin pool for VM disks:local-lvm) - Hostname:
tctmachine - Static IP:
10.10.10.10/16· Gateway10.10.10.1· DNS1.1.1.1 - Web UI verified at:
https://10.10.10.10:8006
Installation issues or notes:
🔧 Phase 2 — VM Provisioning & Network Bridge
Step 3: Bridge configuration Networking
- Bridge name (mgmt):
vmbr0(bridgeseno1to school LAN) - Static IP given to Proxmox physical host:
10.10.10.10/16· GW10.10.10.1 - Additional bridges built (Week 2 prep):
vmbr1· DMZ172.16.0.0/24· host IP172.16.0.10|vmbr2· LAN192.168.0.0/24· host IP192.168.0.10 - Ping test to internet (8.8.8.8): ___________ ms
- Ping test to gateway (10.10.10.1): ___________ ms
Step 4: Create base VMs
| VM name | OS & version | Static IP | Assigned role | Responsible |
|---|---|---|---|---|
| jumpbox (VM 101) ✓ running | Ubuntu Server 24.04 LTS | 172.16.0.X/24 (vmbr1) | Hardened SSH jump host · DMZ entry point · user tct_jumpbox | 🌐 Networking |
| WinSrv (VM 102) running · static IP set 2026-05-05 | Windows Server 2025 Datacenter Eval (24H2) | 192.168.0.15/24 (vmbr2 · static) | (future) DNS / DHCP / IIS / AD | 🪟 Windows |
| Linux-Ubuntu (VM 104) install pending · client workstation | Ubuntu 24.04 LTS Desktop | 192.168.0.25/24 (vmbr2 · static planned) | Linux GUI client · Firefox tester · DHCP/DNS validation | 🐧 Linux |
| LinuxServer (VM 105) install in progress · 2026-05-05 | Ubuntu Server LTS | 192.168.0.20/24 (vmbr2 · static) | NGINX · MariaDB · NTP · Syslog | 🐧 Linux |
| PFsense (VM 100) staged | pfSense (Netgate) | WAN 172.16.0.20 · LAN 192.168.0.1 | Optional LAN router (alt to host iptables) | 🌐 Networking |
| PFsense2 (VM 103) spare / staging | pfSense (Netgate) | TBD | Backup / experimentation copy | 🌐 Networking |
- Ping response Windows → Linux: ___________ ms
- Ping response Linux → Windows: ___________ ms
Step 5: Documentation & reporting Team Lead
- Populate the IT Asset Tracking spreadsheet with host + VM info
- Export a snapshot for the Week 1 report
📐 Network diagram requirement
Create a diagram showing the Proxmox host, vmbr0, and your two base VMs. Pick one tool:
- Cisco Packet Tracer — recommended for exposure to network simulation
- Paper sketch — photo acceptable
- draw.io or Visio
📄 Week 1 report — submit as PDF or Word
Include:
- Proxmox host screenshot — dashboard showing both VMs running
- Network diagram — from Phase 3
- Asset tracking snapshot — top entries from your spreadsheet
- Short reflection — 2–3 sentences per question:
- Were your hardware specs adequate for virtualization?
- What installation or network issues did your team encounter?
- Is your environment ready to begin service setups next week?
Week 1 Report Checklist
- Team roles filled in at top of form
- Hardware inspection table completed with actual specs
- Proxmox install details (RAID, ISO, partition, FS) recorded
- Bridge and host static IP captured
- Both base VMs listed with IPs
- Cross-VM ping results recorded
- Asset tracking spreadsheet populated
- Network diagram created (Packet Tracer / draw.io / paper)
- Proxmox dashboard screenshot captured
- Three reflection answers written
- Report exported to PDF/Word and submitted
Weekly Deliverables
Every deliverable = a document + supporting screenshots in your docs folder.
Expectations (graded)
- Communicate as a team — daily 10-minute standup, even if async in chat
- Document everything — if it's not written down, it doesn't exist
- Screenshots for every configuration — more is better than less
- Test your services — claims without proof lose points
- Final presentation — the environment actually works on the day
📺 Learn — Curated Video Searches
Each tile opens a YouTube search for that exact topic in a new tab. I'm using search links instead of hardcoded videos so you always get the most recent / highest-rated tutorials instead of dead links.
🏗️ Foundation — Proxmox & Virtualization
Proxmox install for beginners
Full install walkthrough, from USB boot to first login
Creating your first VM in Proxmox
Click-by-click VM creation
Proxmox network bridges explained
vmbr0, vmbr1, vmbr2 and what they do
What is a hypervisor?
Concept explainer, no prior knowledge needed
HP ProLiant ML350p Gen8 BIOS (F9)
System Utilities, boot order, walkthrough
HP Smart Array P420i RAID (F8)
Create logical drives on the Gen8 controller
HP Intelligent Provisioning (F10)
Guided RAID + OS install in one wizard
HP iLO 4 setup
Remote power + console access, even when the OS is down
🛡️ Networking & Firewalls
🪟 Windows Server
Windows Server install
Full OS install from ISO
Active Directory — domain controller setup
Add the AD DS role, promote, first users
DNS + DHCP on Windows Server
Zones, scopes, options — the full combo
IIS web server setup
Hosting a site on Windows
File shares + NTFS permissions
Why share and NTFS are different layers
SQL Server Express + SSMS
Your internal database
Windows Server Backup
Schedule + restore test
🐧 Linux Server
Ubuntu Server install + static IP
Base OS and netplan configuration
NGINX install + first site
Web server basics
MongoDB install on Ubuntu
NoSQL database, your Week 2 deliverable
cron jobs explained
Scheduling scripts (backups, log rotation)
SSH hardening
Change port, disable root, key-only login
rsync backup scripts
Incremental backups done right
UFW firewall basics
Ubuntu's simple firewall front-end
🔒 Security, Monitoring, Backup
🎓 Server+ exam prep (optional but recommended)
Glossary — the acronym swamp, drained
- Proxmox VE
- A free hypervisor. It runs multiple VMs on one physical server. You manage it via a web UI on port 8006.
- Hypervisor
- Software that hosts virtual machines. Type-1 (Proxmox, ESXi) runs on bare metal; Type-2 (VirtualBox) runs on top of an OS.
- VM (Virtual Machine)
- A software-emulated computer. Behaves like a separate PC but shares the host's CPU / RAM / disk.
- vmbr*
- A Linux bridge in Proxmox. Acts like a virtual network switch — VMs plugged into the same bridge can talk.
- DMZ
- Demilitarized Zone. A network segment that holds anything exposed to the outside world. Designed to be expendable — if it's popped, the attacker is still one firewall away from your crown jewels.
- Private LAN
- Internal-only network for AD, databases, file shares. Never directly reachable from the internet.
- OPNsense
- An open-source firewall/router (FreeBSD-based). Routes and filters traffic between your segments.
- AD (Active Directory)
- Microsoft's directory service. Stores users, groups, computers. Handles authentication for the domain.
- DNS
- Maps names (
server.capstone.local) to IPs. - DHCP
- Hands out IP addresses automatically to clients.
- IIS
- Internet Information Services — Microsoft's web server.
- NGINX
- A popular open-source web server and reverse proxy.
- MongoDB
- A NoSQL document database.
- NTFS permissions
- File-level access control on Windows. Separate from share permissions — both apply, most restrictive wins.
- IDS / IPS
- Intrusion Detection / Prevention. IDS alerts on suspicious traffic, IPS blocks it.
- Snort / Suricata
- Two common open-source IDS engines. Suricata is multi-threaded; Snort is older/classic.
- Wazuh
- Open-source SIEM / host monitoring platform. Agents report to a central server.
- rsync
- Linux tool that syncs files efficiently — only changed blocks are copied. Great for backups.
- cron
- Linux scheduler. Lines like
0 2 * * * /path/script.shrun a script at 2am daily. - RTO / RPO
- Recovery Time Objective (how fast you restore) and Recovery Point Objective (how much data you're willing to lose).
- SIEM
- Security Information and Event Management — collects logs from everything and alerts on patterns.
- GPO
- Group Policy Object — Windows-native way to enforce settings across many machines via AD.
- VLAN
- Virtual LAN. Tags frames so one physical switch can carry multiple isolated networks.
- Jump box
- A hardened intermediate server. You SSH/RDP here first, then hop to internal systems. Single audit chokepoint.