← Index Master deck Week 2 → nav Esc overview F fullscreen
Cybertex · Server+ Capstone · Week 1

From Bare Metal to Hypervisor

One physical server. Three drives in RAID 5. Proxmox VE live and reachable on the school LAN — in a single week.

1

HP ML350p Gen8

3

Drives in RAID 5

3 TB

Total storage

32 GB

DDR3 ECC RAM

Instructor: Anthony Pena · [email protected]

The Brief

What Week 1 required us to do

🎯 Project objective

Take an enterprise tower server straight off the shelf, identify and document every component, build a fault-tolerant storage array, and install a hypervisor that's reachable from the school LAN.

Deliverables

  • Full hardware inventory with part numbers and datasheets
  • RAID array sized for the four planned VMs
  • Live Proxmox VE host on a static management IP
  • Screenshots proving each milestone

📋 The build sequence

  • Part 1 · Flash a USB drive with the Proxmox ISO using Rufus
  • Part 2 · Enter BIOS, set USB boot priority
  • Part 3 · Build the RAID array in the controller utility
  • Part 4 · Install Proxmox VE on the array · verify the dashboard
  • Part 5 · Upload ISO images to Proxmox storage

Constraint: every IP we used had to come from instructor — the school LAN 10.10.0.0/16 is shared with other teams.

Equipment · As Delivered

HP ProLiant ML350p Gen8 tower server

Asset details

ManufacturerHP
ModelProLiant ML350p Gen8
Product ID736983-S01
Serial #2M251705M9
Form factor5U Tower (rack convertible)
BIOSP72 · 08/02/2014
ChassisHot-plug drives, redundant PSU, hot-plug fans
ManagementiLO 4 (dedicated RJ-45 port)

Why this platform fits

  • Enterprise-grade hardware — hot-plug drives, ECC RAM, redundant PSUs — built for 24/7 lab use
  • iLO 4 lets us install and operate without ever touching the physical machine
  • Smart Array P420i gives us hardware RAID — faster than software RAID and survives a host reinstall
  • Four onboard 1 GbE NICs give us room to segment traffic in later weeks
  • Two CPU sockets and 24 DIMM slots = headroom for future expansion
Equipment · Physical Inspection

What's inside

Front panel

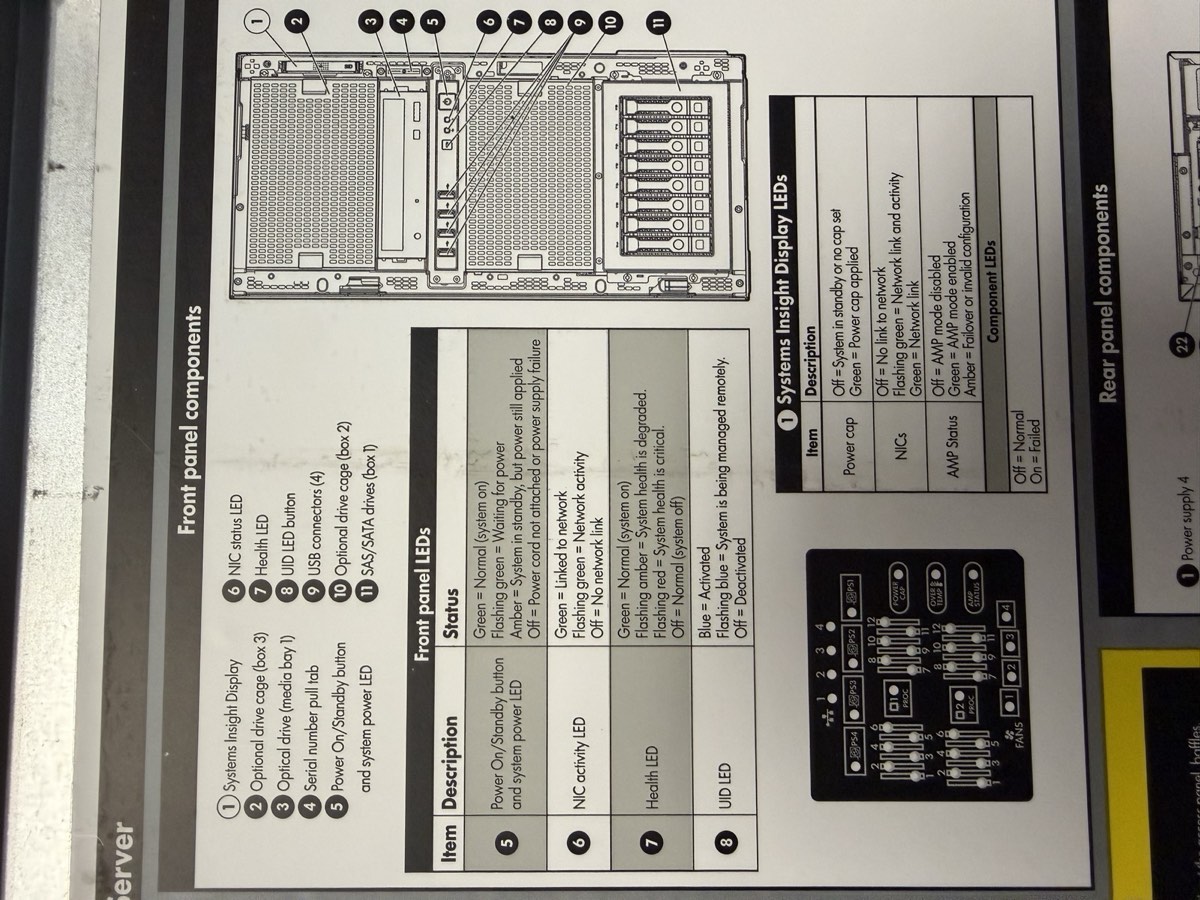
Front panel — Systems Insight Display, drive cage, USB ports, serial pull-tab, power button

System board

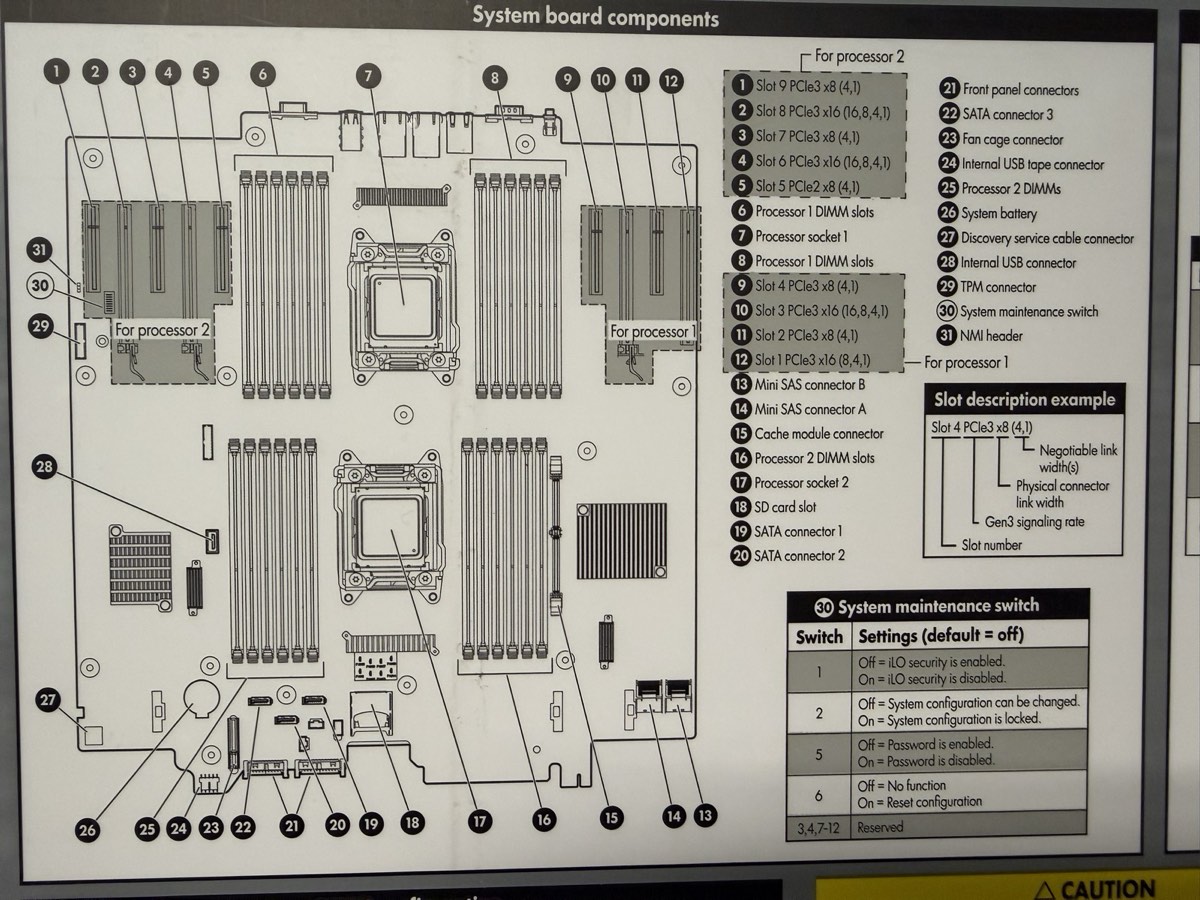
System board — 2 CPU sockets, 24 DIMM slots, P420i RAID controller, PCIe risers

DIMM layout

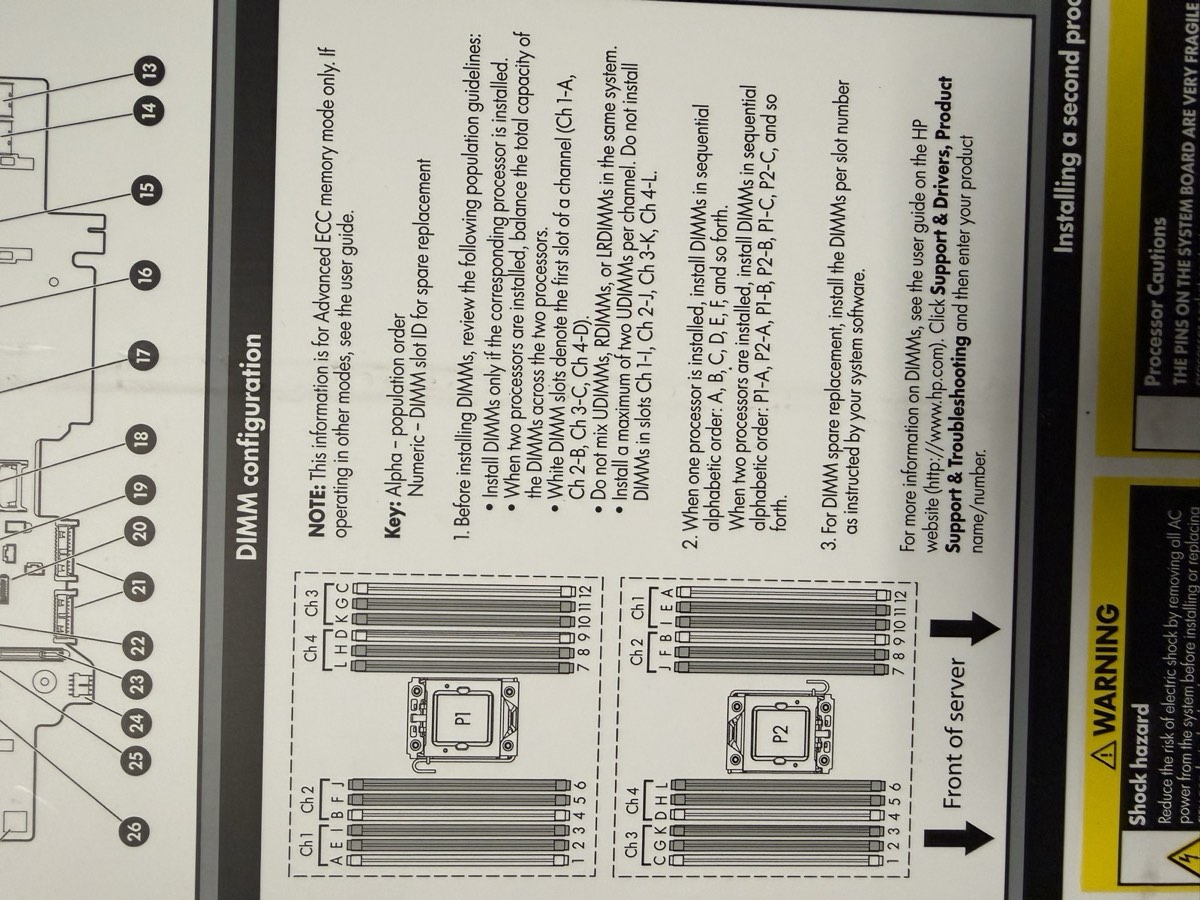
DIMM population chart — white slots first, matched pairs, balanced across channels

Equipment · Components Identified

Every part matched to a datasheet
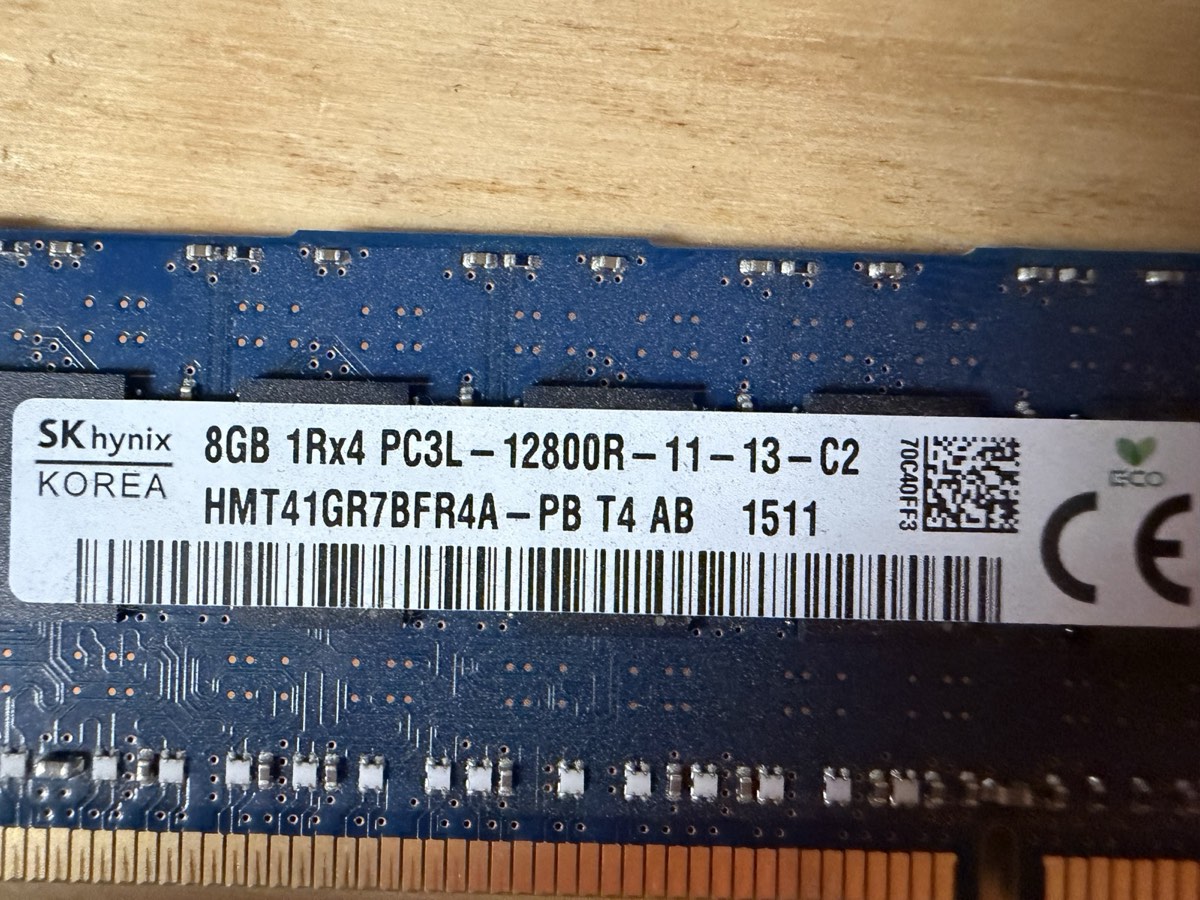
SK Hynix RAM

RAM · 4× 8 GB

SK Hynix HMT41GR7BFR4A-PB · PC3L-12800R · DDR3L-1600 ECC RDIMM · 1.35 V
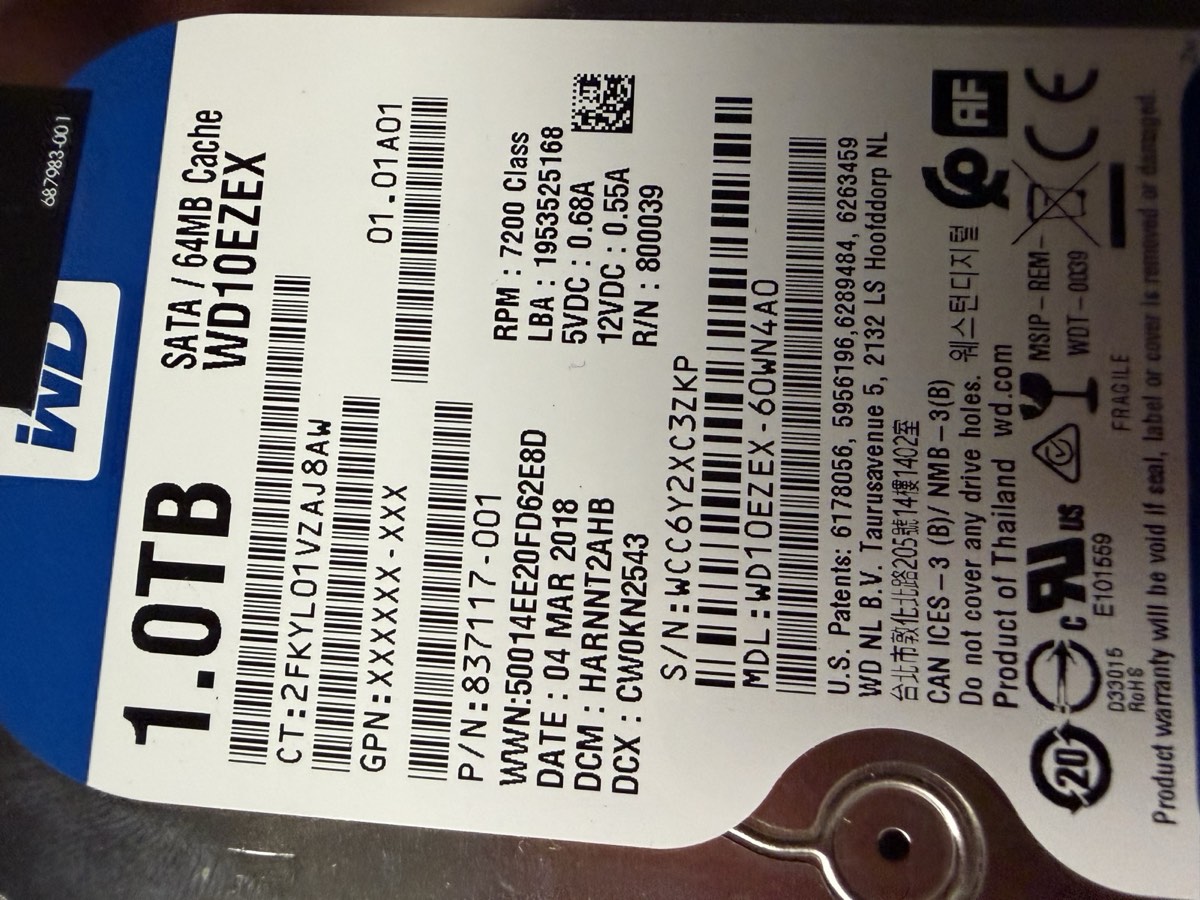
WD Blue

Drive 1 · WD Blue

WD10EZEX · 1 TB · 7200 RPM · 64 MB cache · SATA · 2018
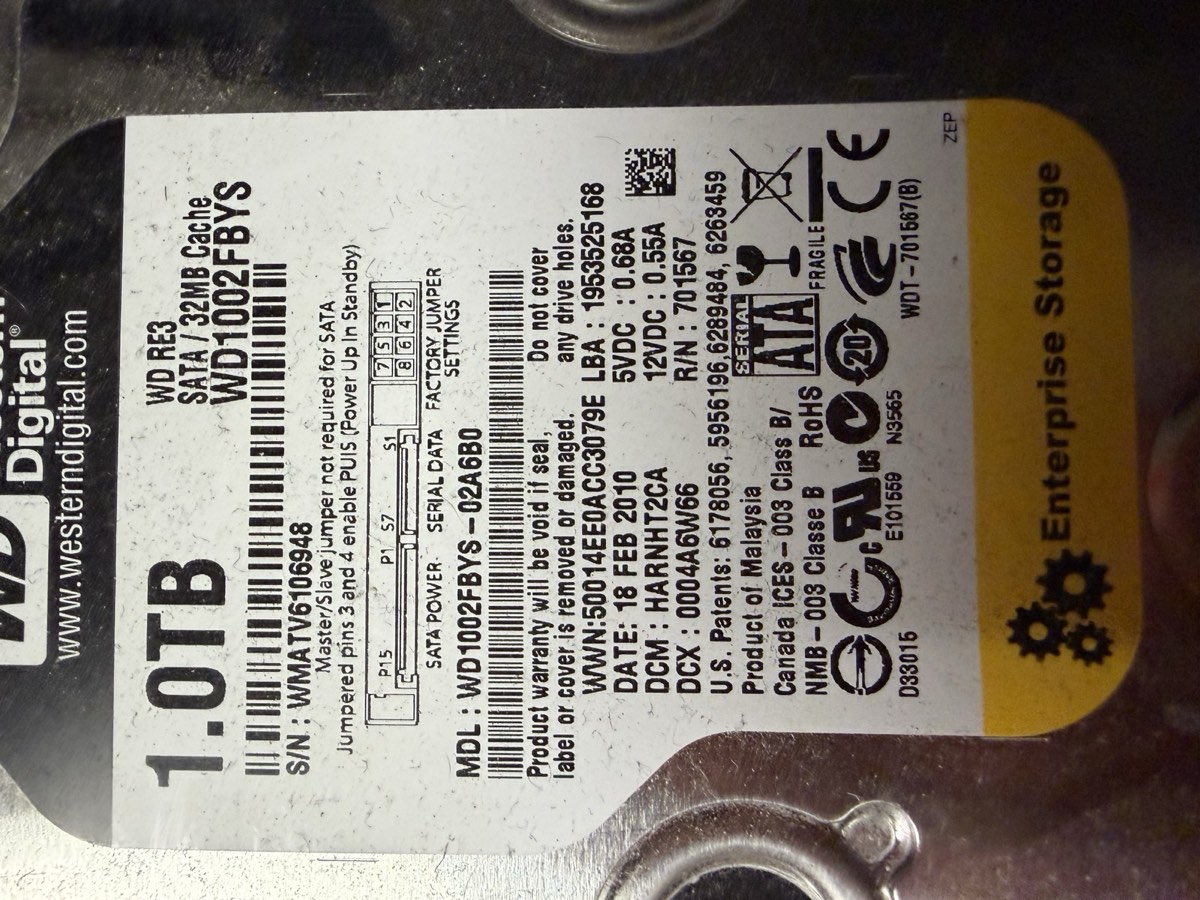
WD RE3

Drive 2 · WD RE3

WD1002FBYS · 1 TB · 7200 RPM · 32 MB cache · SATA · 2010
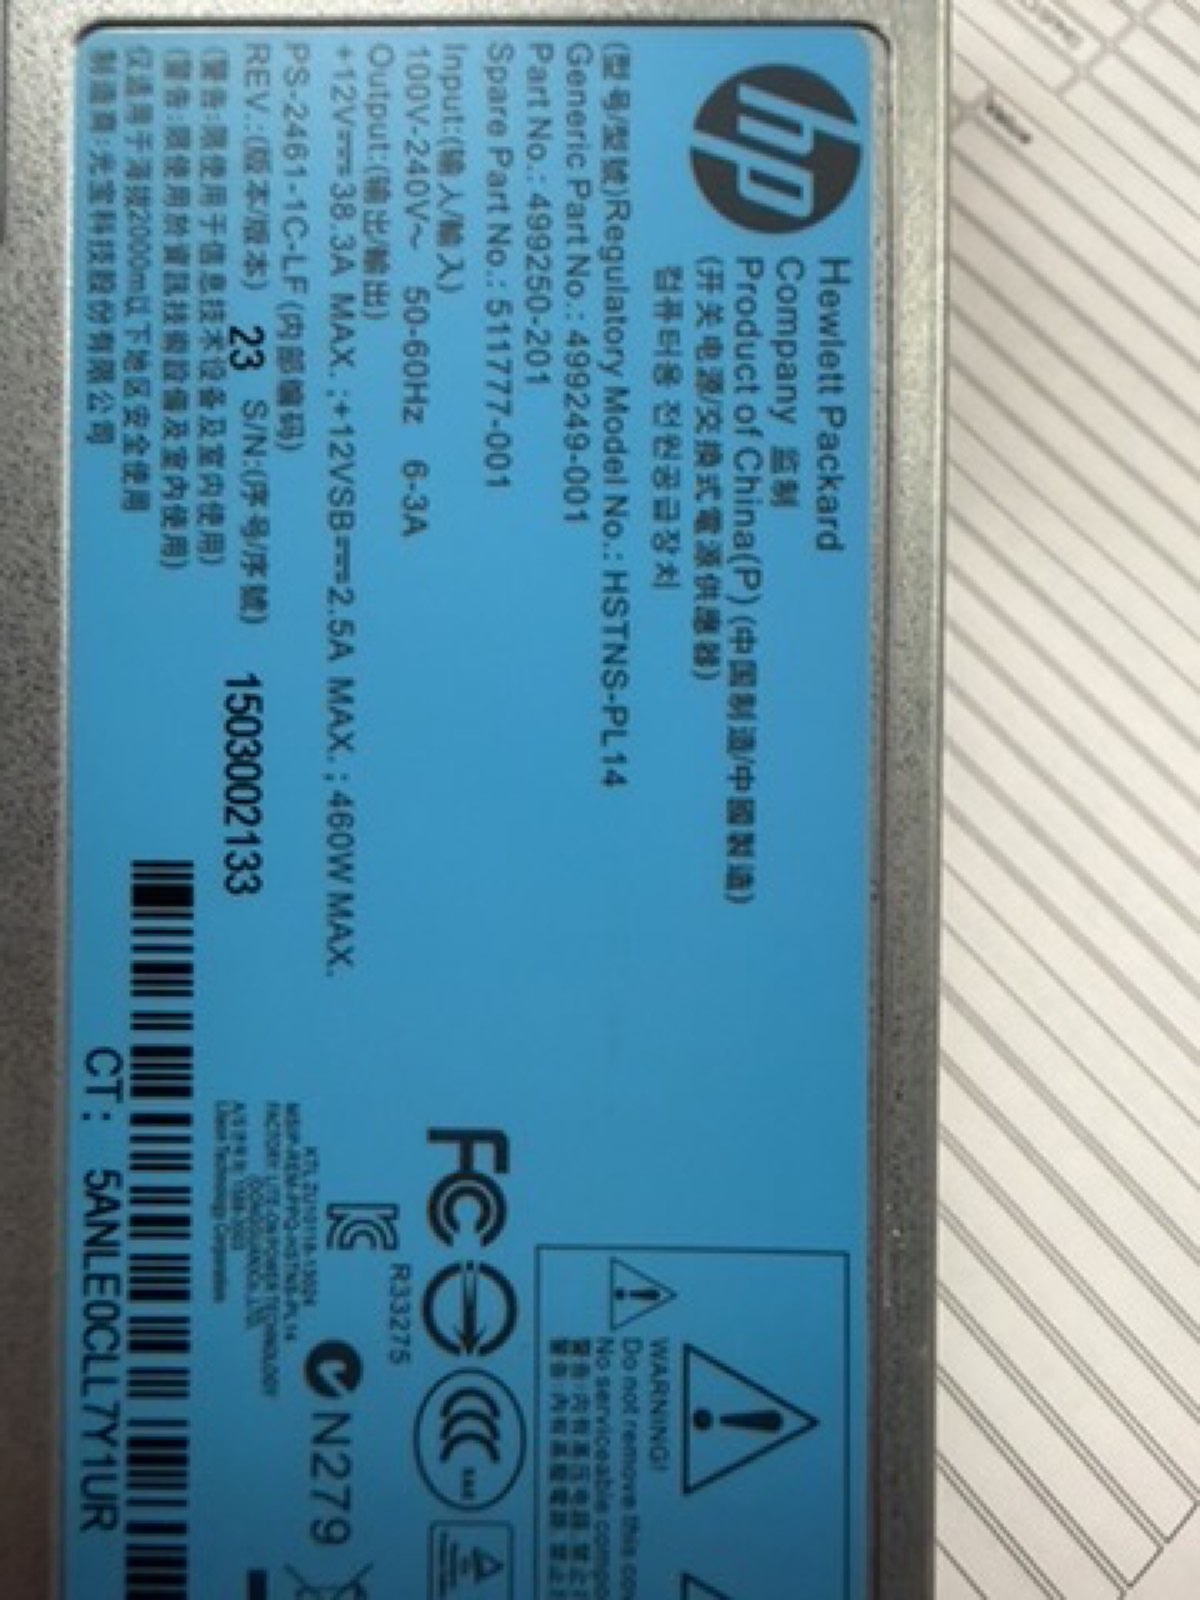
HP 460W PSU

PSU · 2× 460 W 1+1

HP HSTNS-PL14 · Gold Common Slot · p/n 511777-001

Additional: 1× Xeon E5-2609 v2 (socket 1) · 3× 1 TB SATA drives in Bays 1–3 (3 TB total) · P420i RAID controller onboard · iLO 4 management

Equipment · Final Spec Sheet

The machine, fully documented

Compute

CPU1× Xeon E5-2609 v2
Cores / threads4C / 4T (no HT)
Base clock2.50 GHz (no turbo)
L3 cache10 MB
Socket 2empty
VT-x / VT-d

Memory

Installed32 GB = 4× 8 GB
TypeDDR3L-1600 ECC RDIMM
Effective1333 MT/s (IMC cap)
Slots used4 of 24 · quad-channel ✓
NUMA nodes1 (single CPU)

Storage

ControllerSmart Array P420i
Firmware8.50.66.00
CacheFBWC capacitor (likely 512 MB)
Drives3× 1 TB SATA 3.5" (3 TB total)
Bay locationsPort 11, Box 1, Bays 1–3

Networking

Onboard NICHP 331i (Broadcom BCM5719)
Ports4× 1 GbE
PXE / SR-IOV /
Remote mgmtiLO 4 (dedicated RJ-45)

Power & Cooling

PSUs2× 460 W 1+1
ModelHP HSTNS-PL14 Gold
Input100–240 V · 50/60 Hz
Fans4 hot-plug redundant

Firmware

BIOSP72 · 08/02/2014
Bootblock03/05/2013
SATA Option ROMv2.00.CO2 (2011)
NIC Boot AgentBroadcom NetXtreme (2014)
Boot modeLegacy
The Build · Roadmap

Five steps from bare metal to live hypervisor

#StepWhere
1Flash USB with Proxmox ISORufus on school PC
2Set USB as primary boot deviceServer BIOS
3Build RAID 5 array on 3 drivesP420i ORCA
4Install Proxmox VE + verify dashboardConsole + browser :8006
5Upload ISO images to ProxmoxWeb UI → local storage

Tools and assets we needed

  • USB drive (4 GB minimum, used DD-mode flash so existing data is wiped)
  • Rufus 4.7 from \\itsdc3\its
  • Proxmox VE 6.4-1 ISO (later upgraded to 8.2.2)
  • Keyboard + monitor for console access
  • Static IP from instructor on 10.10.0.0/16
  • Patch cable to school LAN port
Step 1 Flash USB with Rufus

Build the bootable installer

Procedure

  1. 1Plug the USB drive into a school PC
  2. 2Open File Explorer → type \\itsdc3\its in the address bar
  3. 3Open Rufus 4.7
  4. 4Under Device, select your USB drive (check the "list USB devices" box if needed)
  5. 5Click SELECT → navigate to \\itsdc3\its → pick Proxmox 6.4-1 ISO
  6. 6Partition scheme: MBR for Legacy BIOS, GPT for UEFI
  7. 7File system: FAT32
  8. 8Click START
  9. 9When prompted, choose DD mode — required for Proxmox
  10. 10Wait for Rufus to finish, then safely eject

Why DD mode matters

Proxmox's installer image is a hybrid ISO — it expects to be written byte-for-byte to the USB, not extracted as files. ISO mode (the default) leaves the bootloader in a state where the server can't find the installer.

If you forget DD mode, the symptom is a USB that BIOS recognizes as bootable but that drops to a black screen or "no operating system found" right after POST.

Output

A bootable USB containing the Proxmox VE installer. Anything that was previously on the drive is gone.

⚠ Double-check the device dropdown before clicking START — Rufus will happily wipe the wrong drive.

Step 2 BIOS & boot order

Get the server to boot from the USB

On the HP ML350p Gen8

  1. 1Plug keyboard + monitor into the server
  2. 2Power on, watch for the HP splash screen
  3. 3Press F9 repeatedly for RBSU (ROM-Based Setup Utility)
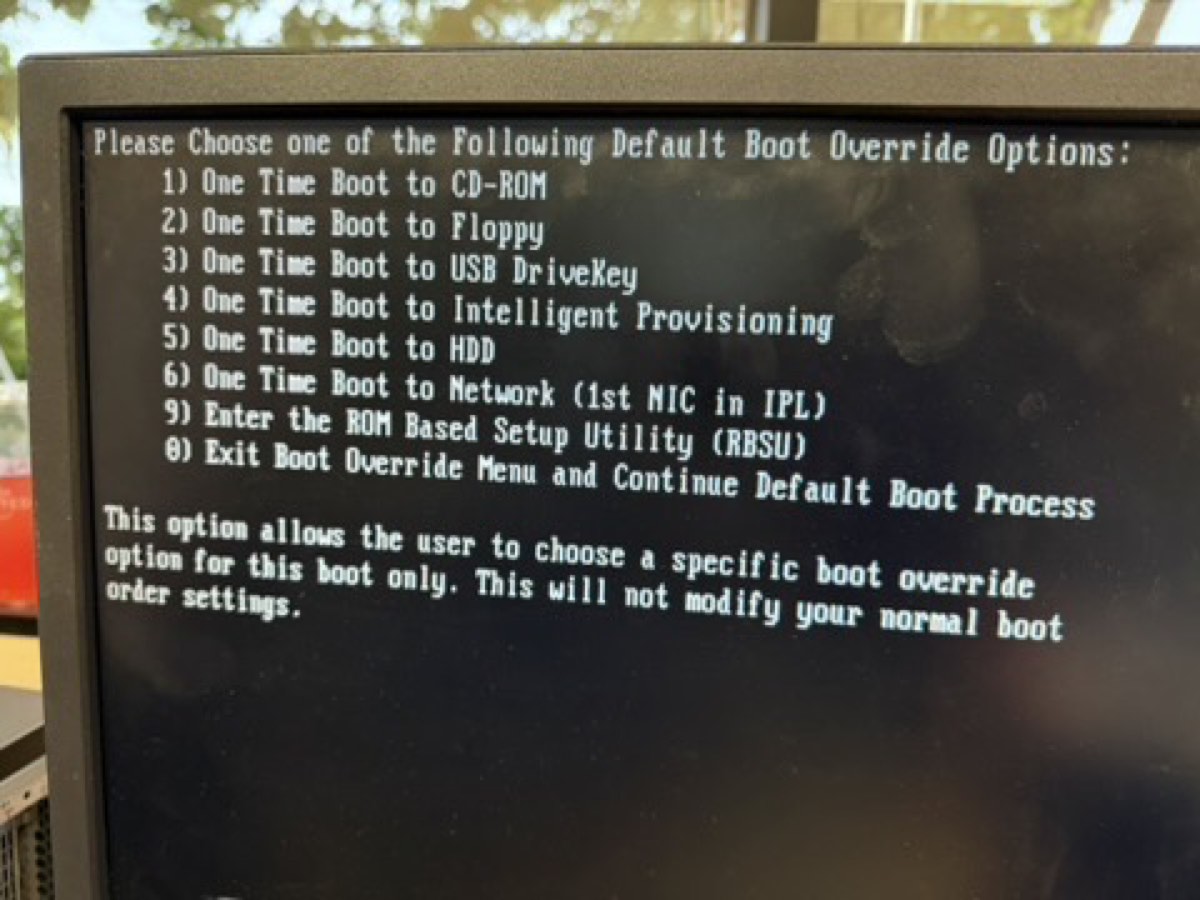
  4. 4Or, simpler: press F11 at POST for the one-time Boot Menu override
  5. 5From the boot menu, pick the USB device — the server boots straight into the Proxmox installer

F2 is for Dell servers; HP uses F9 / F10 / F11. Always check the on-screen prompt during POST — different vendors map different keys.

HP F9 RBSU prompt at POST

↑ POST prompt showing F9 (RBSU), F10 (Intelligent Provisioning), F11 (Boot Menu)

F11 boot override menu

↑ F11 boot override — pick the USB or CD-ROM (iLO virtual media)

Step 3 Build RAID 5 in ORCA

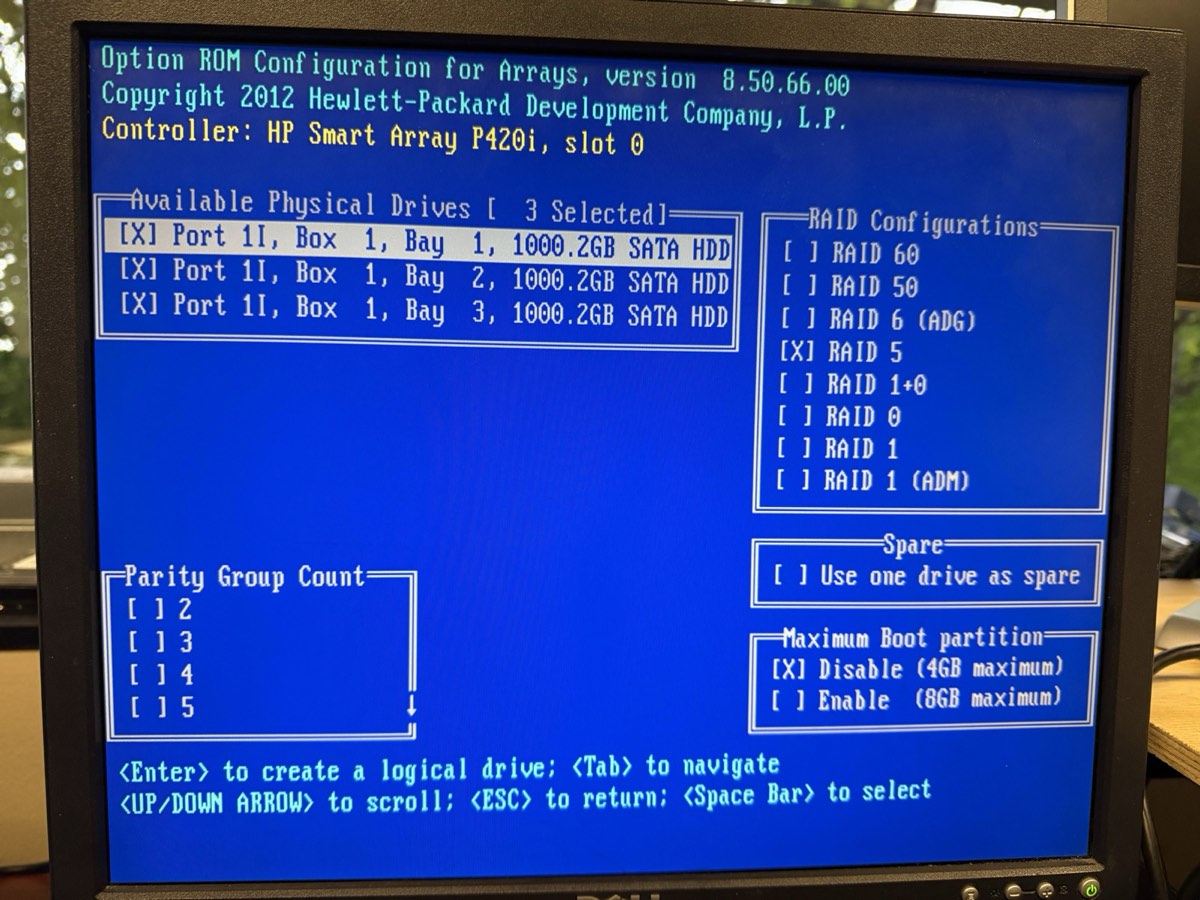
Three drives, one fault-tolerant array

ORCA RAID 5 selection screen

3 drives marked [X] · RAID 5 selected · Max Boot Partition disabled (4 GB)

ORCA main menu with View Logical Drive enabled

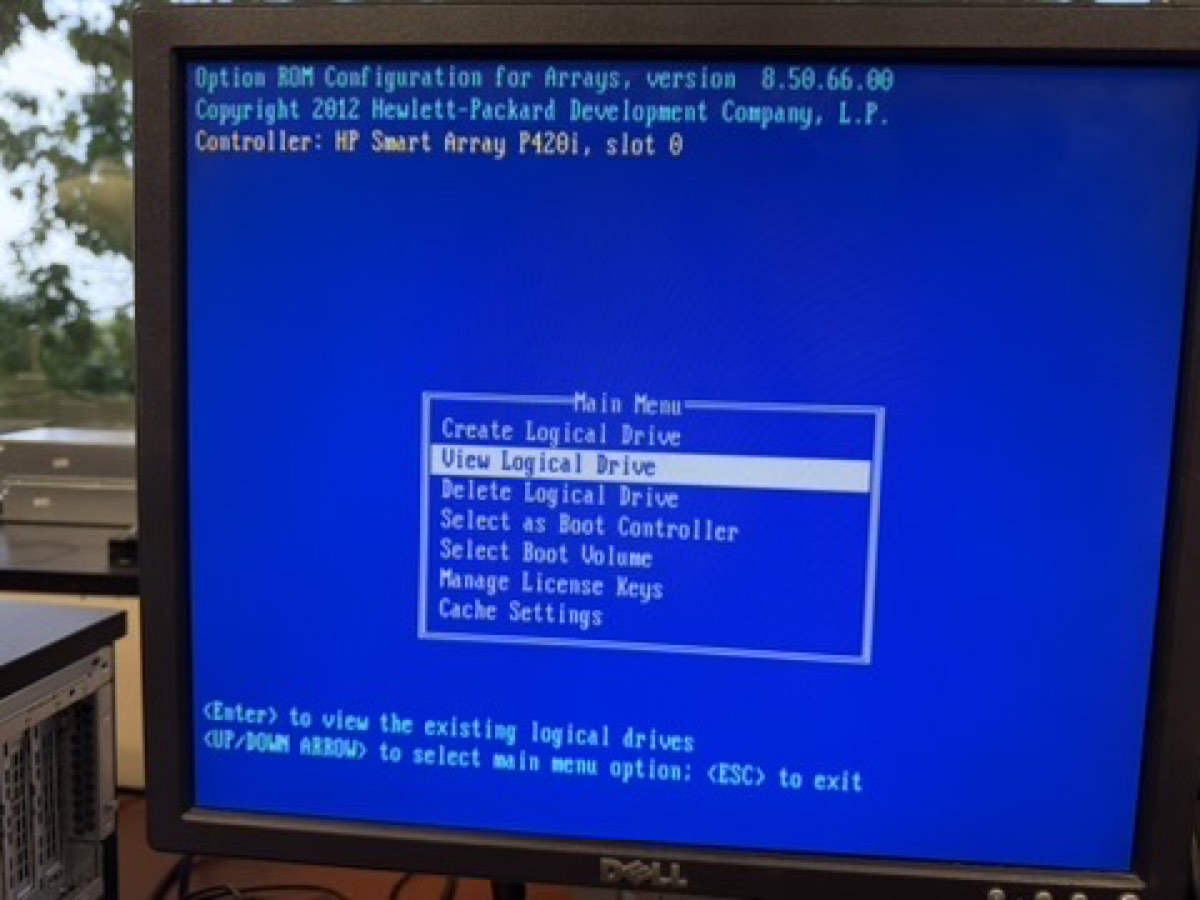
↑ "View Logical Drive" is now selectable — confirms the array exists

Procedure

  1. 1Reboot, watch POST for the Smart Array banner
  2. 2Press F8 to enter ORCA (Option ROM Configuration for Arrays)
  3. 3If a stale array exists: Delete Logical Drive first erases data
  4. 4Choose Create Logical Drive
  5. 5Press Space on each of the 3 drives at Port 11, Box 1, Bays 1–3
  6. 6Select RAID 5; defaults: 256 KiB stripe, Accelerator Enable
  7. 7Press Enter to commit, F8 to save, Esc to exit

Result

1 logical drive · 3 TB total (one drive's capacity reserved for parity) · parity init runs in the background. Array survives one drive failure.

ⓘ HP ORCA auto-starts parity initialization — no separate F2 → Initialize step like Dell PERC controllers require. The lab doc's "Initialize" step is for Dell hardware.

⚠ Drives are mismatched ages (2010 / 2018). Run weekly SMART checks; the oldest drive is statistically most likely to fail first.

Step 3 · Why RAID 5

Trading some space for one drive of forgiveness

Options we considered

LevelUsableProtectionVerdict
RAID 03 TBNoneRejected
RAID 1 (mirror)1 TB1 drive failToo little space
RAID 53 TB1 drive failChosen ✓
RAID 61 TB2 drive failsNeeds 4 drives

Why this was the right call

  • 3 drives = RAID 5 is the natural fit — minimum drive count met, best space efficiency for the disks we have
  • Survives a single drive failure with no data loss — important given our mixed-age drive pool
  • 3 TB total comfortably hosts 4 planned VMs plus ISOs, snapshots, and backups
  • Hardware RAID on the P420i is faster than ZFS on this generation, with no HBA flashing required
Step 4 Install Proxmox VE

From installer prompt to running hypervisor

POST showing Non-System disk error

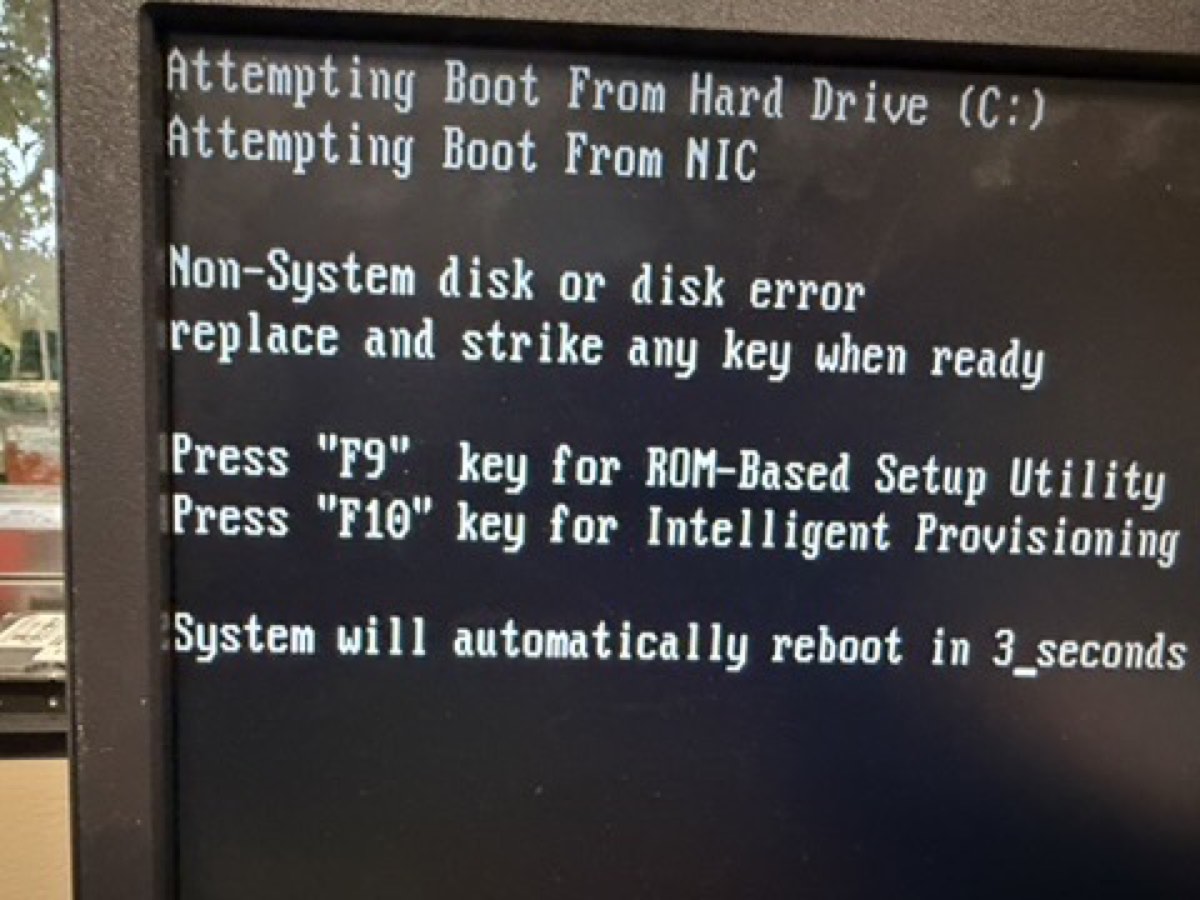
↑ Pre-install POST: array detected, "Non-System disk" — exactly what we want

Proxmox VE boot menu

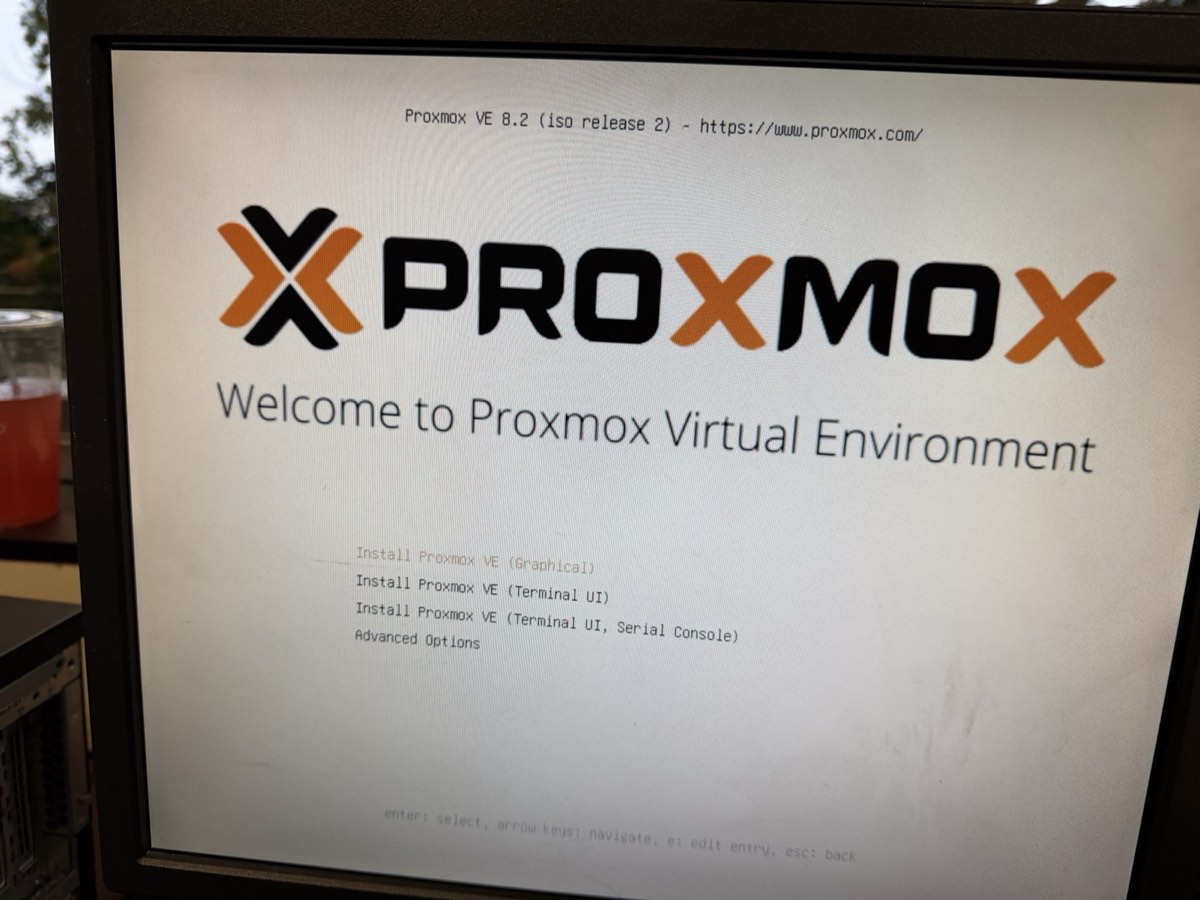
↑ Picked Install Proxmox VE (Graphical)

Proxmox network config

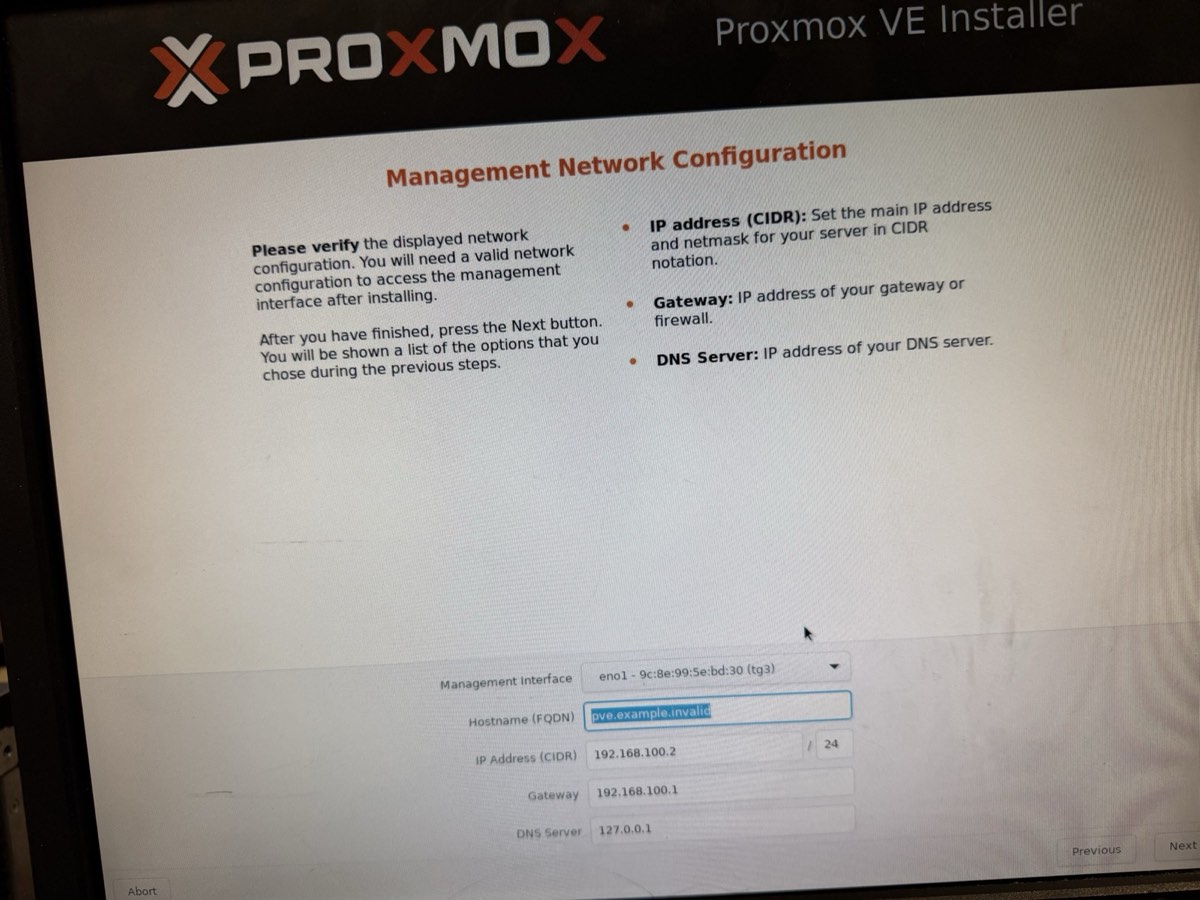
↑ Management network on eno1

Installer values

Filesystemext4 on /dev/sda
Target disk3 TB RAID 5 array
Country / TZUnited States / America/Chicago
Hostnametctmachine
IP (CIDR)10.10.10.10/16
Gateway10.10.10.1
DNS1.1.1.1 (Cloudflare)

ⓘ Used /16 instead of the lab doc's /24 example — covers the entire 10.10.0.0/16 school subnet so the host treats every 10.10.x.y as local.

What happens during install

  • Installer detects the RAID array as a single disk (the controller hides the parity)
  • Wipes and partitions /dev/sda automatically
  • Lays down the Debian-based base system + Proxmox kernel
  • Installs the web stack on port 8006
  • Reboots — about 5 minutes total

Remove the USB before the reboot, or the server will boot back into the installer.

Step 4 · Verify Verify the web UI

Reach the Proxmox dashboard from the school LAN
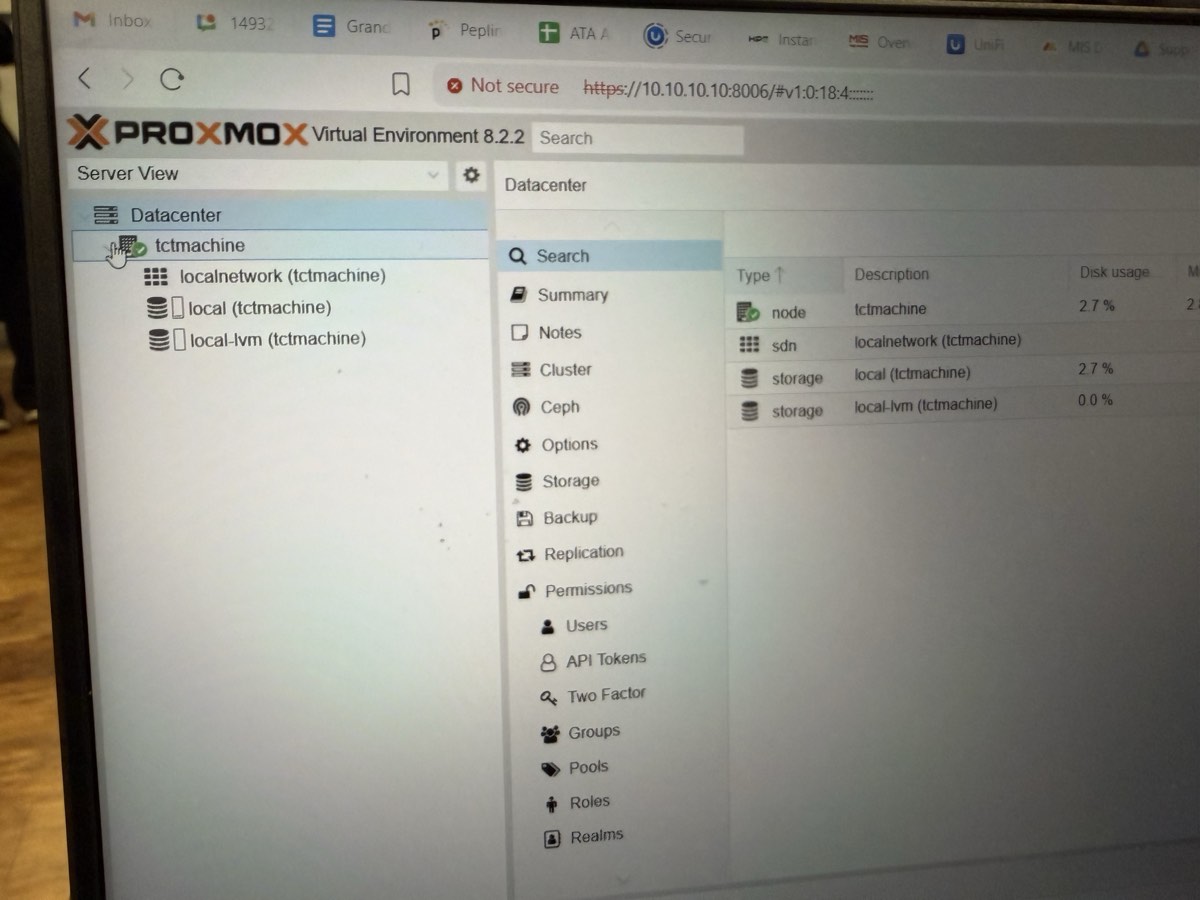
Proxmox VE 8.2.2 web UI showing tctmachine node

https://10.10.10.10:8006 from a laptop on the school LAN. Logged in as root.

What success looks like

  • Proxmox VE 8.2.2 running
  • Node tctmachine visible under Datacenter
  • local storage mounted · 2.7% used (base system)
  • local-lvm thin pool ready · 0.0% used (waiting for VMs)
  • Internet reachable via 1.1.1.1
  • TLS, login, summary widgets all functional

Quick checks from the host shell

# confirm IP + gateway
ip addr show eno1
ip route

# confirm internet + DNS
ping -c 2 1.1.1.1
ping -c 2 google.com

# confirm storage
pvesm status
Step 5 Upload ISO images to Proxmox

Stage installer ISOs for the Week 2 VMs

Procedure

  1. 1From a school desktop, open https://10.10.10.10:8006
  2. 2Log in as root
  3. 3Sidebar tree: Datacentertctmachinelocal (not local-lvm)
  4. 4Center pane: click the ISO Images tab
  5. 5Click Upload
  6. 6Click Select File… → navigate to \\itsdc3\its
  7. 7Pick an ISO → confirm Upload
  8. 8Repeat for each ISO planned for Week 2

Why this happens now

Proxmox needs installer media available before any VM can be created. The ISOs sit in local storage and get attached as virtual CD-ROMs to new VMs in Week 2.

ISOs we staged

  • Ubuntu Server — for the Jump Box and Linux Server
  • Windows Server — for the AD / DNS / DHCP / IIS roles
  • Windows 10 — client machine for testing
  • Ubuntu Desktop — Linux client for testing

Storage path on the host: /var/lib/vz/template/iso/

✓ With ISOs staged, Week 2 can start immediately — no waiting on uploads.

Week 1 · Status

Proxmox VE 8.2.2 is live

Done

  • Every component identified and documented
  • iLO 4 reachable for remote management
  • RAID 5 array built on 3× 1 TB SATA (3 TB total)
  • Proxmox VE 8.2.2 installed on the array
  • Static management IP 10.10.10.10/16 on eno1
  • Web UI live at https://10.10.10.10:8006
  • Internet reachable (DNS 1.1.1.1)

Screenshots captured for the demo

  • POST banner showing the RAID 5 array, 1785 error cleared
  • ORCA main menu with the logical drive present
  • Proxmox installer summary screen
  • Proxmox login + node dashboard

Carried into Week 2

  • Create vmbr1 (DMZ · 172.16.0.0/24) and vmbr2 (LAN · 192.168.0.0/24)
  • Stand up the Jump Box on vmbr1
  • Deploy Windows + Linux servers on vmbr2
  • Wire NAT and port-forwarding between zones
Week 1 Complete

Bare metal → live hypervisor

HP ProLiant ML350p Gen8 · 1× Xeon E5-2609 v2 · 32 GB DDR3 ECC · RAID 5 on 3× 1 TB SATA (3 TB total)
Proxmox VE 8.2.2 reachable at https://10.10.10.10:8006

✓ Week 1 done Week 2: Bridges + VMs Week 3: Services Week 4: Demo

Continue to Week 2 walkthrough →

All Slides (click to jump · Esc to close)

1 / 16