⚠ DHCP coordination: pfSense2 currently serves DHCP for 192.168.0.0/24 (pool .100–.200). Before activating Windows DHCP, either (a) disable pfSense LAN DHCP, or (b) split the pool so the two don't overlap. Don't run two DHCP servers on the same broadcast domain.
Overview
What you're building this week
🎯 Objective
Prove the internal network works via the NAT bridge and Jump Box, then stand up the core services both teams depend on downstream.
By Friday, any VM should be able to:
Resolve winserver.teamx.local via your own DNS
Lease an IP from your DHCP scope
Browse the Windows IIS welcome page
Browse the Linux NGINX welcome page
Query the MariaDB capstone_db from CLI
📋 Grading watch-outs
Every phase needs screenshots — save as you go, not at the end
Ping results + latencies go in the table — "it works" isn't enough
Export asset-tracker snapshot with VM names, IPs, roles
Two reflection sentences each on: trickiest test, longest service, unresolved issues
Cover page with week #, team, and roles
Team
Role assignments
📋 Team Lead
Coordinate the other three
Save & log all screenshots
Asset-tracker snapshot (VMs · IPs · roles)
Assemble final report
🌐 Networking
Phase 0: NAT bridge + Jump Box tests
Phase 3: cross-VM ping & DNS lookups
Verify DHCP leases actually issue
Fill every ping/lookup row
🪟 Windows
Install DNS role + zone + A record
Install DHCP role + scope
Install IIS + deploy welcome page
Screenshots of each
🐧 Linux
Install + enable NGINX
Deploy Linux welcome page
Install MariaDB + create DB/user
Test query from CLI
Three-zone topology · pfSense2-routed
Locked Week 2 IP plan
Subnets & gateways
Zone
CIDR
Gateway
School LAN
10.10.0.0/16
10.10.10.1
DMZ (vmbr1)
172.16.0.0/24
172.16.0.1 (pfSense)
LAN (vmbr2)
192.168.0.0/24
192.168.0.1 (pfSense)
pfSense2 (VM 103) sits on all three bridges: WAN 10.10.110.10, DMZ .1, LAN .1. It does NAT, DHCP, and DNS resolution (Unbound + DNSSEC).
VM IP assignments — live state
VM
IP
Role
WinSrv (102)
192.168.0.15 static
DNS · DHCP · IIS · AD
LinuxServer (105)
192.168.0.20 static
NGINX · MariaDB
Jumpbox (101)
172.16.0.100 DHCP
SSH gateway · DMZ
pfSense LAN DHCP scope
192.168.0.100 – 192.168.0.200
pfSense DMZ DHCP scope
172.16.0.100 – 172.16.0.200
⚠ Statics .2–.99 and .201–.254 are safe — outside the DHCP pool.
The big picture · pfSense2-routed
What we're building — visual topology
vmbr0 · School LANvmbr1 · DMZ 172.16/24vmbr2 · LAN 192.168/24
How we got here · 7 build steps
Build setup — what to do, what to verify
🛠 The 7 build steps
Bridges — create vmbr1 (DMZ) + vmbr2 (LAN) on the Proxmox host
pfSense2 — install + assign three NICs, set IPs, automatic NAT
DHCP + DNS — turn on pfSense's DHCP for both subnets, configure Unbound
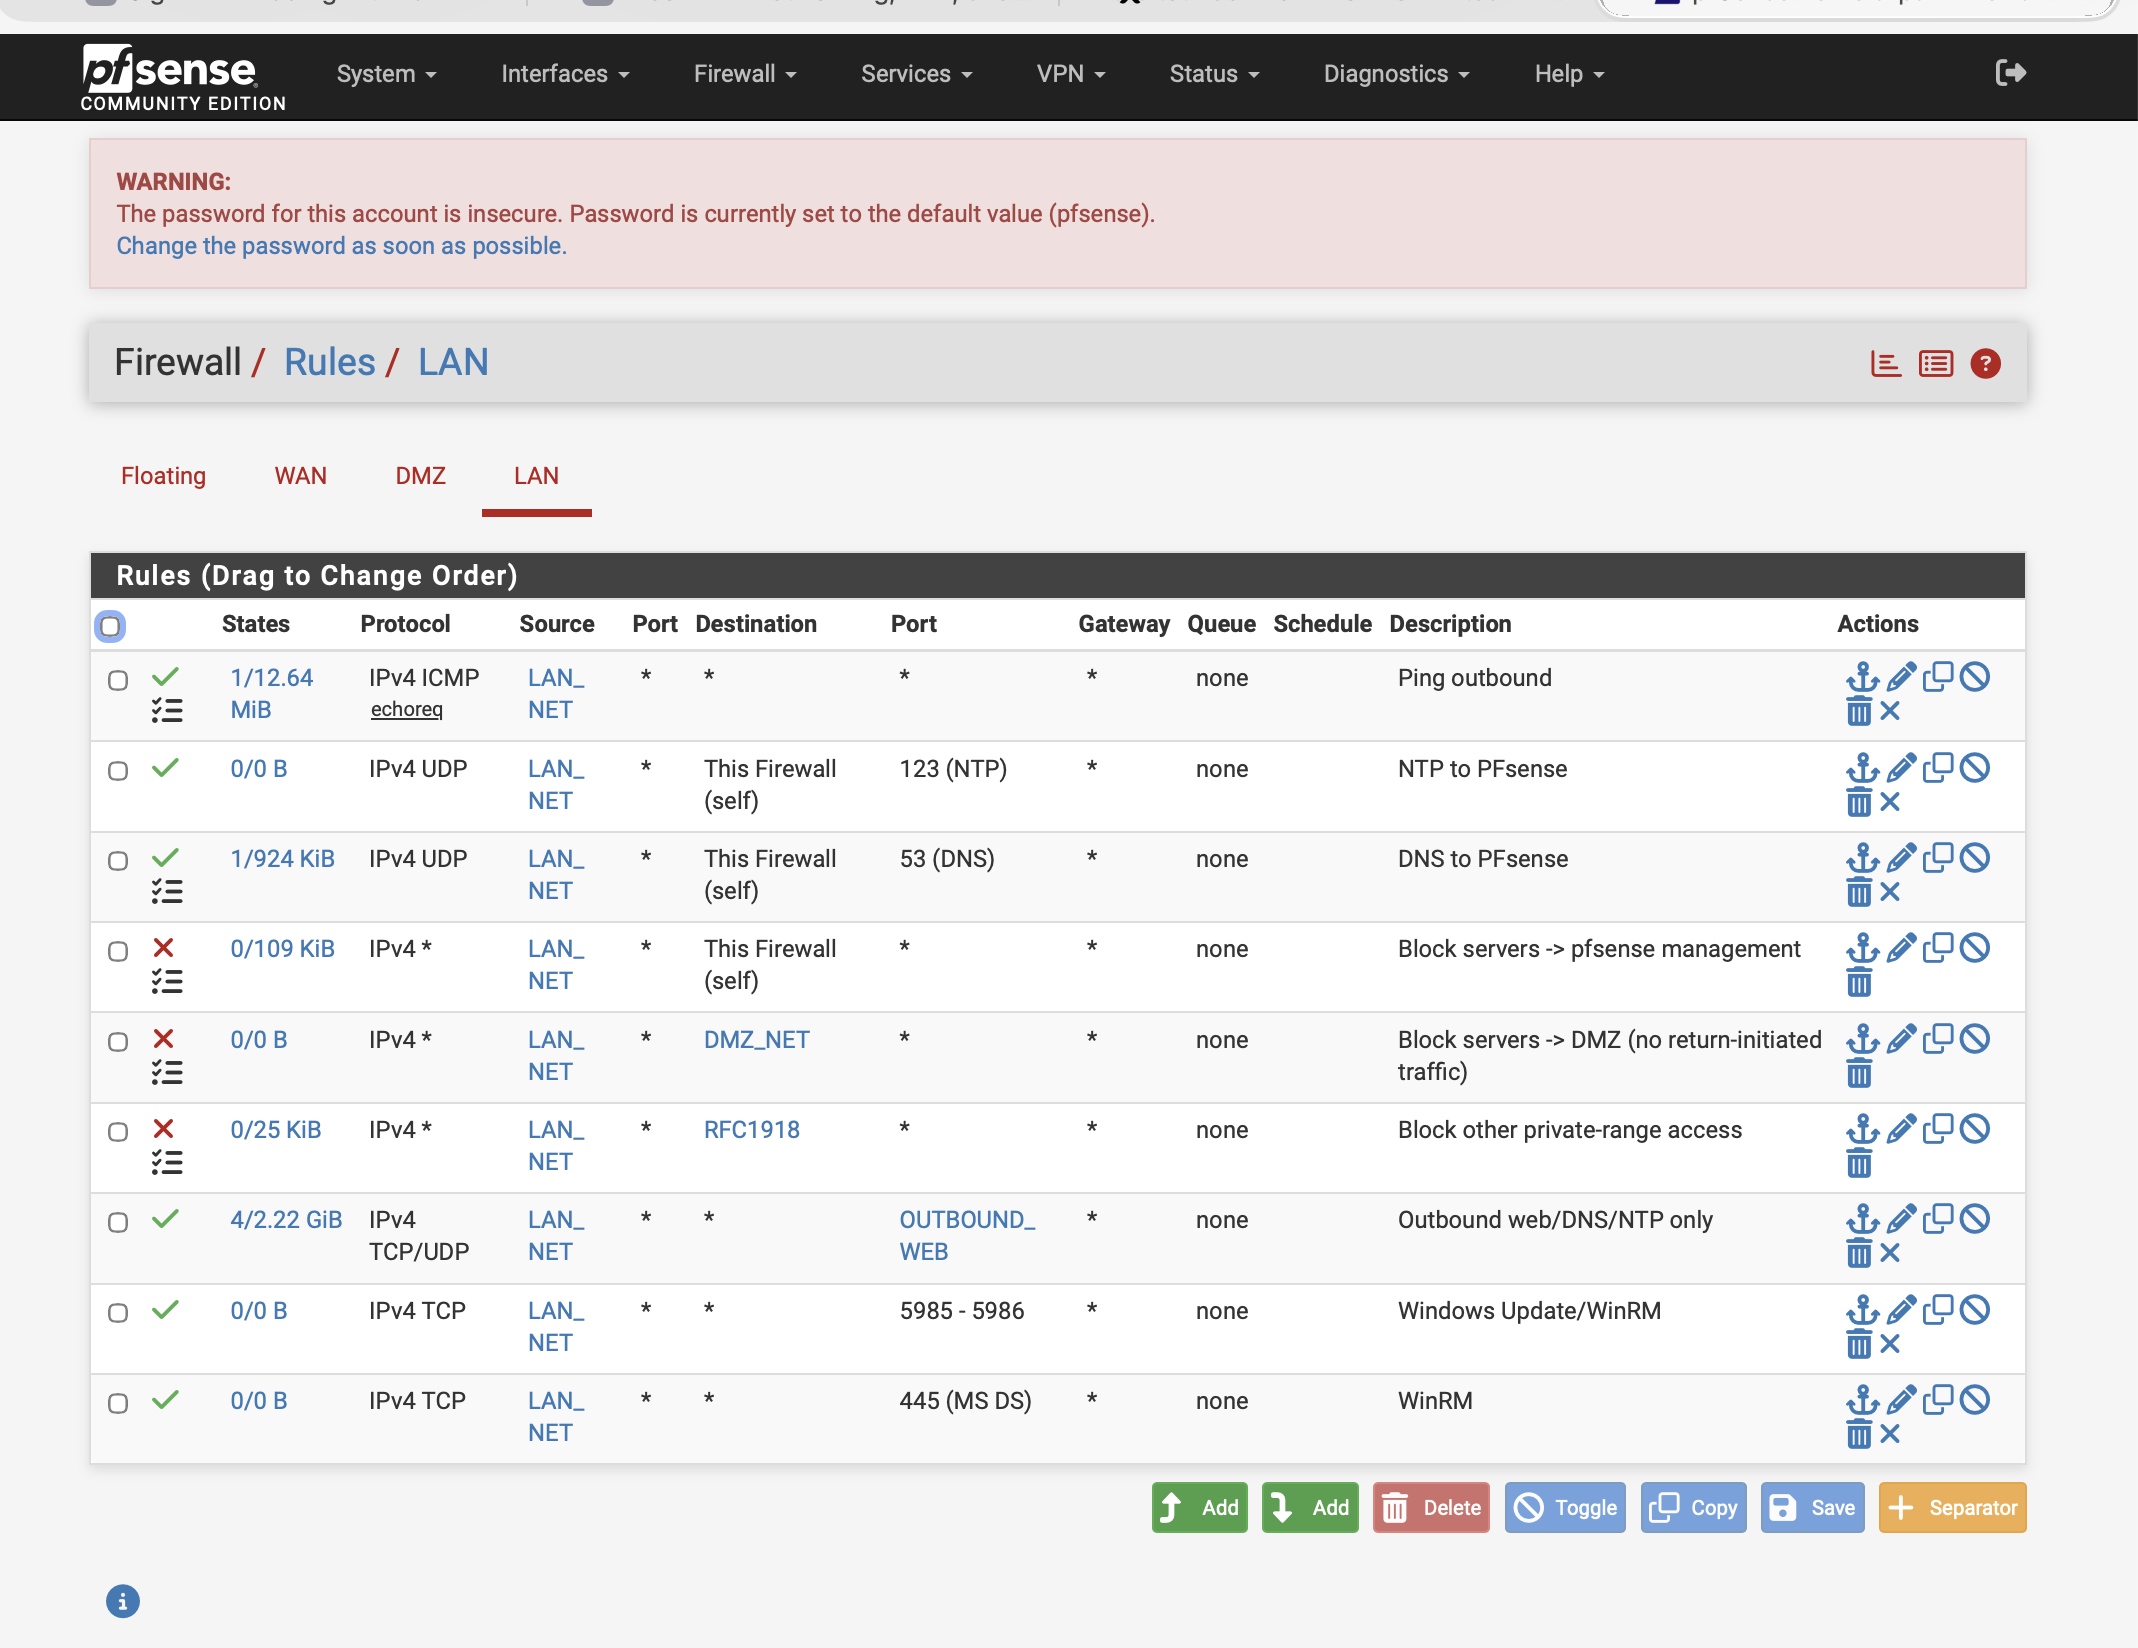
LAN firewall — apply the 9-rule defense-in-depth ruleset on vmbr2
Jumpbox — install Ubuntu Server on vmbr1, harden SSH, enable UFW
WinSrv — install Win Srv 2025, set static 192.168.0.15
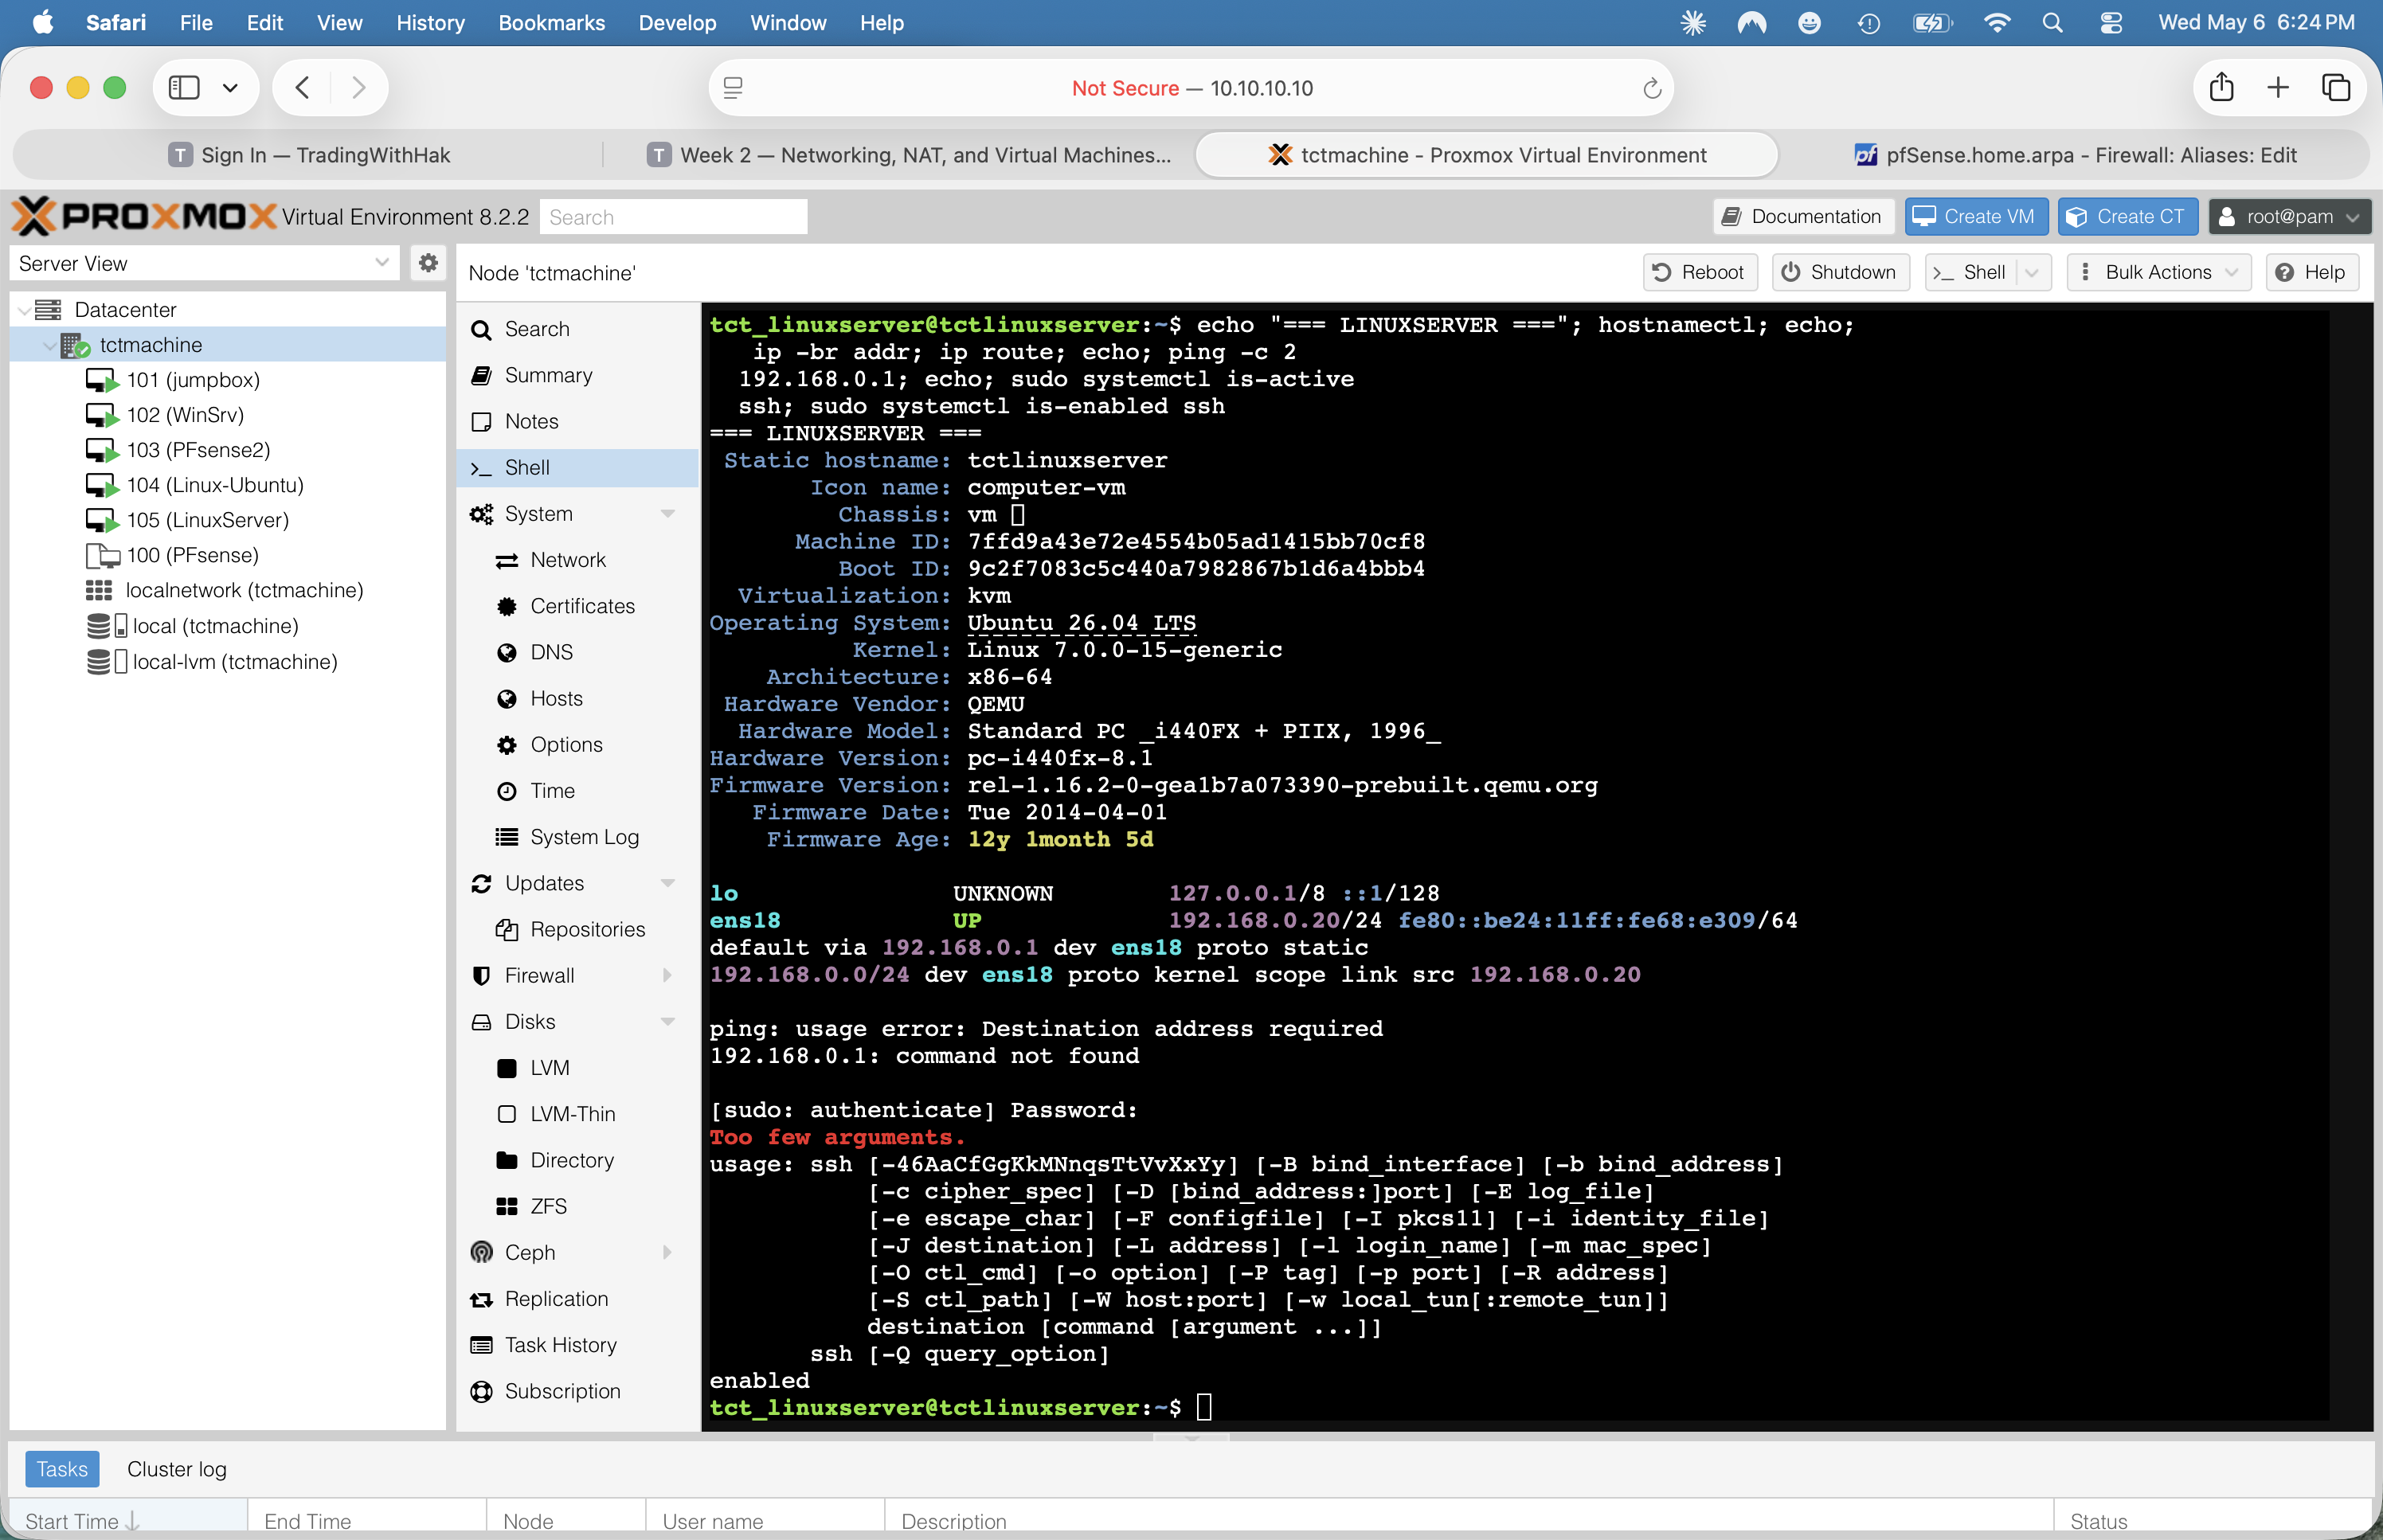
LinuxServer — install Ubuntu Server on vmbr2, set static 192.168.0.20
📸 Verification artifacts
Every step has a paired live capture from the running build (2026-05-06 verification pass). The next 7 slides walk through each step with the matching screenshot beside it.
# SSH or web shell to the host:ssh [email protected]nano /etc/network/interfaces# add these blocks (after vmbr0):
auto vmbr1
iface vmbr1 inet static
address 172.16.0.10
netmask 255.255.255.0
bridge_ports none
bridge_stp off
bridge_fd 0
auto vmbr2
iface vmbr2 inet static
address 192.168.0.10
netmask 255.255.255.0
bridge_ports none
bridge_stp off
bridge_fd 0
# reload networking:ifreload -aip -br addr
Both bridges are bridge_ports none — they're VM-only switches, no physical NIC backing.
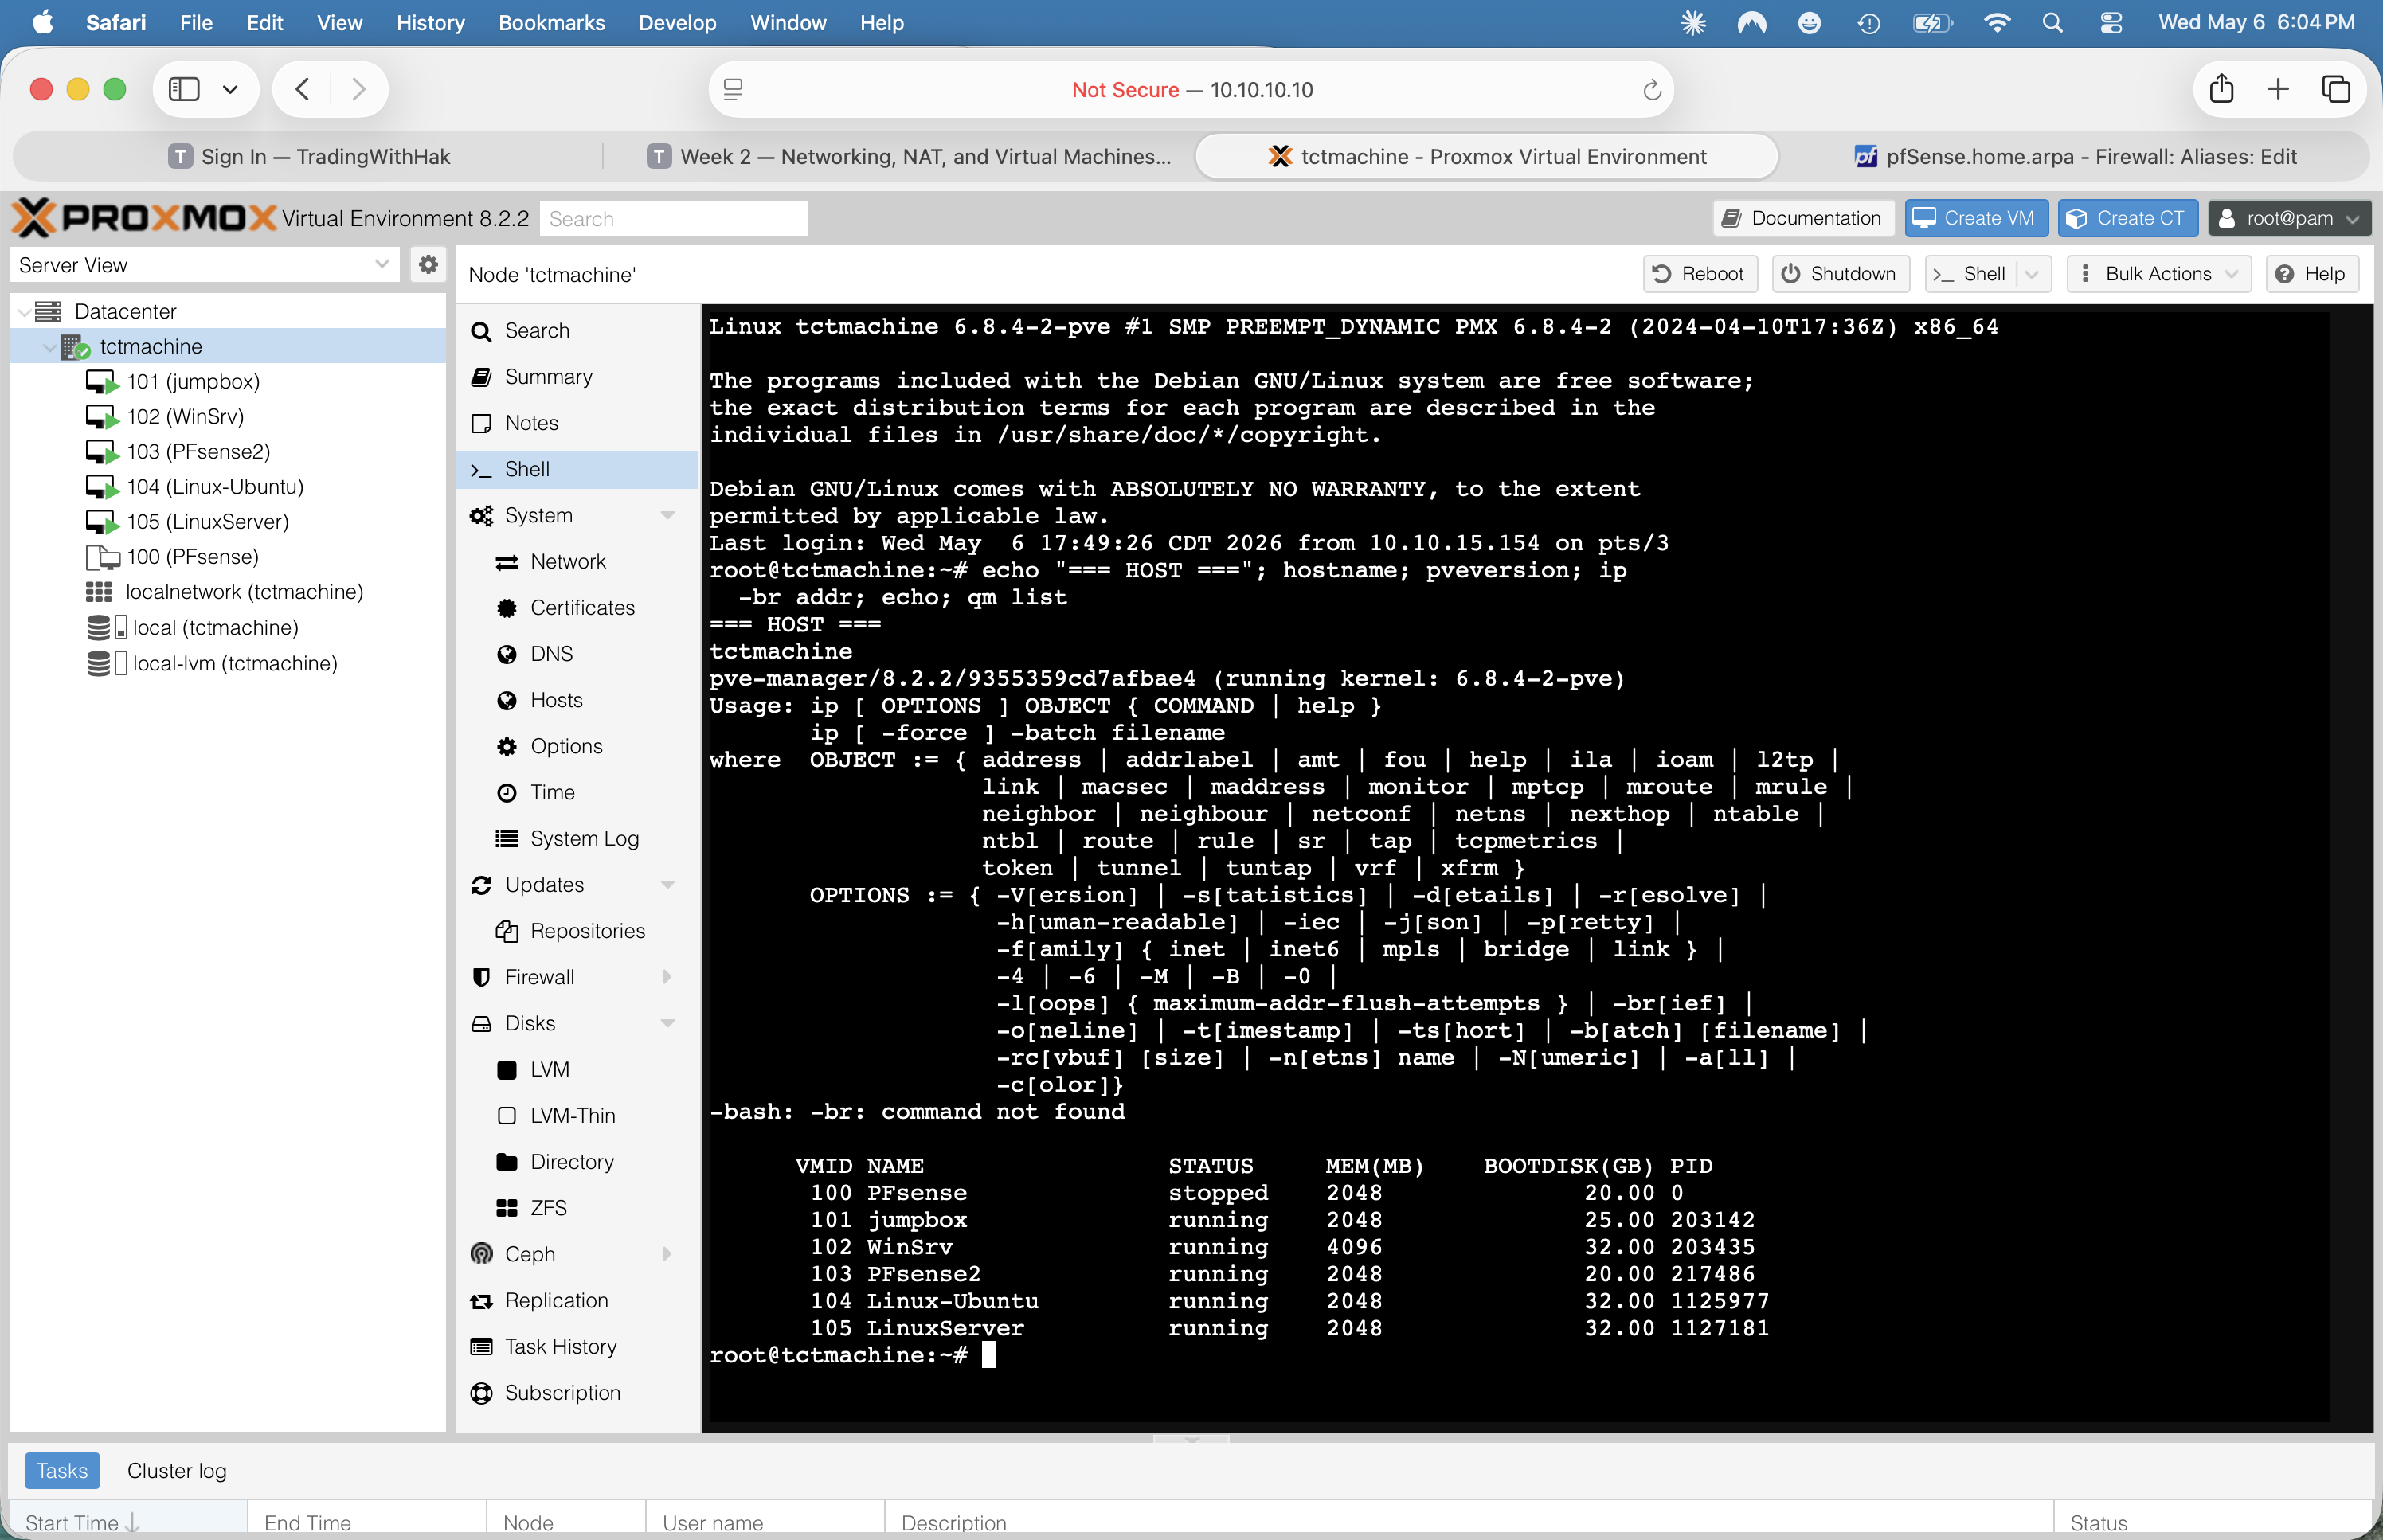
Verified live
Fig 01 · qm list + pveversion · all 6 VMs accounted for after build
Step 2🛡️ Networking · pfSense
Install pfSense2 — three NICs, three subnets
VM creation (Proxmox UI)
Create VM → name PFsense2 (VMID 103) · 2 vCPU · 2 GB RAM · 20 GB disk
Add three virtio NICs:
net0 → vmbr0 (WAN side)
net1 → vmbr1 (DMZ)
net2 → vmbr2 (LAN)
Mount netgate-installer-v1.1.1-RELEASE-amd64.iso on ide2
Boot · run installer → all defaults · accept ZFS or UFS as preferred
Console interface assignments
After install, at the blue menu:option 2 → Set interface(s) IP address
WAN vtnet0 → DHCP from school LAN
DMZ vtnet1 → 172.16.0.1/24
LAN vtnet2 → 192.168.0.1/24
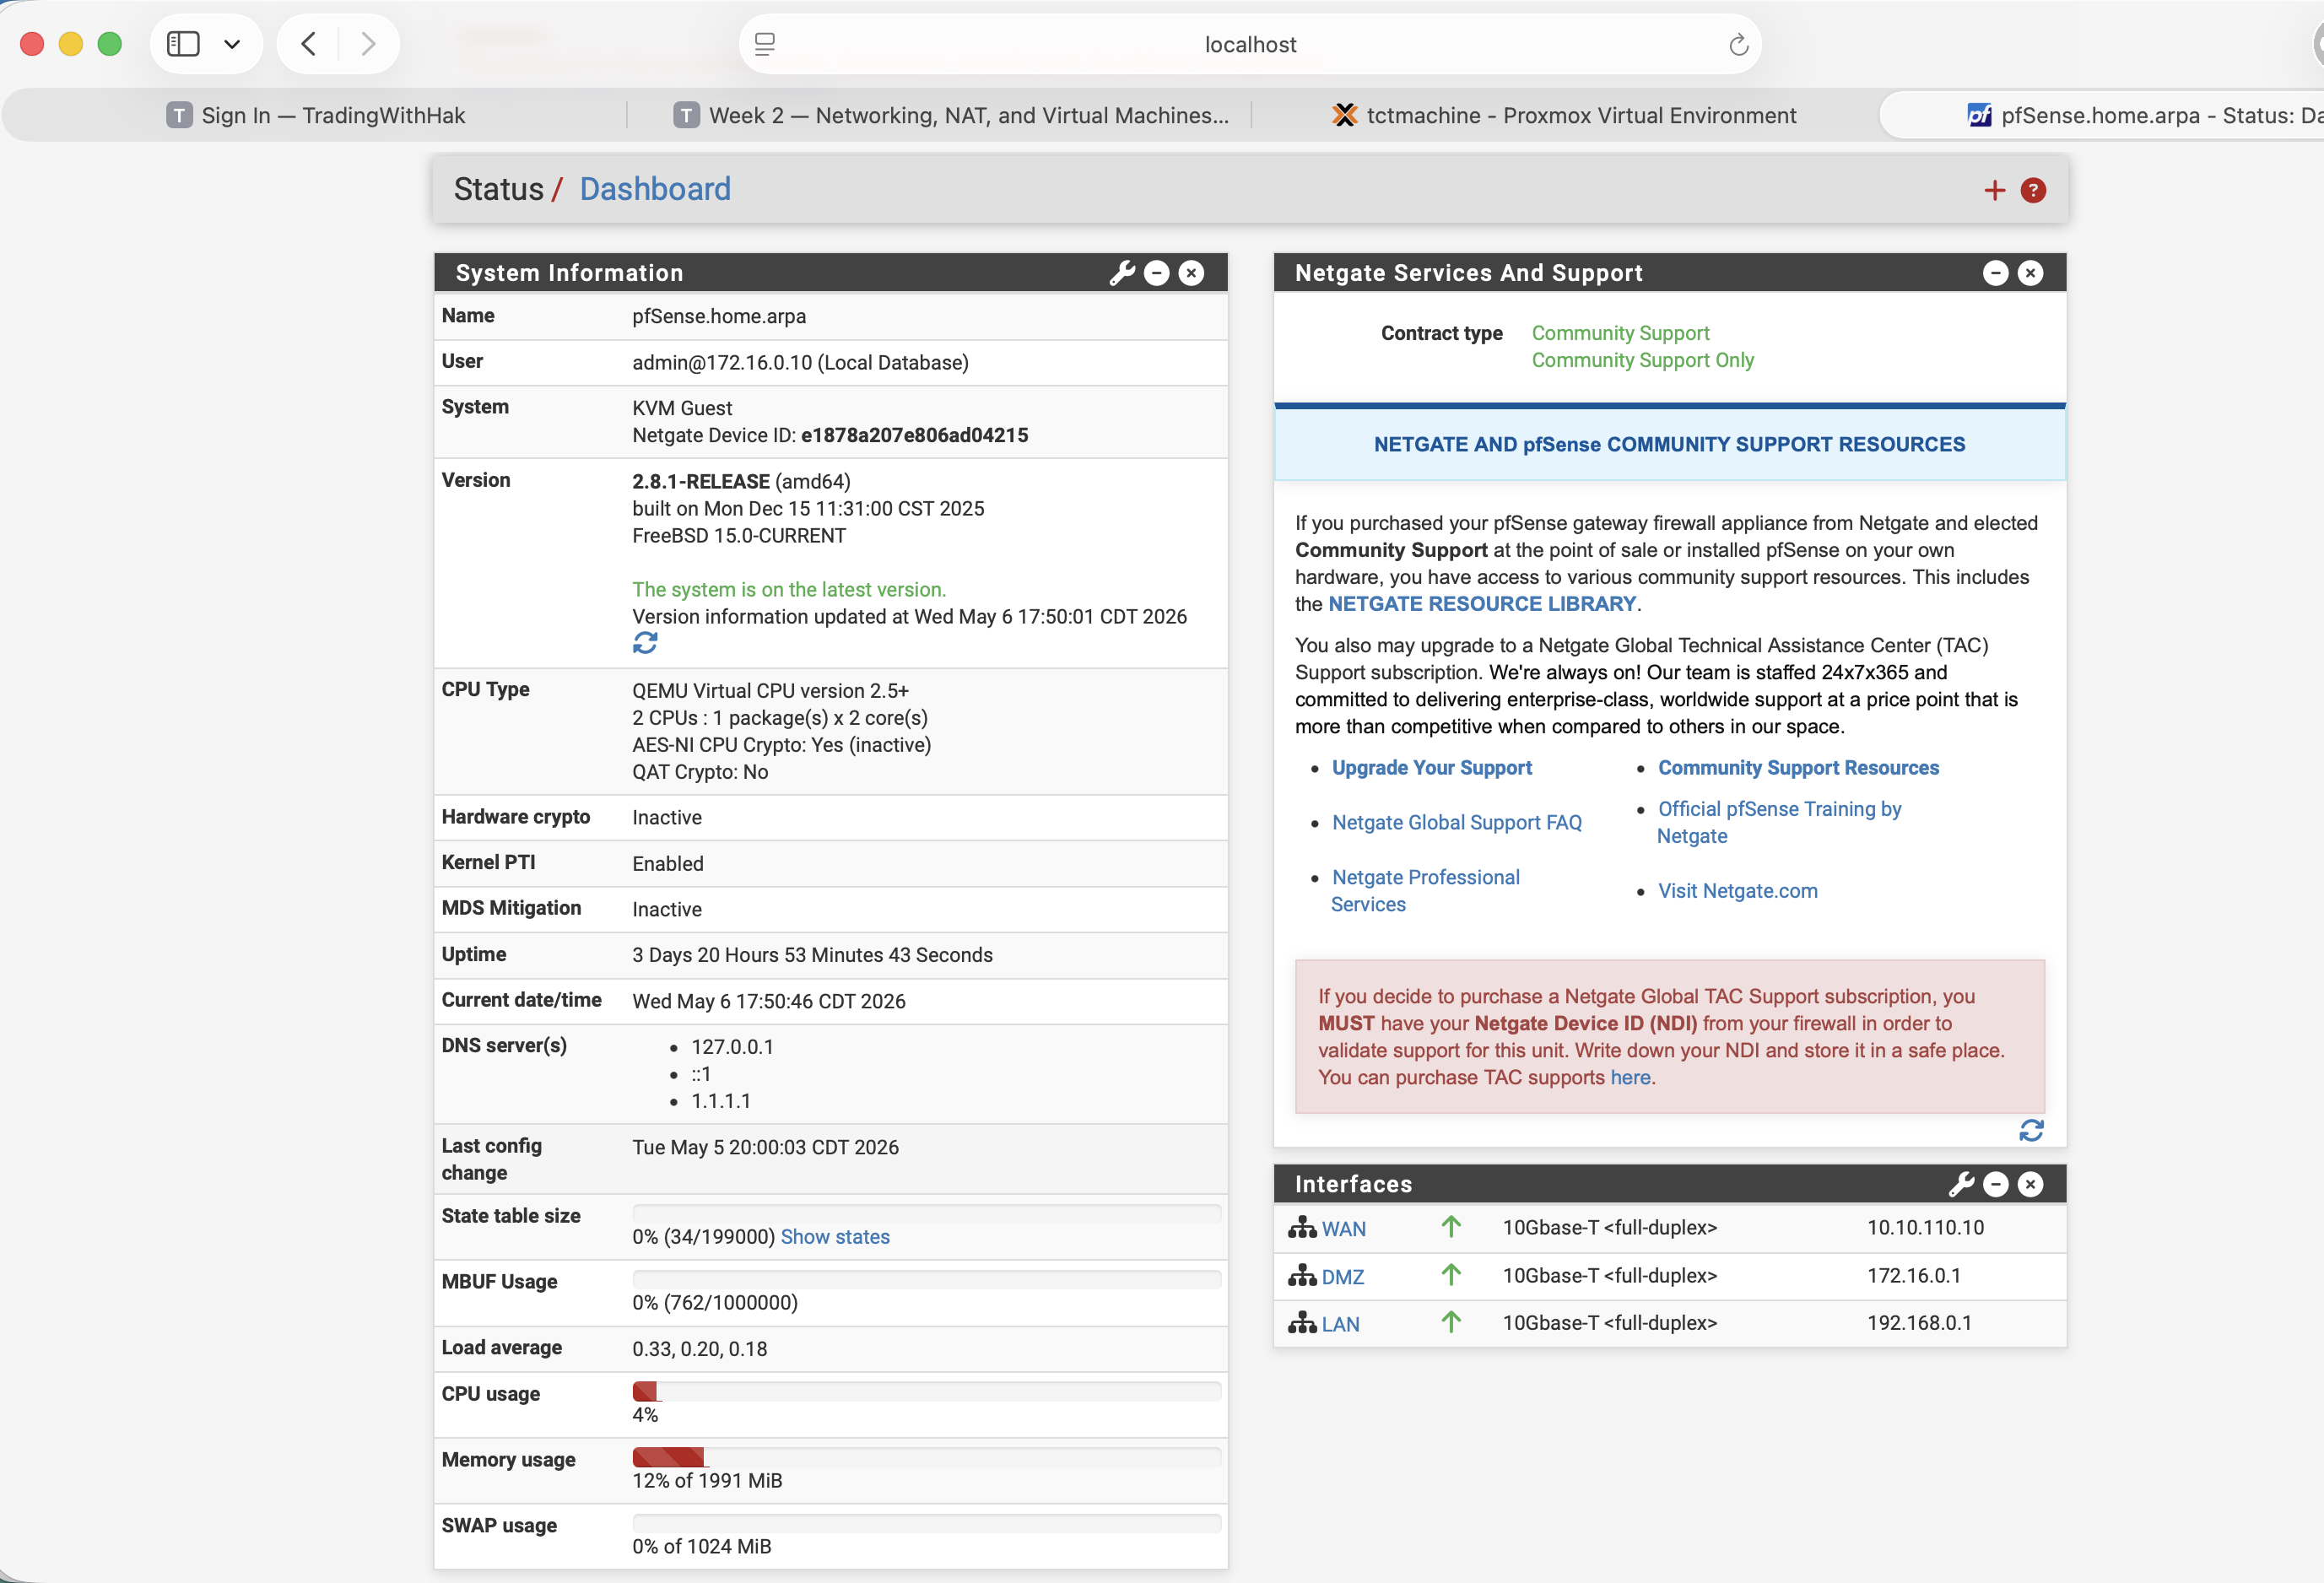
Verified live
Fig 09 · pfSense dashboard · WAN 10.10.110.10 · DMZ .1 · LAN .1
Step 3🛡️ pfSense services
Turn on DHCP + DNS Resolver
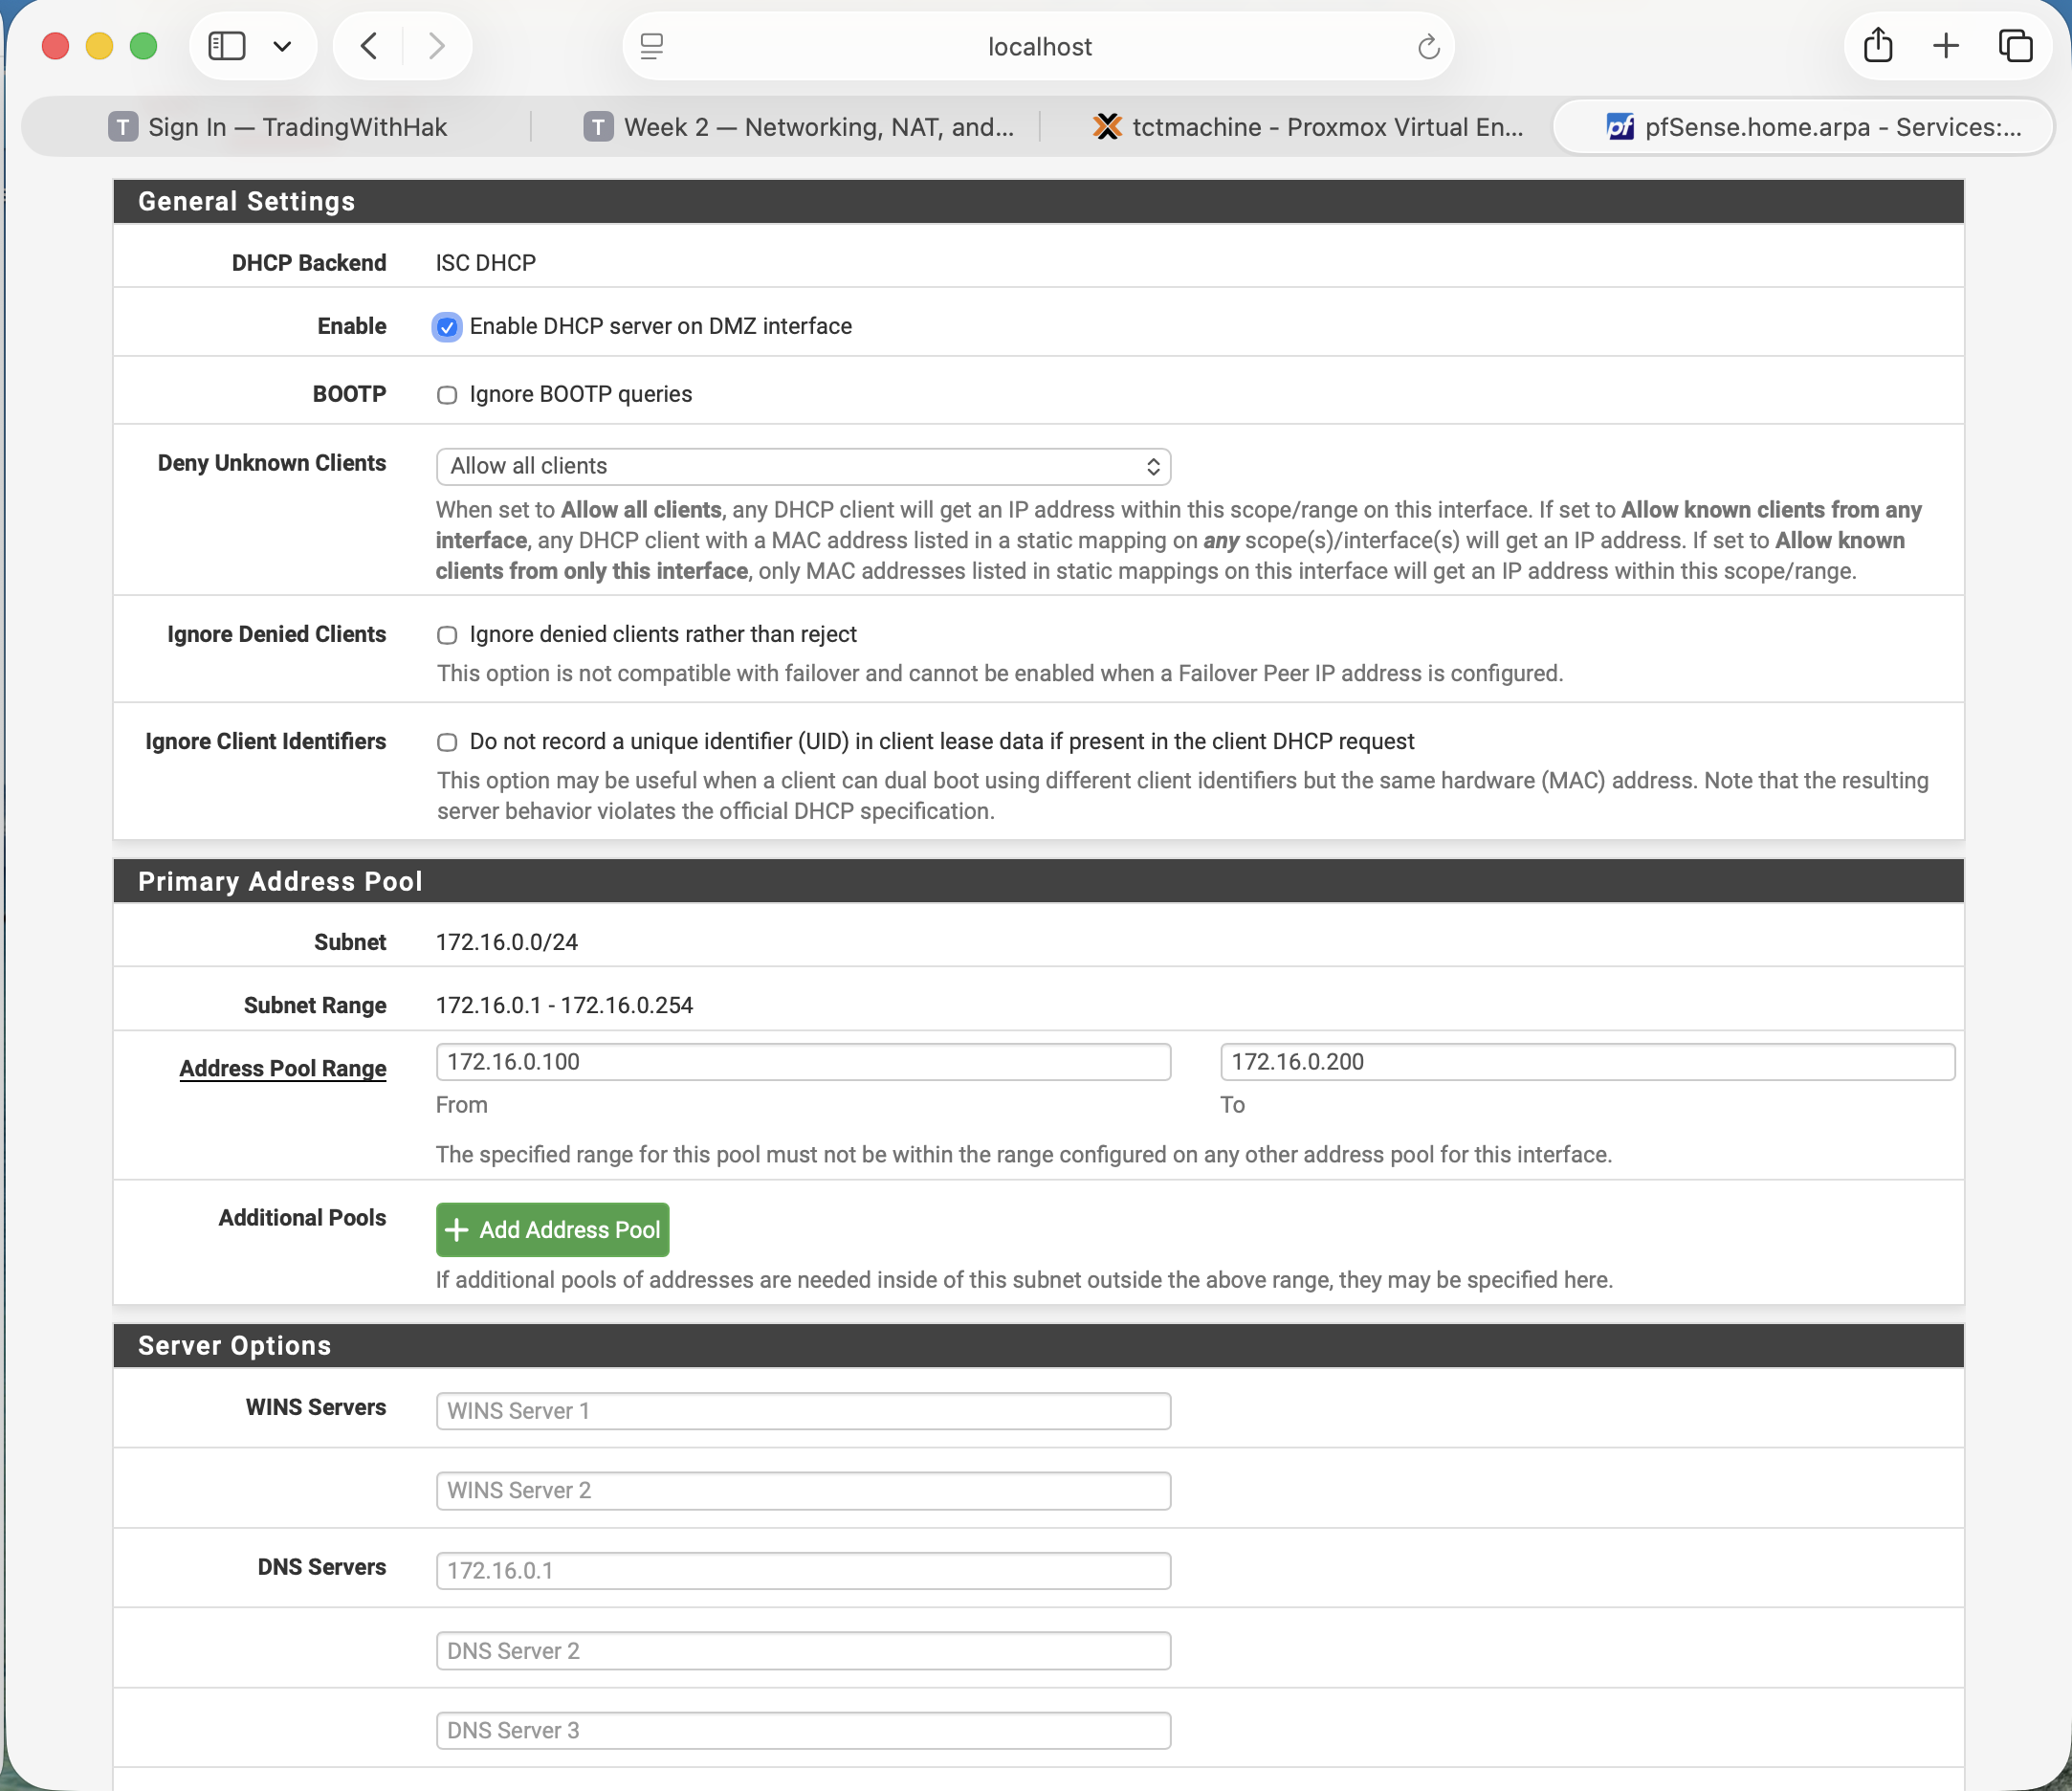
DHCP — Services → DHCP Server
Click DMZ tab → ✓ Enable DHCP server on DMZ
Pool: 172.16.0.100 – 172.16.0.200
DNS server pushed to clients: 172.16.0.1 (pfSense)
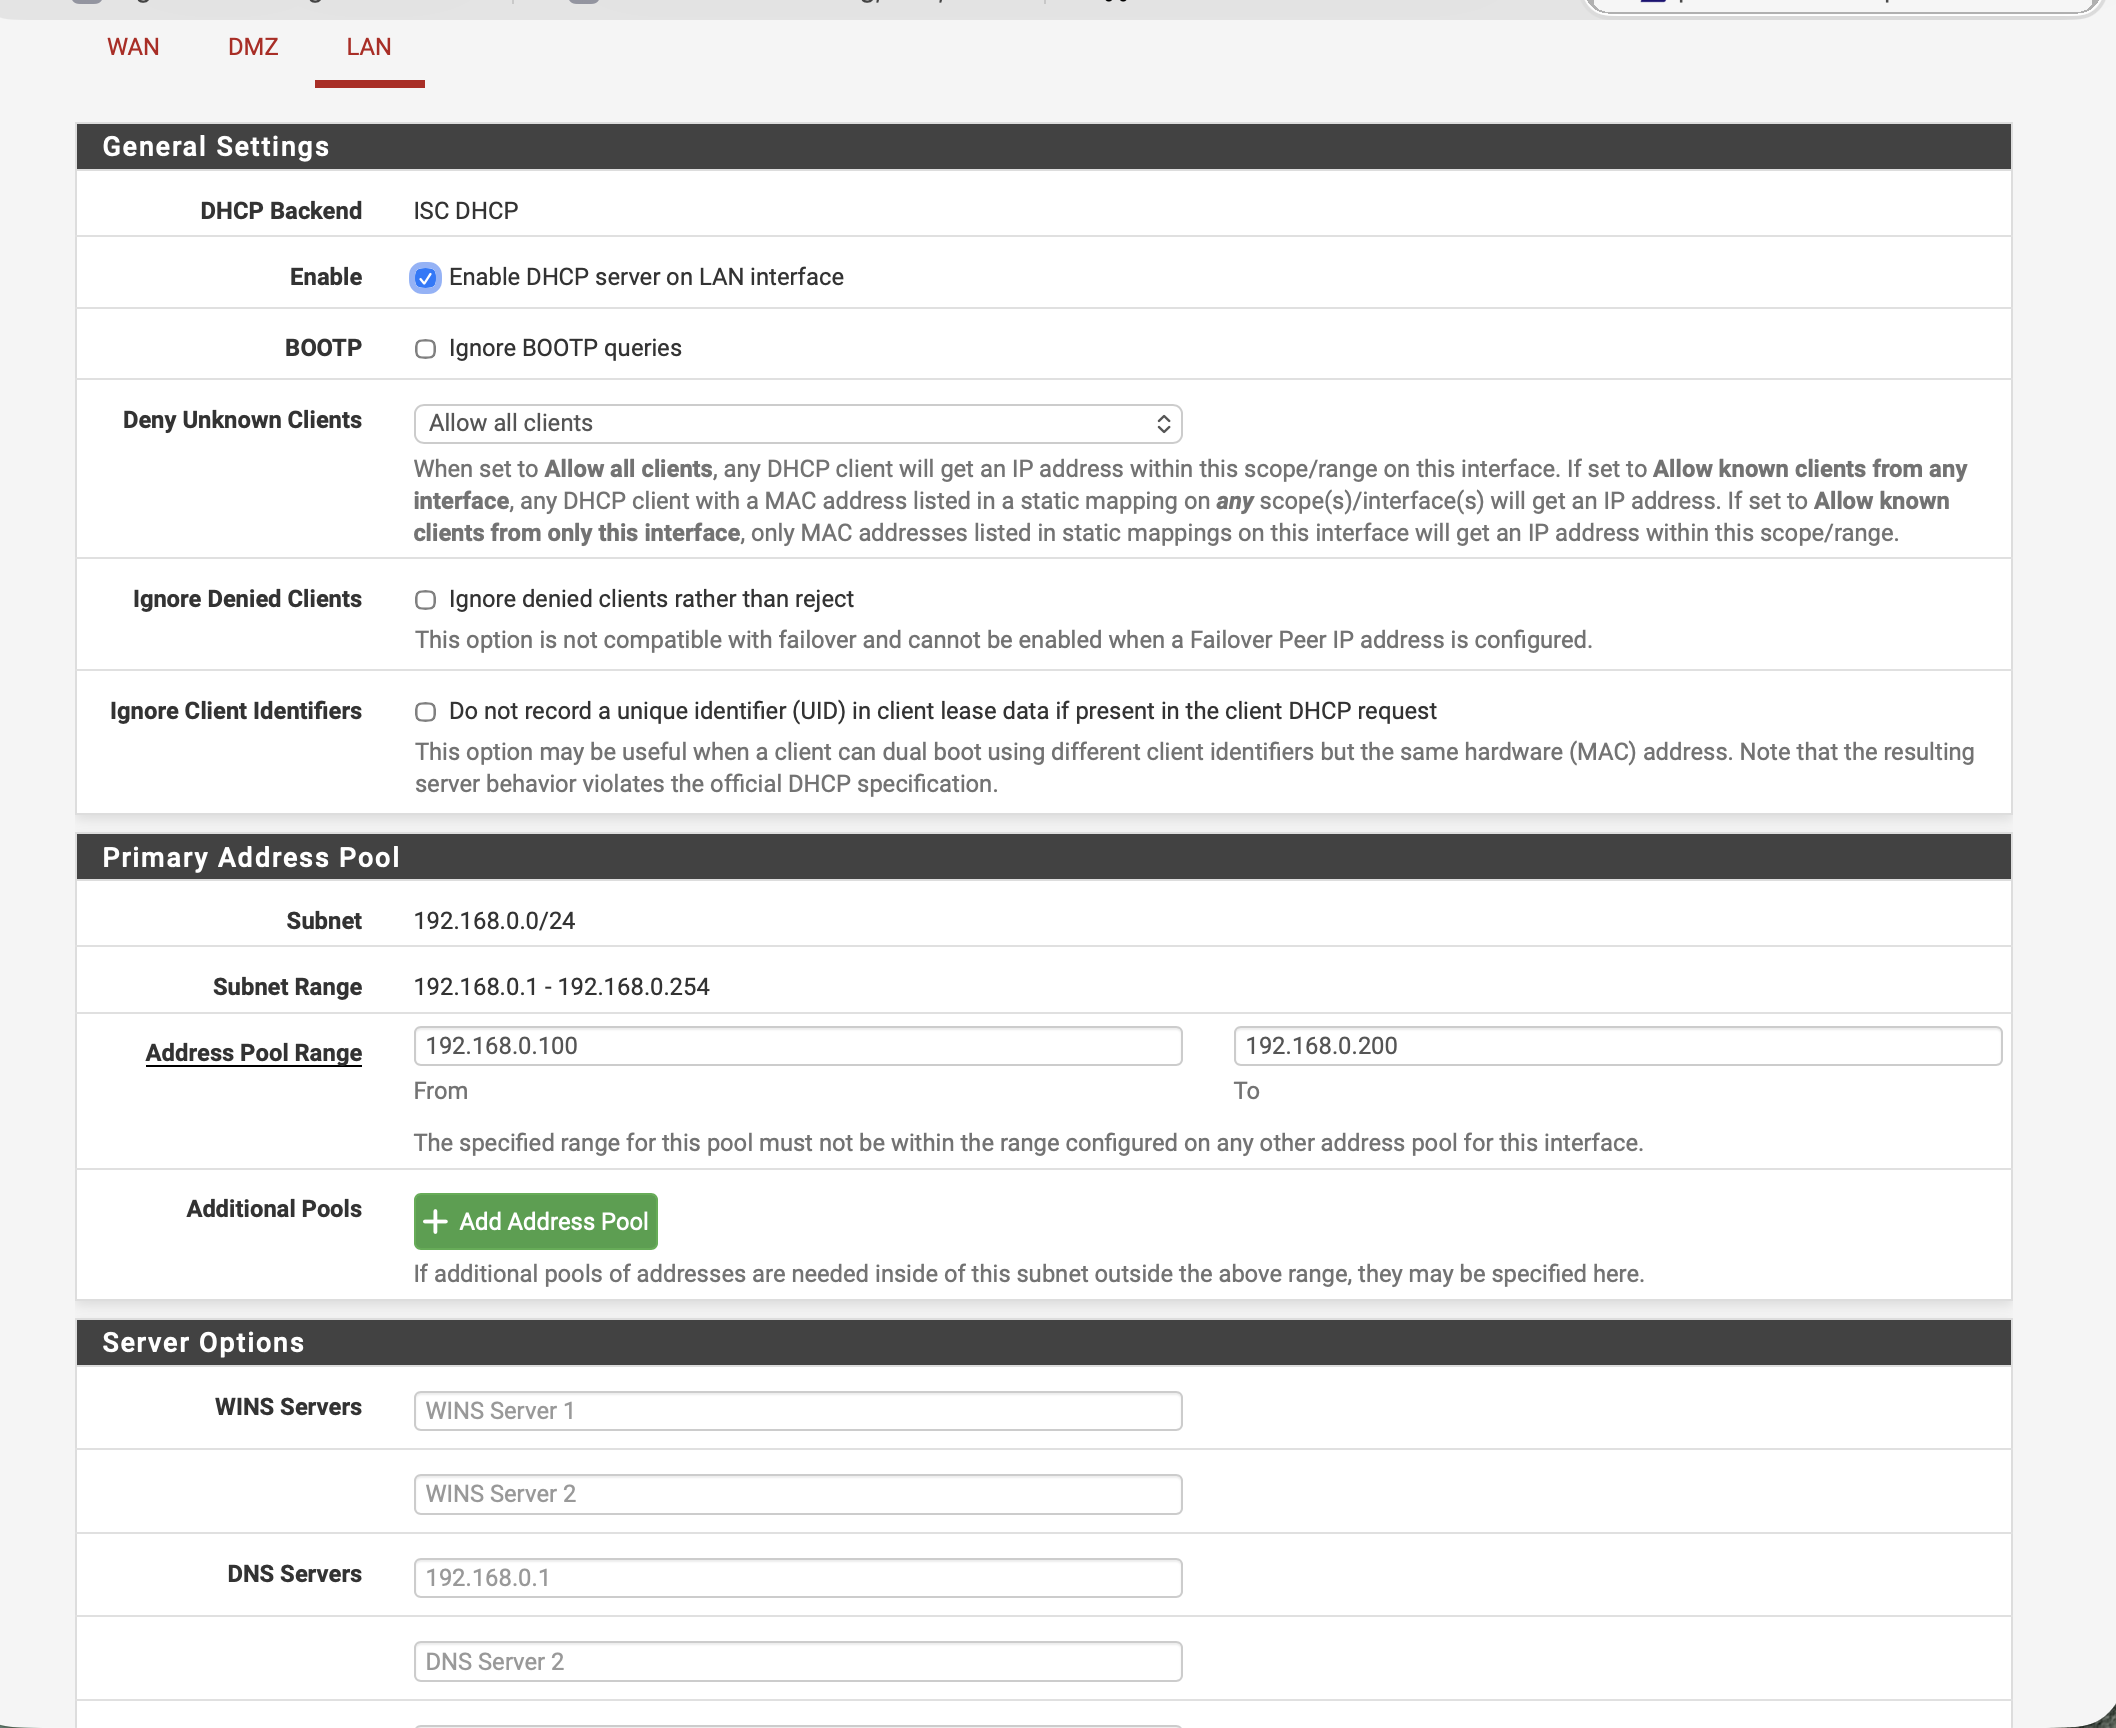
Repeat on LAN tab: 192.168.0.100 – 192.168.0.200, DNS 192.168.0.1
Save + Apply
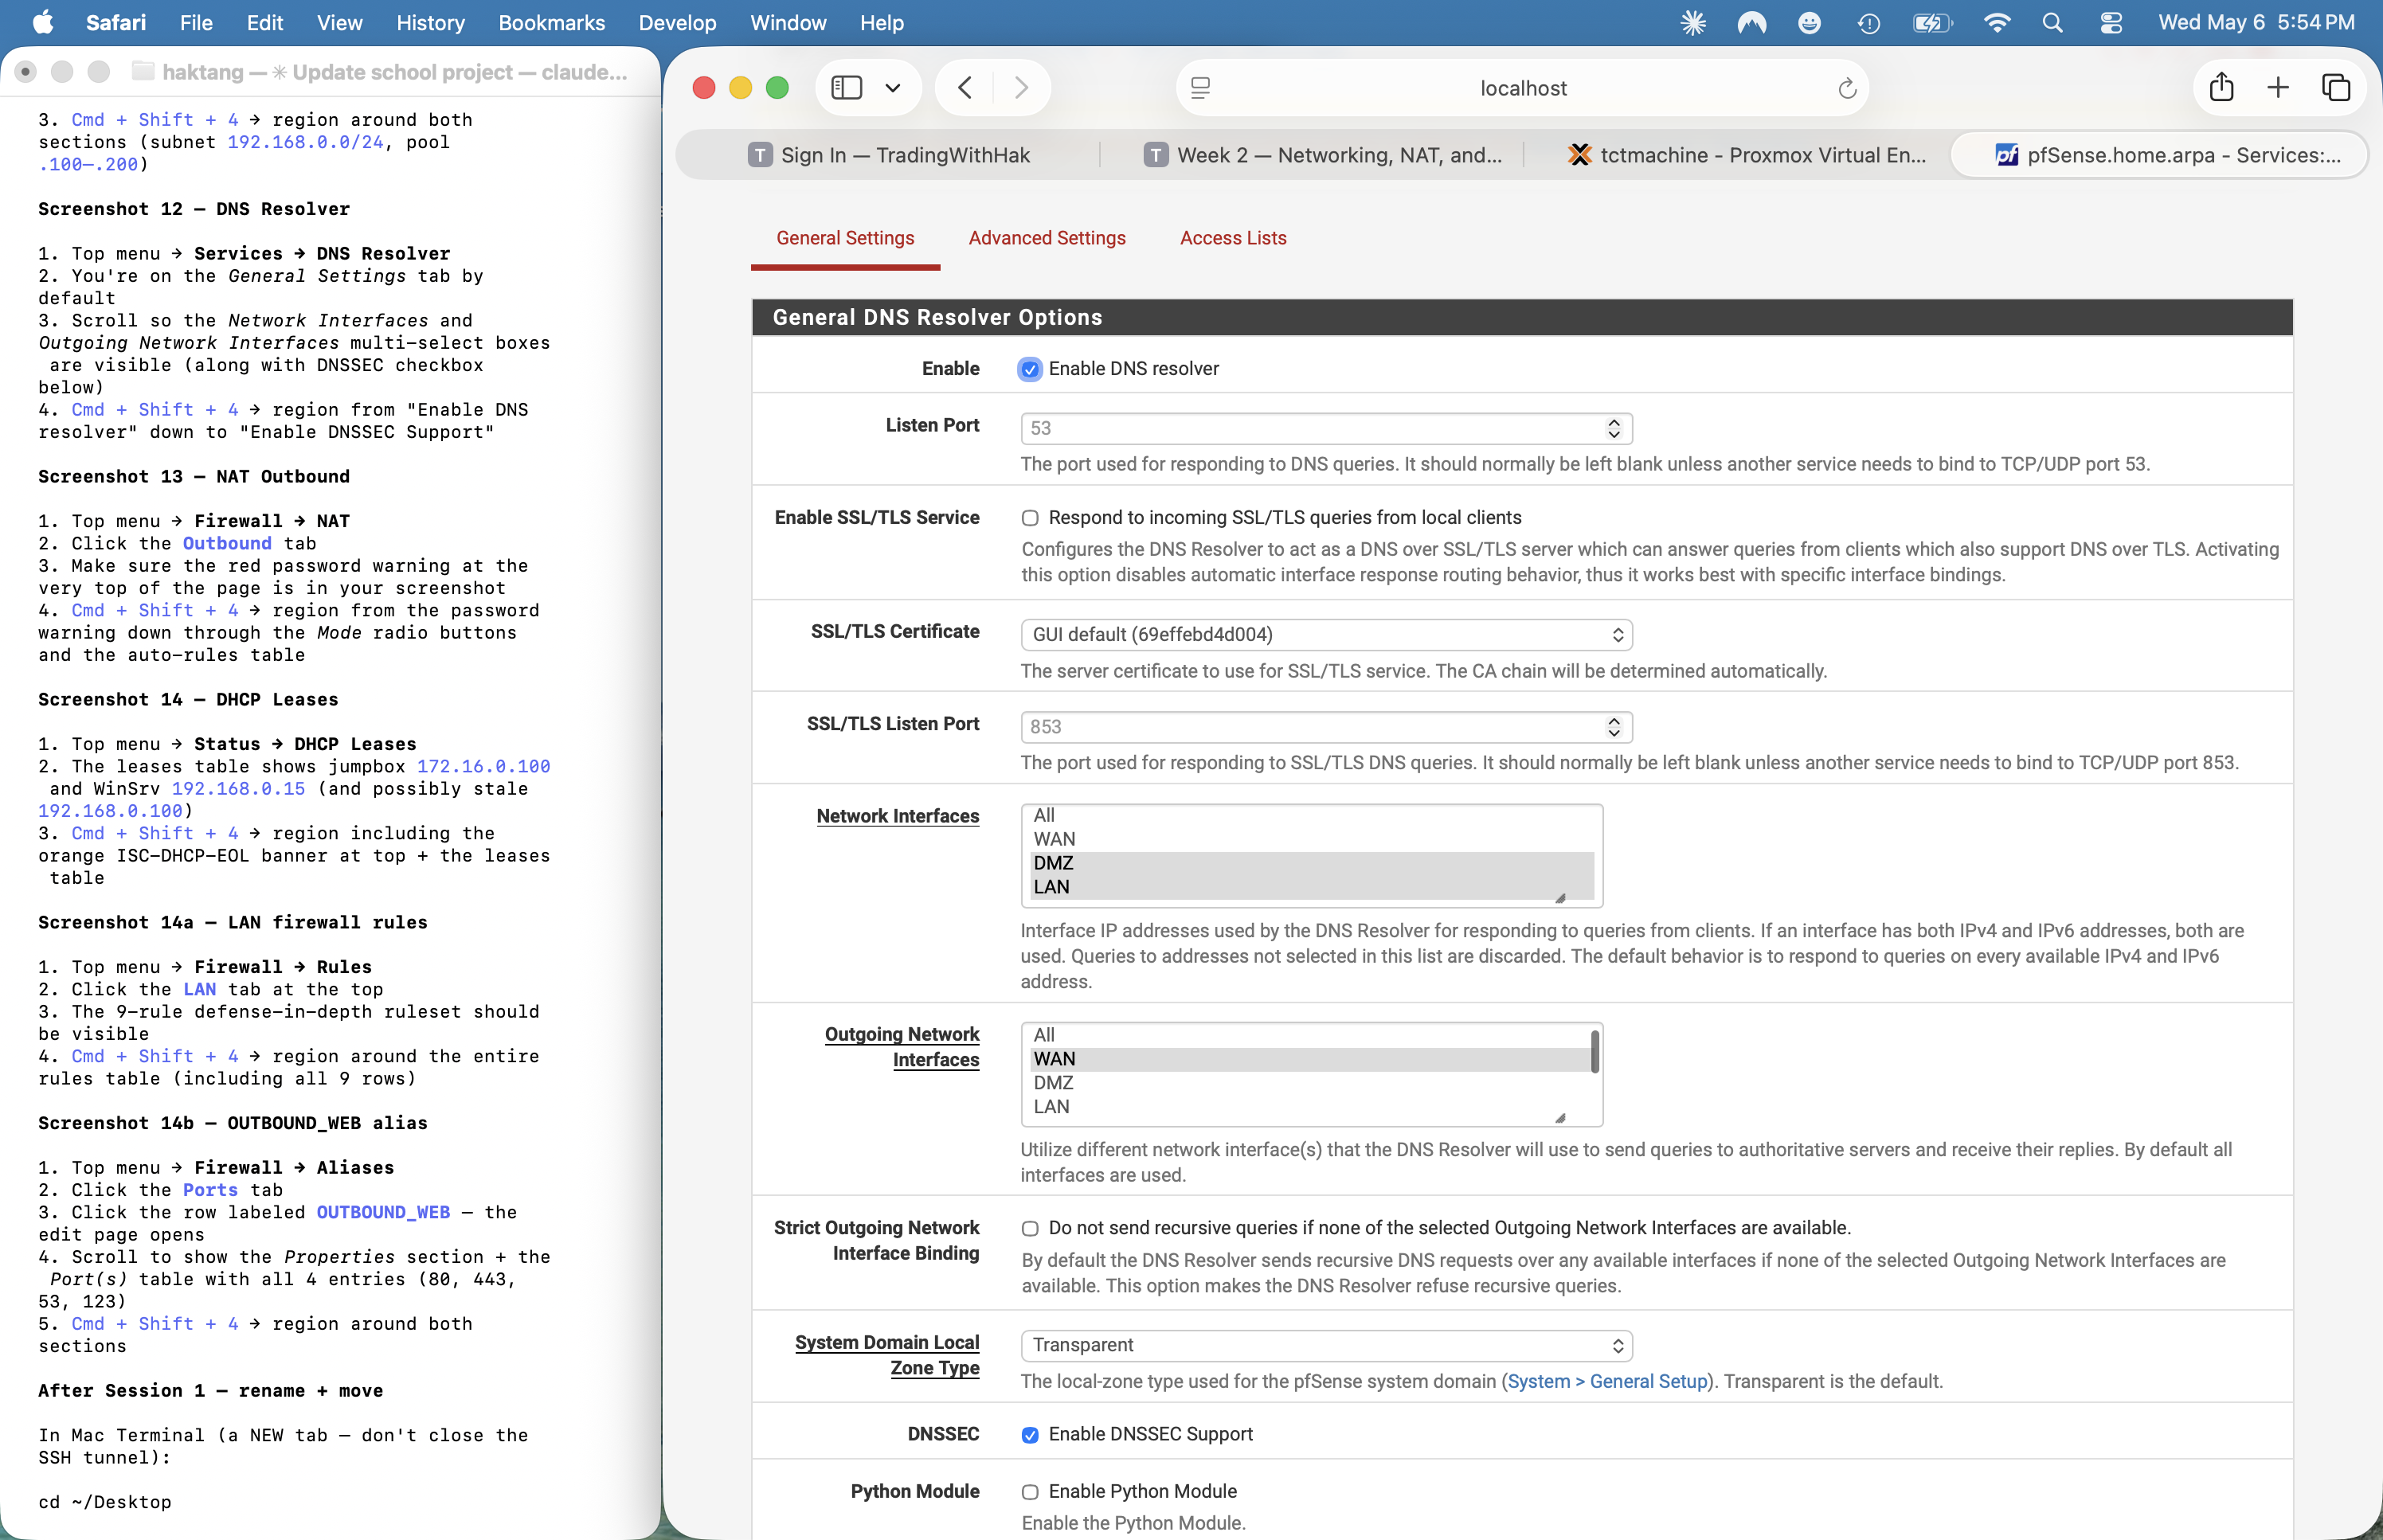
DNS — Services → DNS Resolver
✓ Enable DNS resolver
Network Interfaces: DMZ + LAN (NOT WAN)
Outgoing Network Interfaces: WAN
✓ Enable DNSSEC Support
Save + Apply
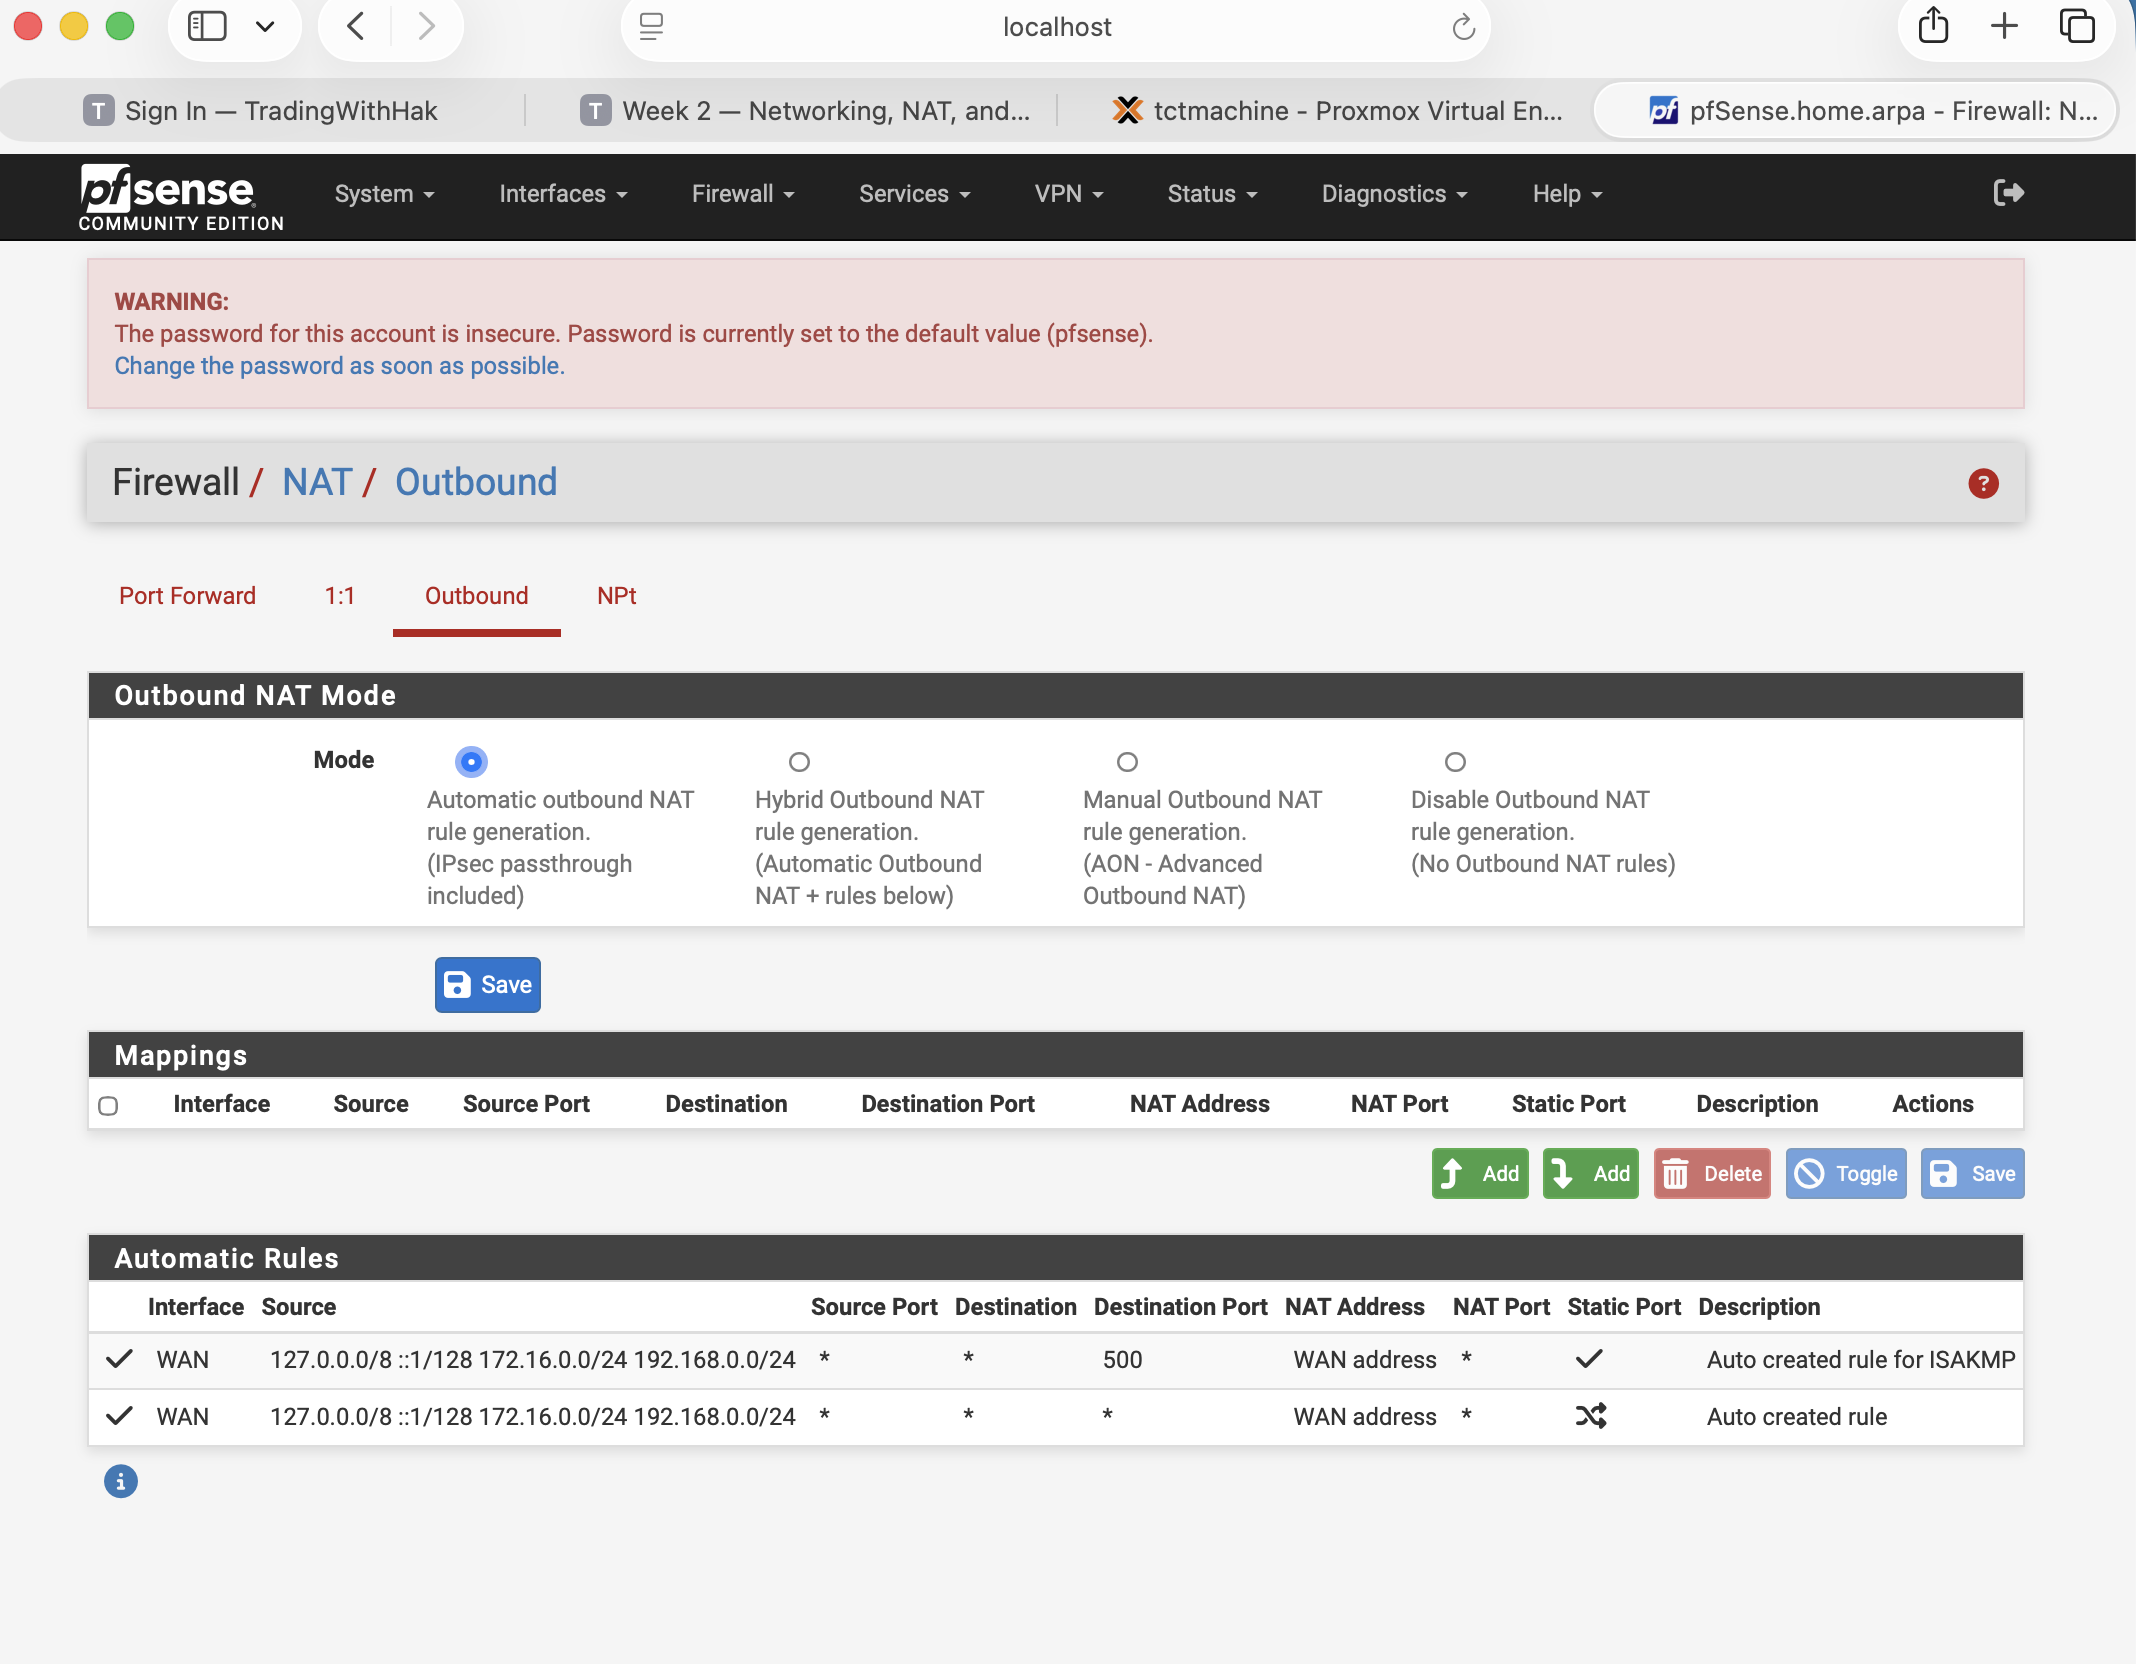
NAT — Firewall → NAT → Outbound
Mode: Automatic outbound NAT — pfSense auto-MASQUERADEs both internal subnets out the WAN address.
Verified live
Fig 10 + 11 · DMZ + LAN scopes (172.16/24 and 192.168/24, both .100–.200)
Create VM 101 · 2 vCPU · 2 GB RAM · 25 GB disk · NIC on vmbr1
Mount Ubuntu Server live ISO · boot · install with default partitioning
Set hostname (e.g. jumpbox) · admin user tct_jumpbox
✓ Install OpenSSH server · skip snaps
Reboot · log in
Configure UFW
sudo ufw default deny incomingsudo ufw default allow outgoingsudo ufw allow from 10.10.10.0/24 to any port 22sudo ufw allow from 192.168.0.0/24 to any port 22sudo ufw allow from 172.16.0.0/24 to any port 22sudo ufw enablesudo ufw status verbose
Harden sshd (later)
Edit /etc/ssh/sshd_config · change Port 2222 · PermitRootLogin no · PasswordAuthentication no after key auth · AllowUsers tct_jumpbox
Verified live
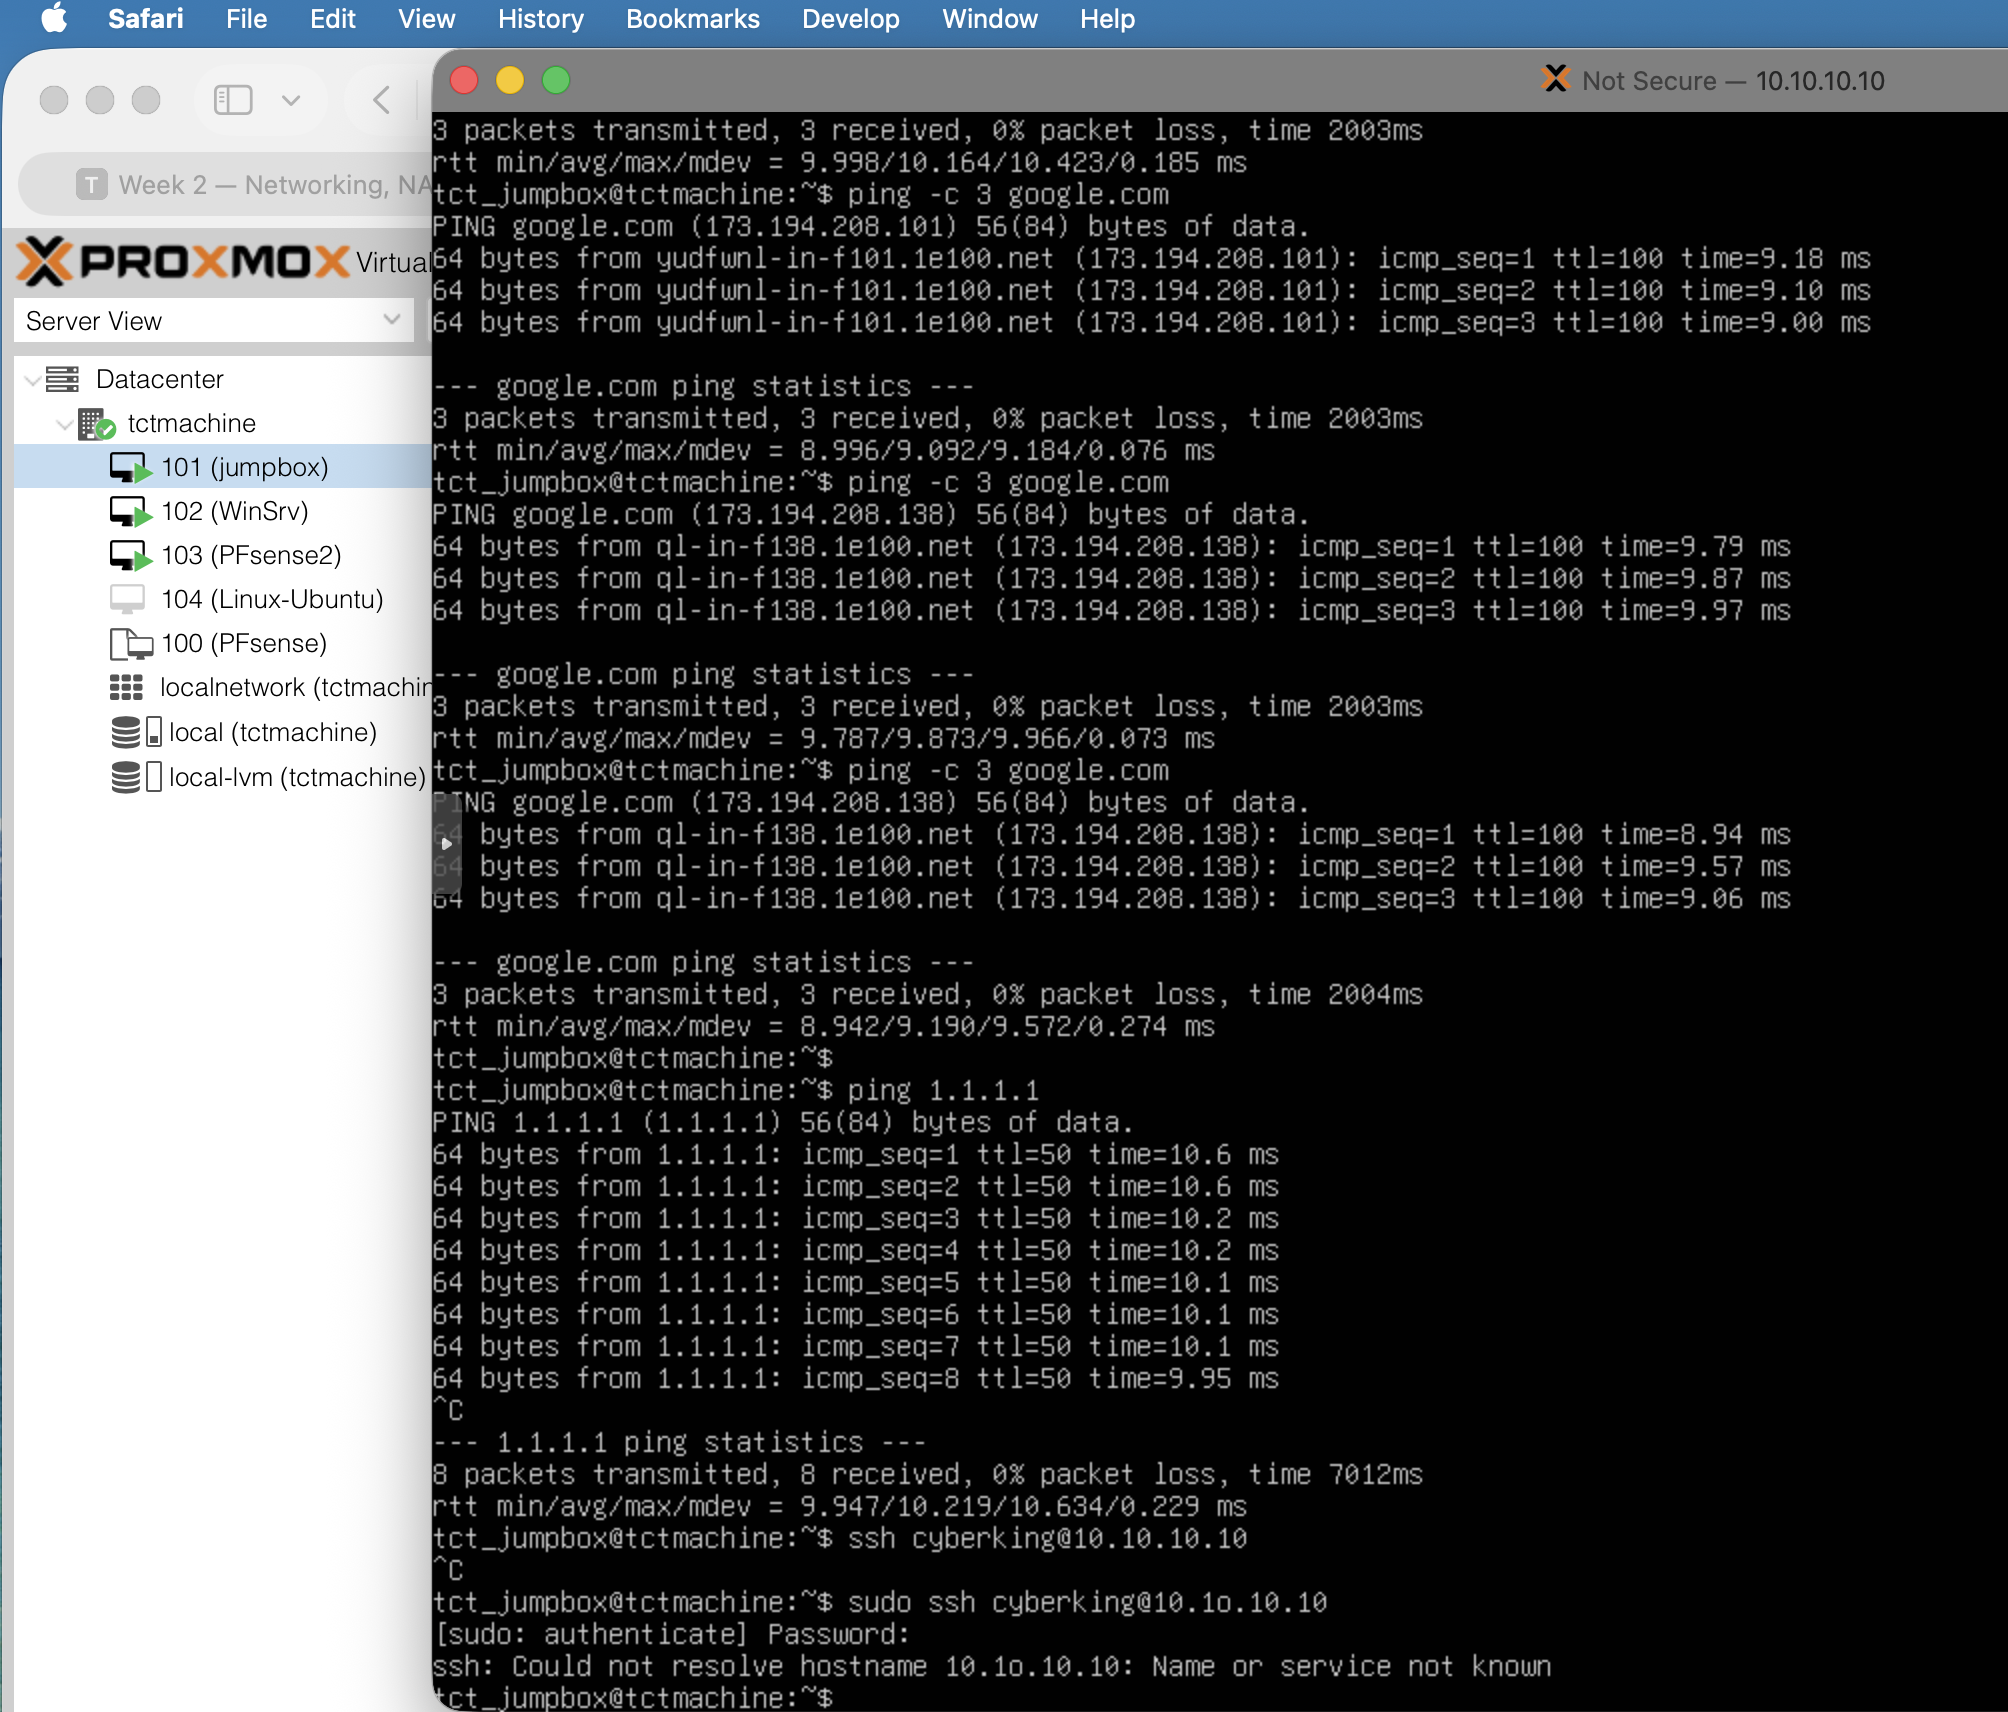
Fig 06 · ping google.com + 1.1.1.1 · 0% loss
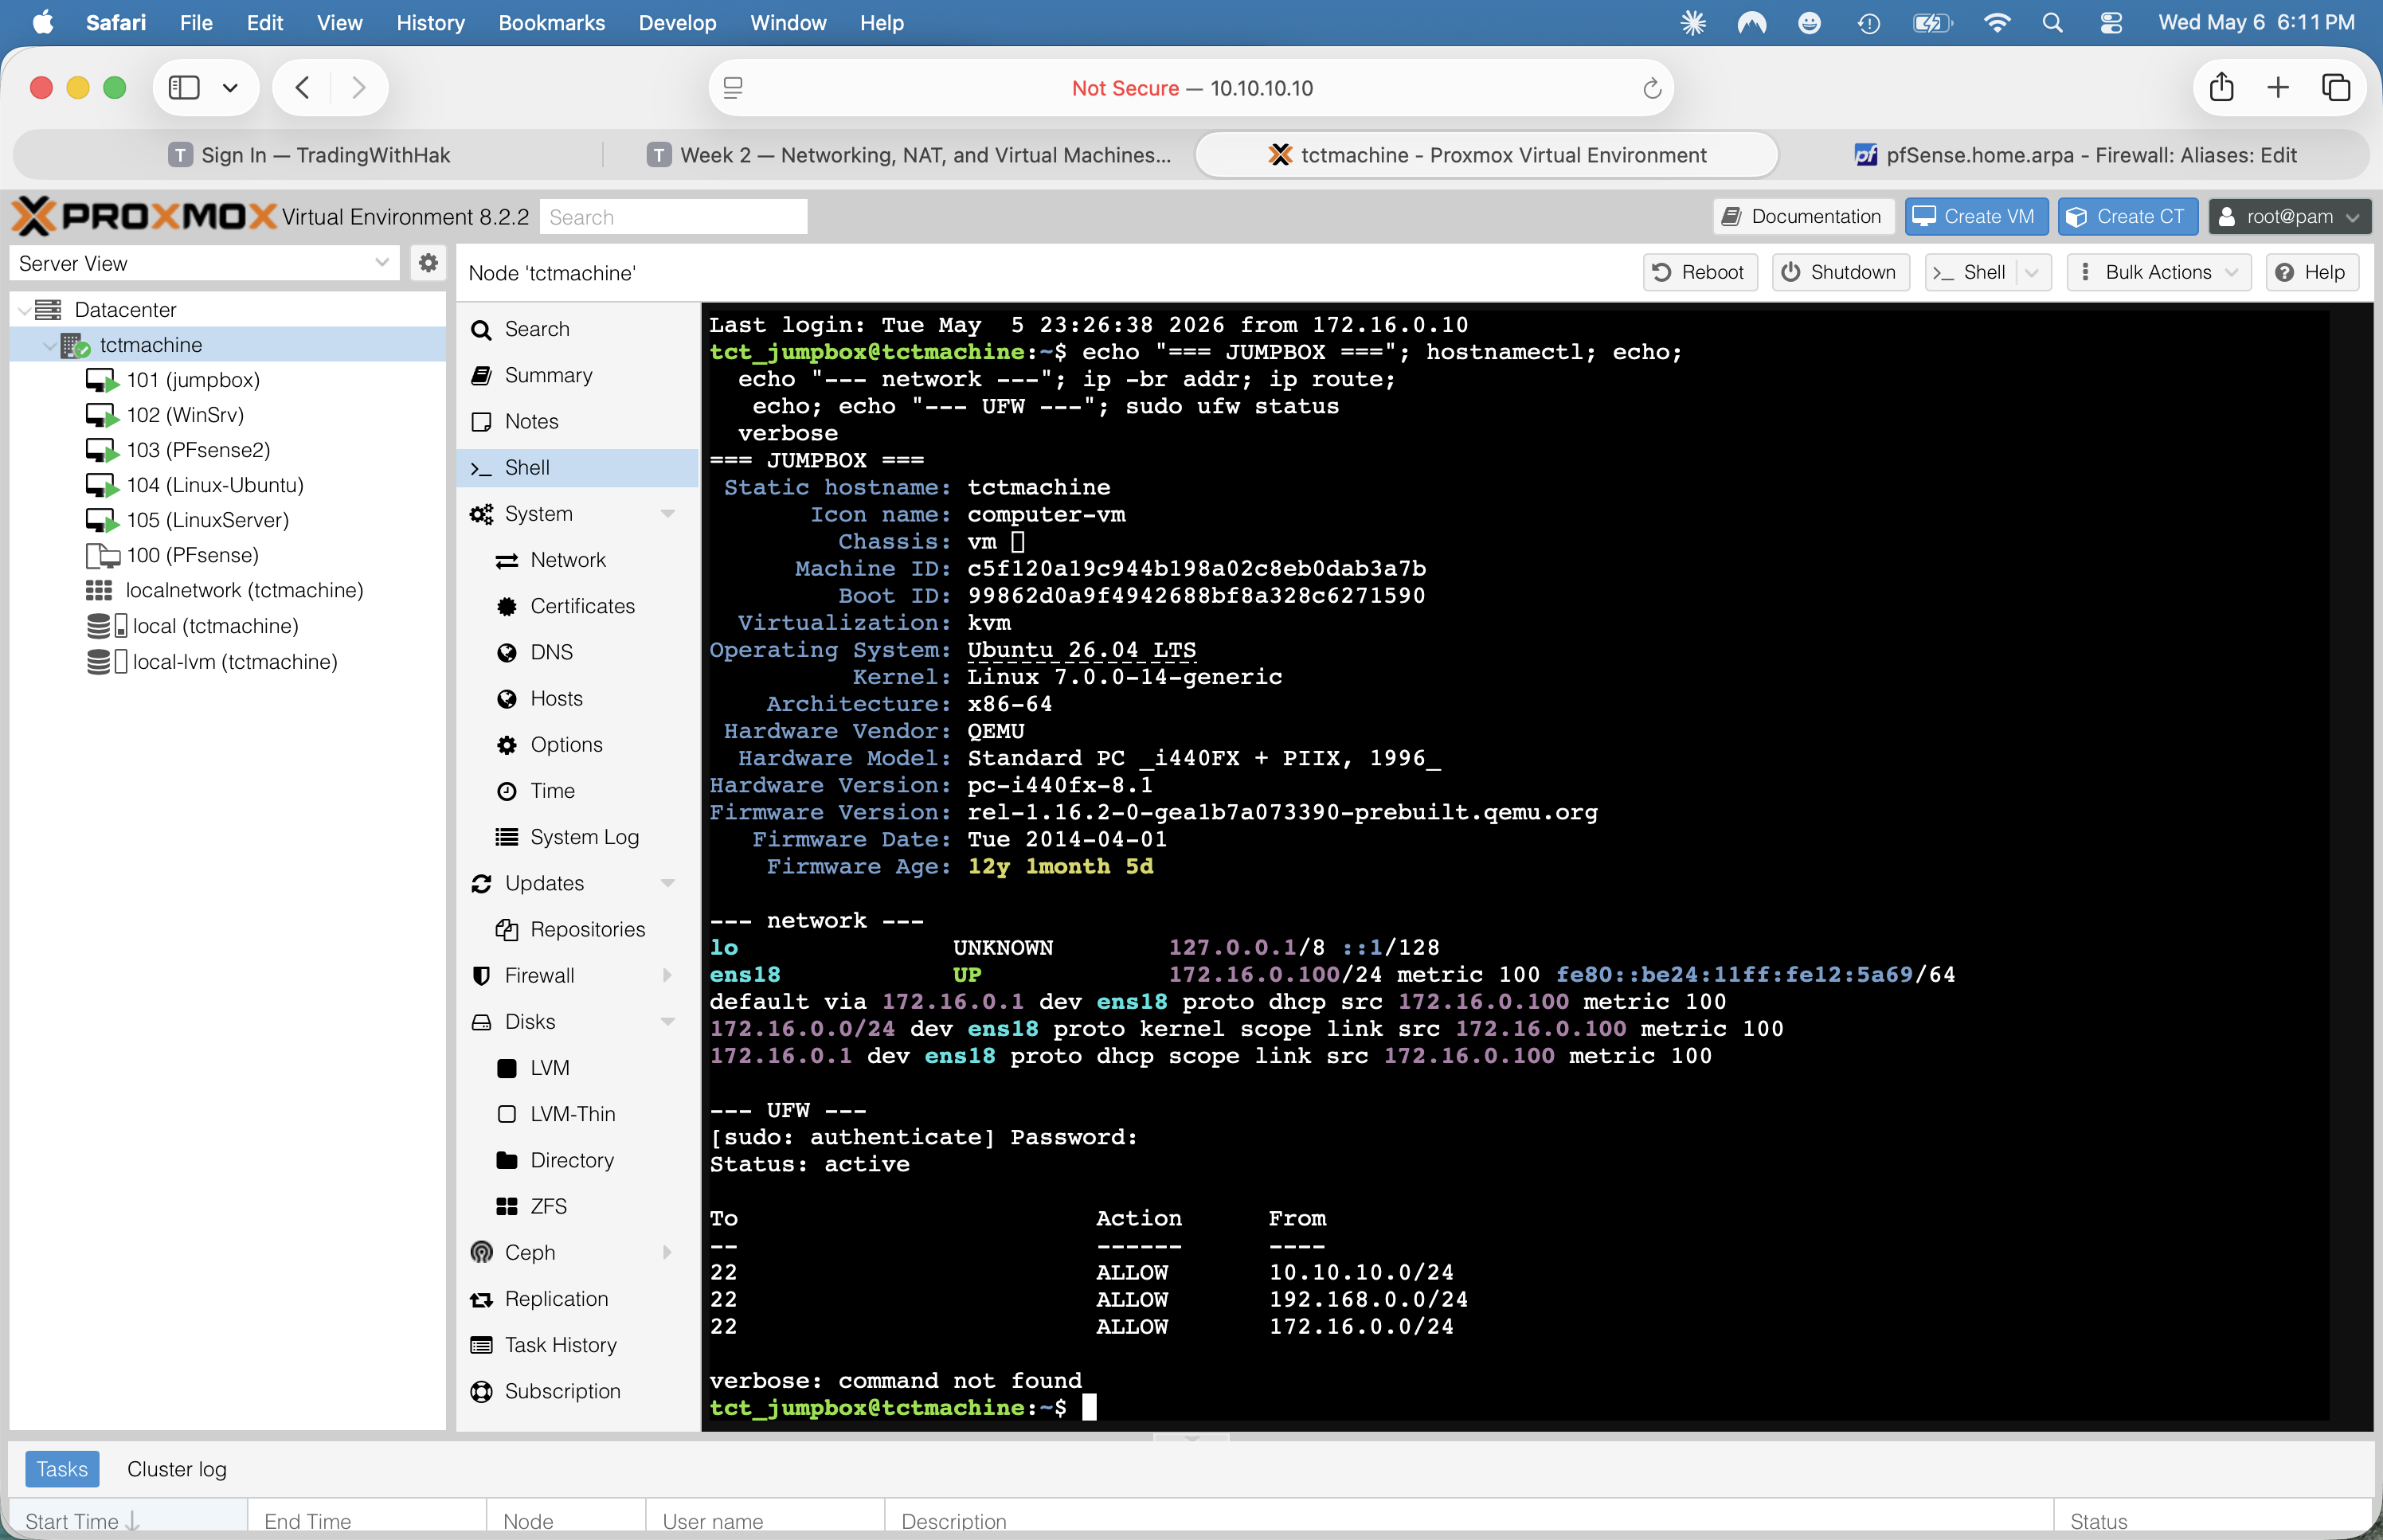
Fig 07 · hostnamectl + ip + UFW status
Step 6🪟 LAN · WinSrv
Install WinSrv 2025 + static IP .15
Install Win Srv 2025 Datacenter Eval
Create VM 102 · UEFI BIOS (OVMF) · 4 GB RAM · 32 GB disk · 2 vCPU
NIC: e1000 on vmbr2 · ✓ Proxmox firewall
Mount Win Srv 2025 EVAL ISO · boot · run installer
Pick Datacenter Evaluation (Desktop Experience)
Custom partition: use the full disk · install (~10 min)
Set Administrator password · sign in
Server Manager opens automatically
Set static IP (GUI path)
Win + R → ncpa.cpl → Network Connections
Right-click Ethernet → Properties
Double-click Internet Protocol Version 4 (TCP/IPv4)
curl -v -m 5 https://www.microsoft.comexpect HTTP 200 in <1 s
From LinuxServer bash:
curl -s https://ifconfig.me→ returns the school's public IP
If outbound fails: check VM gateway = 192.168.0.1 (pfSense LAN), pfSense's Firewall → NAT → Outbound shows Mode = Automatic, and the LAN allow rule at Firewall → Rules → LAN permits the destination port.
⚠ ping 1.1.1.1 from LAN won't reach the internet — by design, the LAN firewall only allows ICMP echoreq to the gateway. Use curl against an OUTBOUND_WEB-listed port (80/443/53/123) instead.
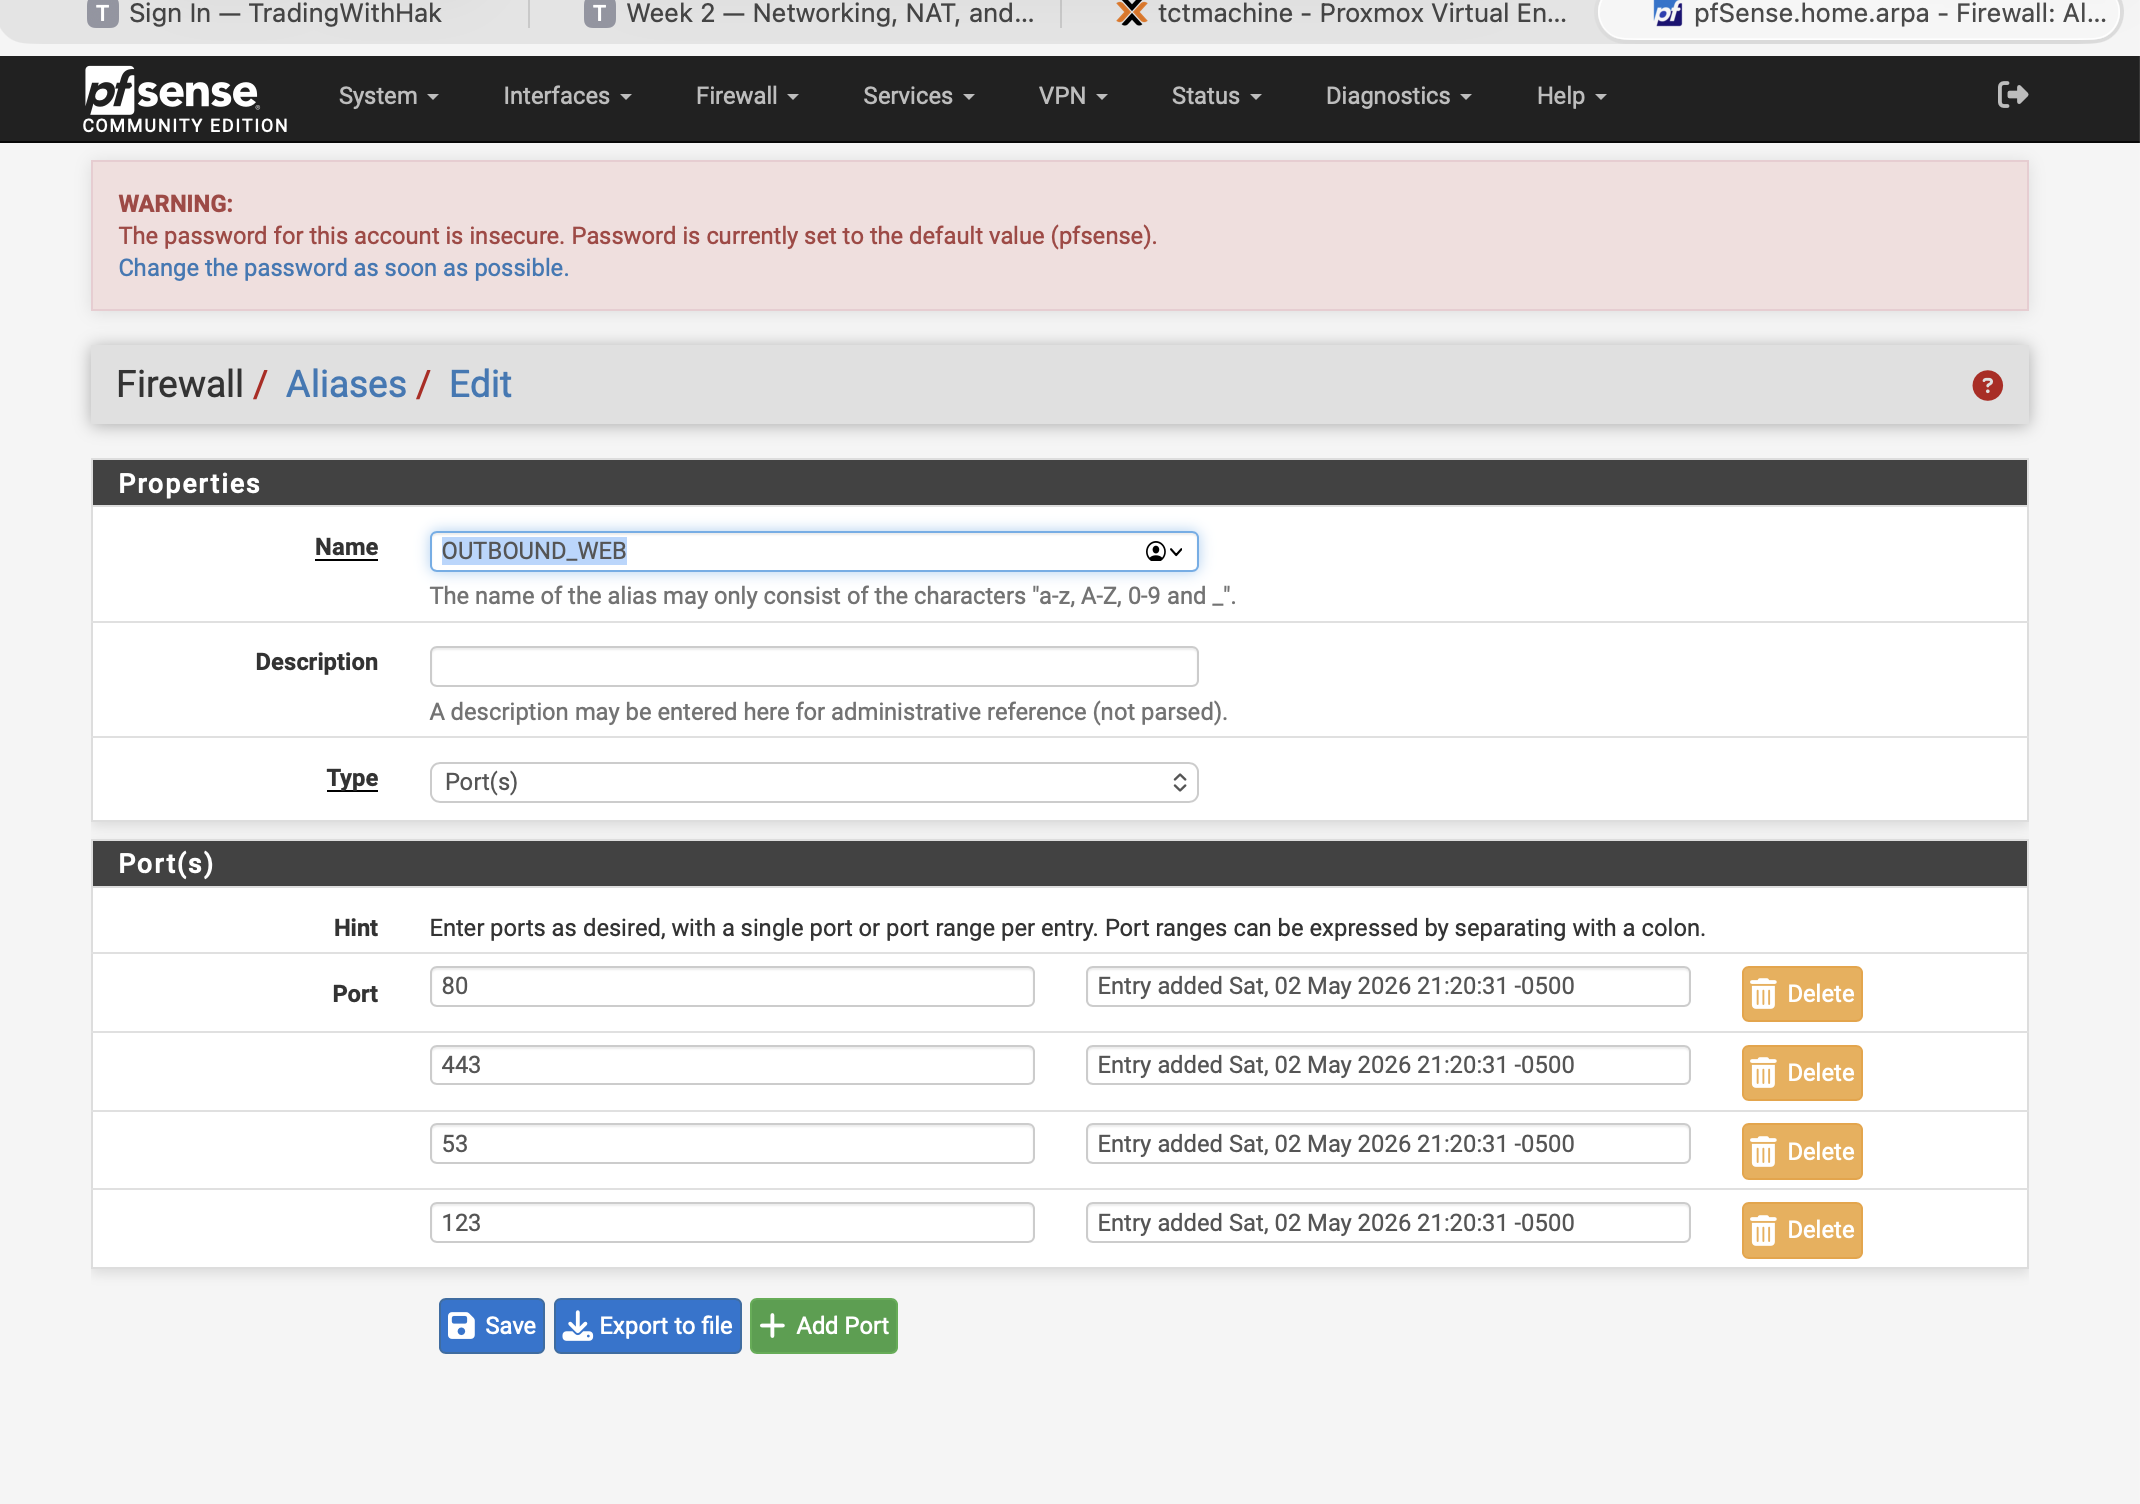
📸 Screenshot the DNS Manager tree showing the zone + A record, and the nslookup output.
Phase 1🪟 Windows Specialist · DHCP
Install DHCP and create the scope
⚠ Two DHCPs would fight. pfSense2 currently leases .100–.200 on the LAN. Before activating Windows DHCP, go to pfSense → Services → DHCP Server → LAN → uncheck "Enable DHCP server on LAN" + Save + Apply. Then Windows owns the scope.
Install the role
Server Manager → Add Roles and Features → check DHCP Server
📸 Screenshot the DHCP Manager scope + Address Leases panel showing at least 1 active lease.
Phase 1🪟 Windows Specialist · IIS
Install IIS and deploy the welcome page
Install the role
Server Manager → Add Roles and Features
Check Web Server (IIS) → Next → accept feature defaults
Install → wait ~2 min
Create the welcome page
File Explorer → C:\inetpub\wwwroot\
Delete the default iisstart.htm + iisstart.png
Right-click → New → Text Document
Paste in the HTML (right →)
Save As… → change "Save as type" to All Files → filename index.html
Welcome page content
<html>
  <body>
    <h1>Welcome to Week 2!</h1>
  </body>
</html>
Test from a client VM
Browser:http://192.168.0.15Or by hostname (DNS working):http://winserver.teamx.local
You should see Welcome to Week 2! rendered as an H1.
📸 Screenshot the browser showing the welcome page — URL bar visible.
Phase 2🐧 Linux Specialist · NGINX
Install NGINX and publish a page
Install & enable
sudo apt updatesudo apt install nginx -ysudo systemctl enable nginxsudo systemctl start nginxsudo systemctl status nginx● nginx.service - A high performance web server
Active: active (running)
Deploy the welcome page
echo "<h1>Welcome to Linux Week 2</h1>" \
| sudo tee /var/www/html/index.html# confirm file:cat /var/www/html/index.html<h1>Welcome to Linux Week 2</h1>
Test from another VM
Browser on Windows / Jump Box:http://192.168.0.20
📸 Screenshot the browser with URL + rendered heading.
If it fails, check: sudo ufw status (allow port 80 if firewall up), NIC IP is actually .3, and gateway is .1.
Optional but recommended: sudo mysql_secure_installation — set root password, remove anon users & test DB.
Create DB + user + grants
CREATE DATABASE capstone_db;

CREATE USER 'capuser'@'localhost'
  IDENTIFIED BY 'securepass';

GRANT ALL PRIVILEGES ON capstone_db.*
  TO 'capuser'@'localhost';

FLUSH PRIVILEGES;
EXIT;
Linux terminal:nslookup winserver.teamx.localServer: 192.168.0.15
Address: 192.168.0.15#53
Name: winserver.teamx.local
Address: 192.168.0.15
If this fails but ping 192.168.0.15 works, the client is still pointed at pfSense (192.168.0.1) for DNS — switch its DNS to the WinSrv address (192.168.0.15) so it queries your zone, then re-test.
DHCP lease check
Spin up a fresh Windows 10/Kali/Ubuntu VM on vmbr1 → set NIC to DHCP.
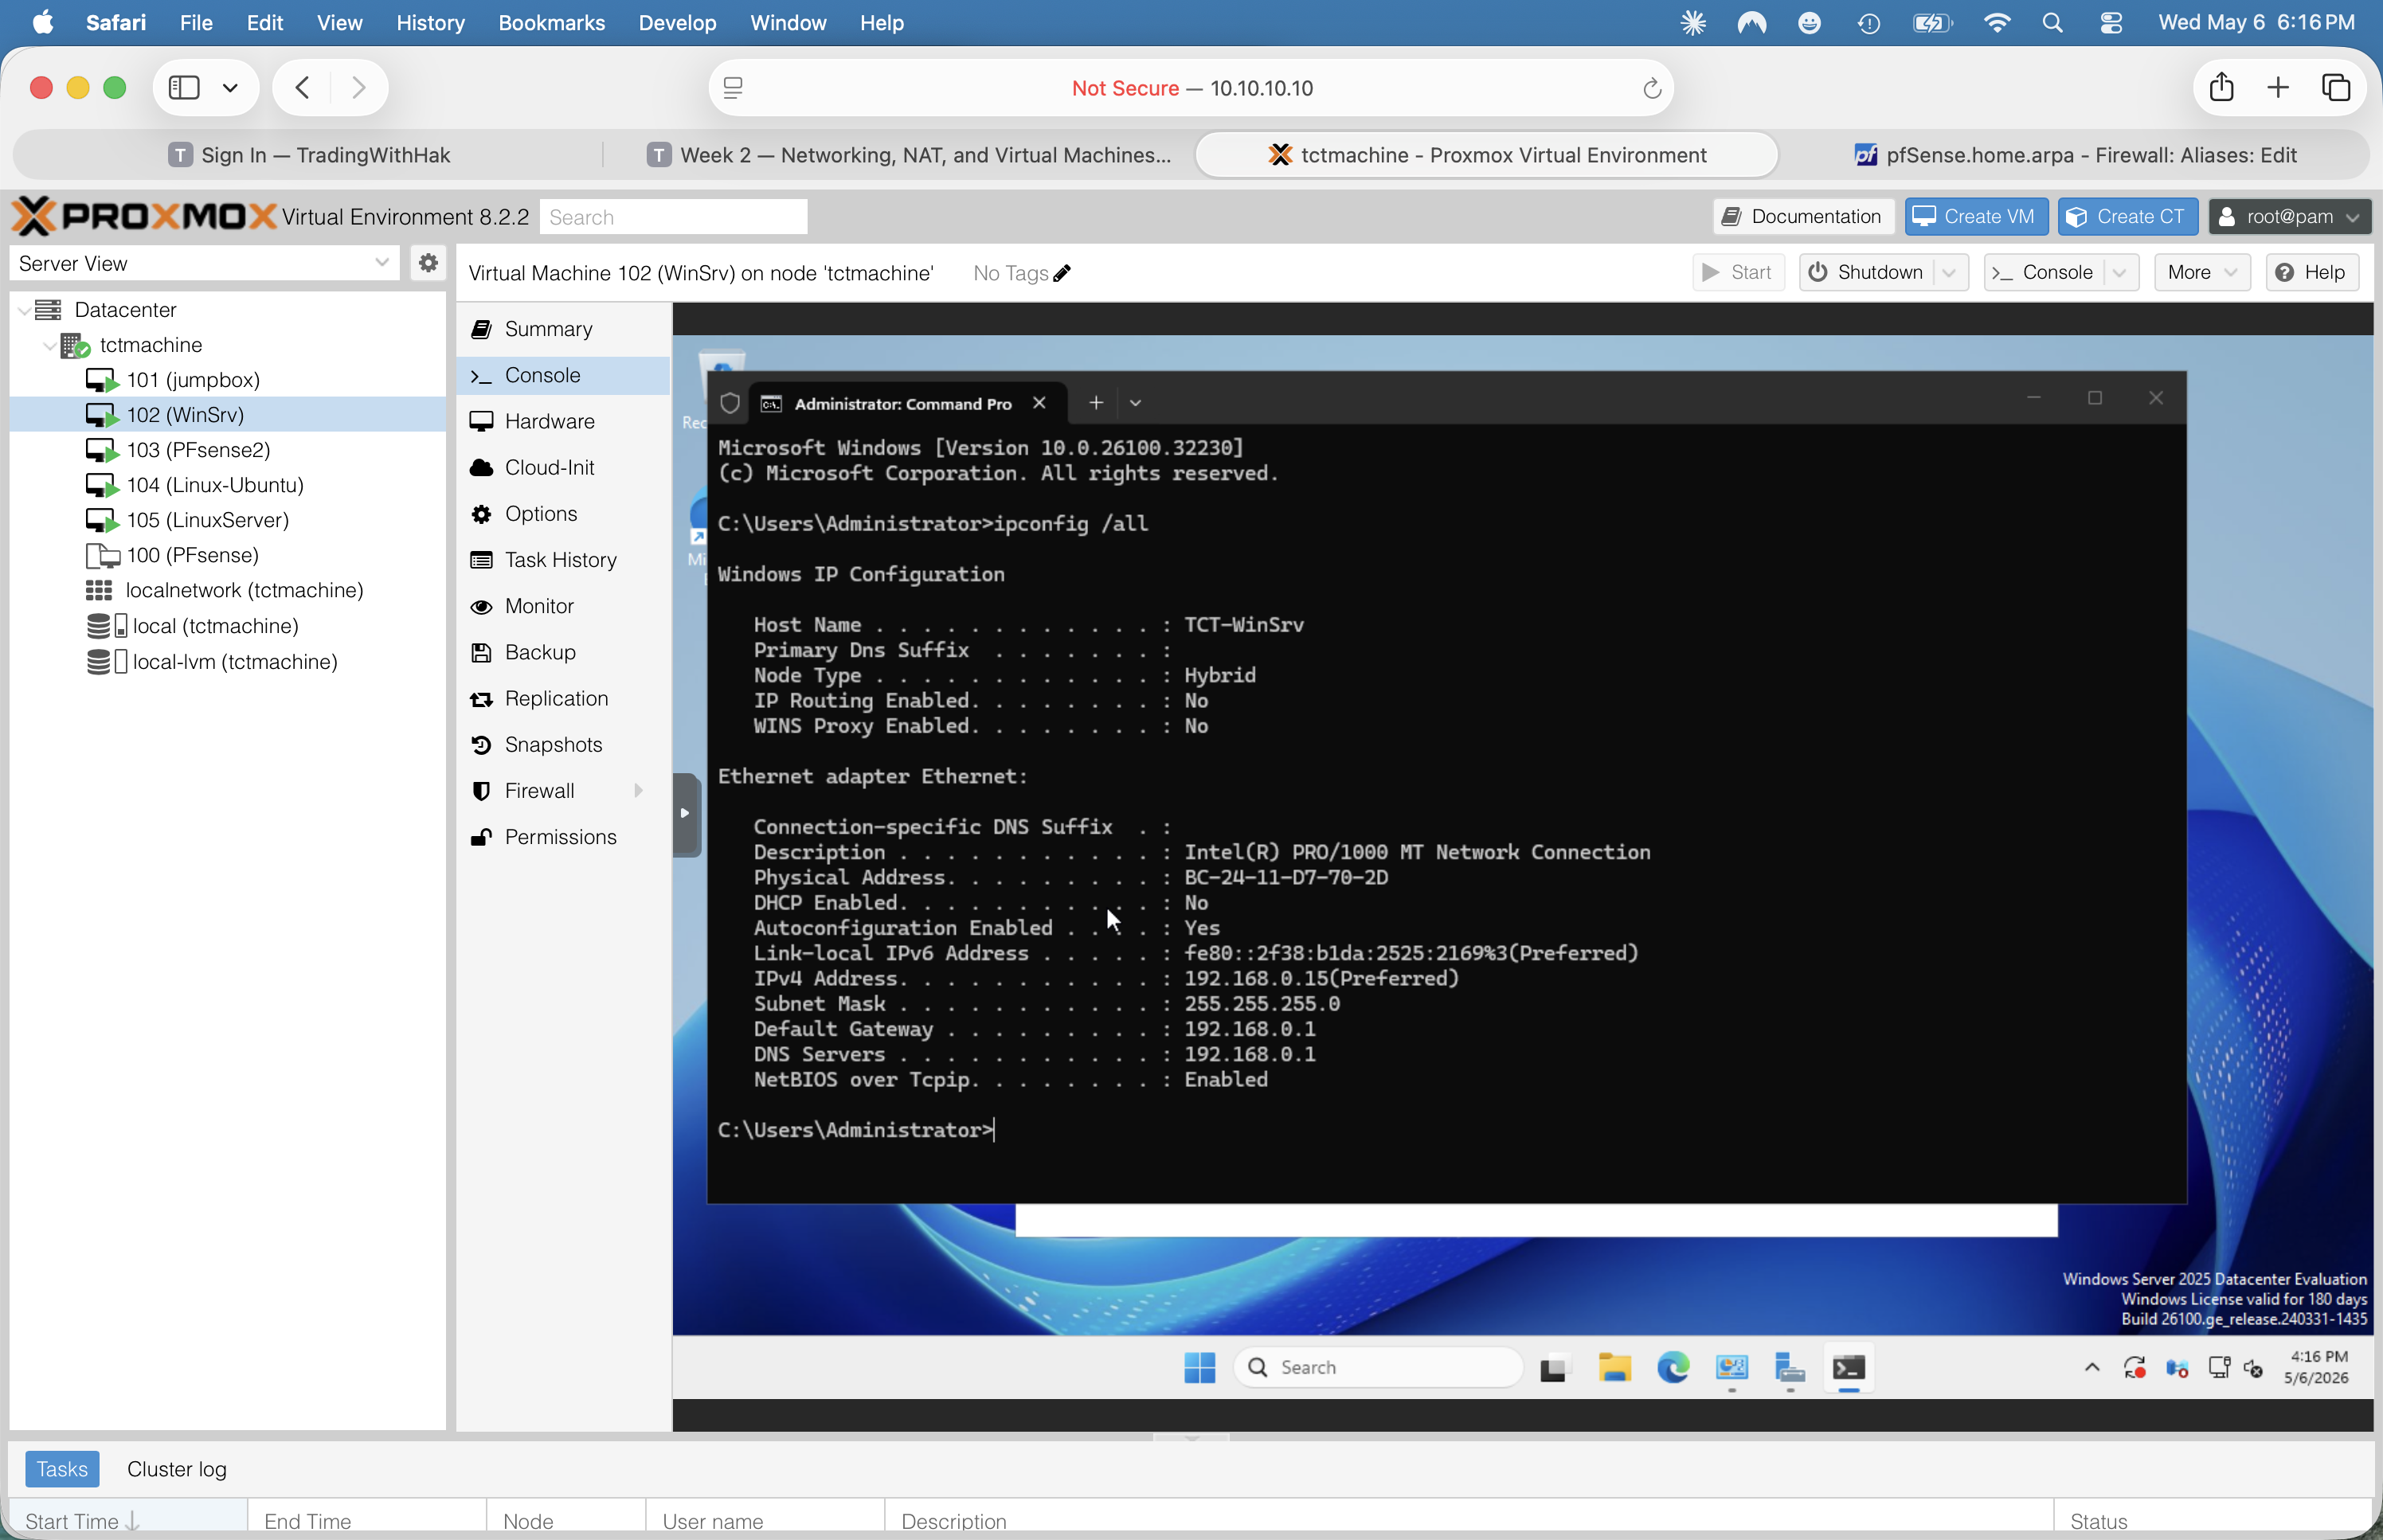
Record the leased IP:ipconfig /all | findstr IPv4IPv4 Address . . . . : 192.168.0.101
📸 Screenshot the DHCP Address Leases on the Windows server showing the client's MAC & IP.
For the Report
Test Summary Table
Test
Expected
Actual
Pass / Fail
Screenshot
Ping Proxmox host → Jump Box
< 5 ms
___ ms
☐
☐
Ping Jump Box → Win VM
< 5 ms
___ ms
☐
☐
Ping Jump Box → Linux VM
< 5 ms
___ ms
☐
☐
Win VM ping 8.8.8.8
< 30 ms
___ ms
☐
☐
Linux VM curl ifconfig.me
School public IP
_________
☐
☐
nslookup winserver.teamx.local
192.168.0.15
_________
☐
☐
DHCP lease issued to client
IP in .10–.100 range
_________
☐
☐
Browse http://192.168.0.15
"Welcome to Week 2!"
rendered Y/N
☐
☐
Browse http://192.168.0.20
"Welcome to Linux Week 2"
rendered Y/N
☐
☐
SHOW DATABASES; via capuser
capstone_db listed
_________
☐
☐
Deliverables
What to hand in
📄 Week 2 Report (PDF or Word)
Cover page — week #, team name, all 4 roles + names