Networking, NAT, and Virtual Machines
What Week 2 covers
Last week we ended with a working hypervisor and an empty network. This week we give it segments, routing rules, and three virtual machines that talk to each other on purpose — plus one extra-credit firewall appliance.
Required
- Three virtual bridges — vmbr0 (mgmt), vmbr1 (DMZ), vmbr2 (LAN)
- IP forwarding turned on in the kernel
- NAT (Network Address Translation) on the Proxmox host so internal subnets reach the school network
- One DNAT (Destination NAT) rule on the host to expose SSH to the Jump Box
- Jump Box — single hardened entry point for administrators
- Windows Server — internal DNS for capstone.local
- Linux Server — general-purpose Ubuntu Server VM
Extra credit
- pfSense — open-source firewall and router VM
- Replaces the host's iptables routing role with a real firewall appliance
- Centralizes NAT, DHCP, and inter-zone rules in one web interface
- Closer to how a real enterprise network is laid out
The required plan stands on its own. The extra credit replaces the perimeter logic, not the VMs behind it.
Acronym key (we will use these a lot)
Quick reference now so the rest of the deck reads clean. A fuller glossary lives on the last slide.
Two topologies — required vs. extra credit
Same hardware, two paths through it. The instructor's plan keeps routing on the host. The extra-credit pfSense build moves perimeter duty into a dedicated firewall appliance.
Both paths give the same end result: three segmented zones, NAT to the school network, one entry point for SSH. The difference is where the routing logic lives — and how realistic it looks.
Step 1 · Three virtual bridges
A vmbr (virtual machine bridge) is a software switch inside Proxmox. Each VM is plugged into one. We need three.
Edit /etc/network/interfaces and reload with ifreload -a.
# vmbr0 — management, bridges to the physical NIC eno1
auto vmbr0
iface vmbr0 inet static
    address  10.10.10.10/16
    gateway  10.10.10.1
    bridge-ports eno1
    bridge-stp off
    bridge-fd  0

# vmbr1 — DMZ, no physical port (internal only)
auto vmbr1
iface vmbr1 inet static
    address  172.16.0.10/24
    bridge-ports none

# vmbr2 — LAN, no physical port
auto vmbr2
iface vmbr2 inet static
    address  192.168.0.10/24
    bridge-ports none
Why no bridge-ports on vmbr1 and vmbr2
Those bridges have no physical cable. They exist only inside the host — VMs talk to each other on them, and the host itself has an IP on them so it can route. This is the whole point of segmentation: traffic cannot leave the bridge except through a rule we write.
Step 2 · Turn on IP forwarding
By default Linux refuses to pass packets between interfaces. Routers route. To turn the Proxmox host into a router, we flip one switch.
# Right now (until next reboot)
sudo sysctl -w net.ipv4.ip_forward=1

# Permanently — uncomment this line in /etc/sysctl.conf
net.ipv4.ip_forward=1

# Verify
cat /proc/sys/net/ipv4/ip_forward
# expected output: 1
Plain English
Without forwarding, vmbr1 and vmbr2 are like two rooms with no doorway. With forwarding plus NAT rules, the host becomes the doorway — packets from 192.168.0.0/24 can leave through vmbr0 and reach the school network.
Step 3 · Outbound NAT (MASQUERADE)
NAT (Network Address Translation) rewrites IP addresses on packets as they cross the router. MASQUERADE is a flavor of source NAT that uses whatever address vmbr0 currently has — convenient because we don't have to hard-code 10.10.10.10.
# Add the rules
sudo iptables -t nat -A POSTROUTING -s 172.16.0.0/24  -o vmbr0 -j MASQUERADE
sudo iptables -t nat -A POSTROUTING -s 192.168.0.0/24 -o vmbr0 -j MASQUERADE

# Persist them across reboots
sudo apt install iptables-persistent
sudo netfilter-persistent save
What this fixes
- A VM at
192.168.0.3tries to reach1.1.1.1 - The school router has no idea where
192.168.0.3is - MASQUERADE rewrites the source to
10.10.10.10on the way out - The reply comes back, the host rewrites it again, the VM gets its answer
How to read the rule
-t nat— the NAT table-A POSTROUTING— apply on the way out-s 192.168.0.0/24— only for packets from the LAN subnet-o vmbr0— only when leaving via vmbr0-j MASQUERADE— rewrite the source address
Step 4 · Inbound port forward (DNAT)
DNAT (Destination Network Address Translation) rewrites where a packet is going. We use it to expose a single internal service — SSH on the Jump Box — to the school network.
# Anything hitting the host on TCP 2222 → forward to the Jump Box's SSH
sudo iptables -t nat -A PREROUTING -i vmbr0 -p tcp --dport 2222 \
   -j DNAT --to-destination 172.16.0.5:2222

# And explicitly allow the forwarded traffic
sudo iptables -A FORWARD -p tcp -d 172.16.0.5 --dport 2222 -j ACCEPT

sudo netfilter-persistent save
From your laptop on the school network: ssh -p 2222 [email protected] reaches the Jump Box. The Jump Box never has a public address, and only port 2222 is exposed.
One placement decision to make
The instructor's guide DNATs to 192.168.0.2:22, assuming the Jump Box is on the LAN. Our build puts it on the DMZ at 172.16.0.5. Pick one and document it — having both rules will create asymmetric routes that fail in confusing ways.
Step 5 · Upload three installer images
An ISO is a single-file image of an installer disk. Proxmox stores them in the local storage and attaches them as virtual CD/DVD drives.
| Image | Used by | Approximate size |
|---|---|---|
| Ubuntu Server 24.04 LTS LTS = Long Term Support | Jump Box, Linux Server | ~2.5 GB |
| Windows Server 2022 Evaluation | Windows Server VM | ~5 GB |
| pfSense CE 2.8.1 (Netgate installer) CE = Community Edition | pfSense VM (extra credit) | ~750 MB |
Proxmox web UI → local (tctmachine) → ISO Images → Upload. Verify SHA-256 checksums after upload.
The virtual machines at a glance
| VM ID / Name | Bridge(s) | IP / Gateway | Role |
|---|---|---|---|
| 100 / PFsense extra credit | vmbr0 + vmbr1 + vmbr2 | WAN 10.10.110.10/16 LAN 172.16.0.20/24 OPT1 192.168.0.1/24 | Edge firewall, NAT, DHCP, DNS forwarder |
| 101 / jumpbox | vmbr1 (DMZ) | 172.16.0.5/24 gw 172.16.0.20 | Single SSH entry point (port 2222) |
| 102 / WinSrv | vmbr2 (LAN) | 192.168.0.2/24 gw 192.168.0.1 | DNS for capstone.local |
| 103 / linuxsrv planned | vmbr2 (LAN) | 192.168.0.3/24 gw 192.168.0.1 | General workload |
Why pfSense lives on three bridges
A firewall sits between networks. pfSense bridges all three: WAN (vmbr0) faces the school network, LAN (vmbr1) faces the DMZ where the Jump Box lives, and OPT1 (vmbr2) faces the private LAN where the servers live. Traffic between any two zones must pass through pfSense's rules.
pfSense — extra credit deliverable
pfSense is a free, open-source firewall and router built on FreeBSD. The name means roughly "packet filter sense" — packet filter is the underlying engine. We're standing it up as the extra-credit perimeter device.
What it gives us
- A real firewall with a clean web interface
- DHCP server for the LAN (
192.168.0.100–.200) - DNS forwarding for clients
- Stateful packet inspection between WAN and LAN
- Logging and traffic graphs
Why it's worth the extra credit
- Replaces host iptables with an industry-standard appliance
- Same skills transfer to OPNsense, Fortinet, Cisco ASA, Palo Alto
- Centralizes NAT, DHCP, and firewall rules in one place to demo
- Console-based first boot teaches network configuration plainly
- Free and well-documented
Required path still stands
If pfSense isn't running on demo day, the lab still meets the Week 2 deliverables — host iptables NAT + Jump Box covers the requirement. pfSense is additive, not load-bearing.
pfSense — VM specs and first boot
Built as VM 100 on the Proxmox node tctmachine, running pfSense 2.8.1-RELEASE (amd64) on the Netgate installer.
Specifications
| Field | Value |
|---|---|
| VM ID / Name | 100 / PFsense |
| vCPU | 2 |
| RAM (Memory) | 2 GB |
| Disk | 20 GB on local-lvm |
| NIC 1 (WAN) | VirtIO on vmbr0 → vtnet0 |
| NIC 2 (LAN) | VirtIO on vmbr1 → vtnet1 |
| NIC 3 (OPT1) | VirtIO on vmbr2 → vtnet2 |
NIC = Network Interface Card. VirtIO is the paravirtualized driver Proxmox prefers — pfSense 2.8.1 names them vtnet0 / 1 / 2 in the order they appear in the VM hardware list.
Console — assign & address
WAN interface name:   vtnet0
LAN interface name:   vtnet1
Optional 1:           vtnet2

Then option 2 — Set IP addresses:

WAN  : 10.10.110.10/16
       gw 10.10.10.1
LAN  : 172.16.0.20/24
       (serves the DMZ)
OPT1 : 192.168.0.1/24
       (serves the private LAN)
       DHCP .100 – .200
Verify in the console banner — it should match the topology slide exactly.
About the LAN / OPT1 naming
pfSense calls the second NIC "LAN" and the third "OPT1" by default — those are just labels for firewall rules. Functionally our DMZ lives on the interface pfSense calls LAN, and our private LAN lives on OPT1. Optional cleanup: rename them in Interfaces → Assignments if you want the names to match conventional labels.
pfSense — live console (proof of build)
Captured 2026-05-01 from the Proxmox Console tab on VM 100. Three interfaces assigned, three IP addresses set, web admin reachable from the host.
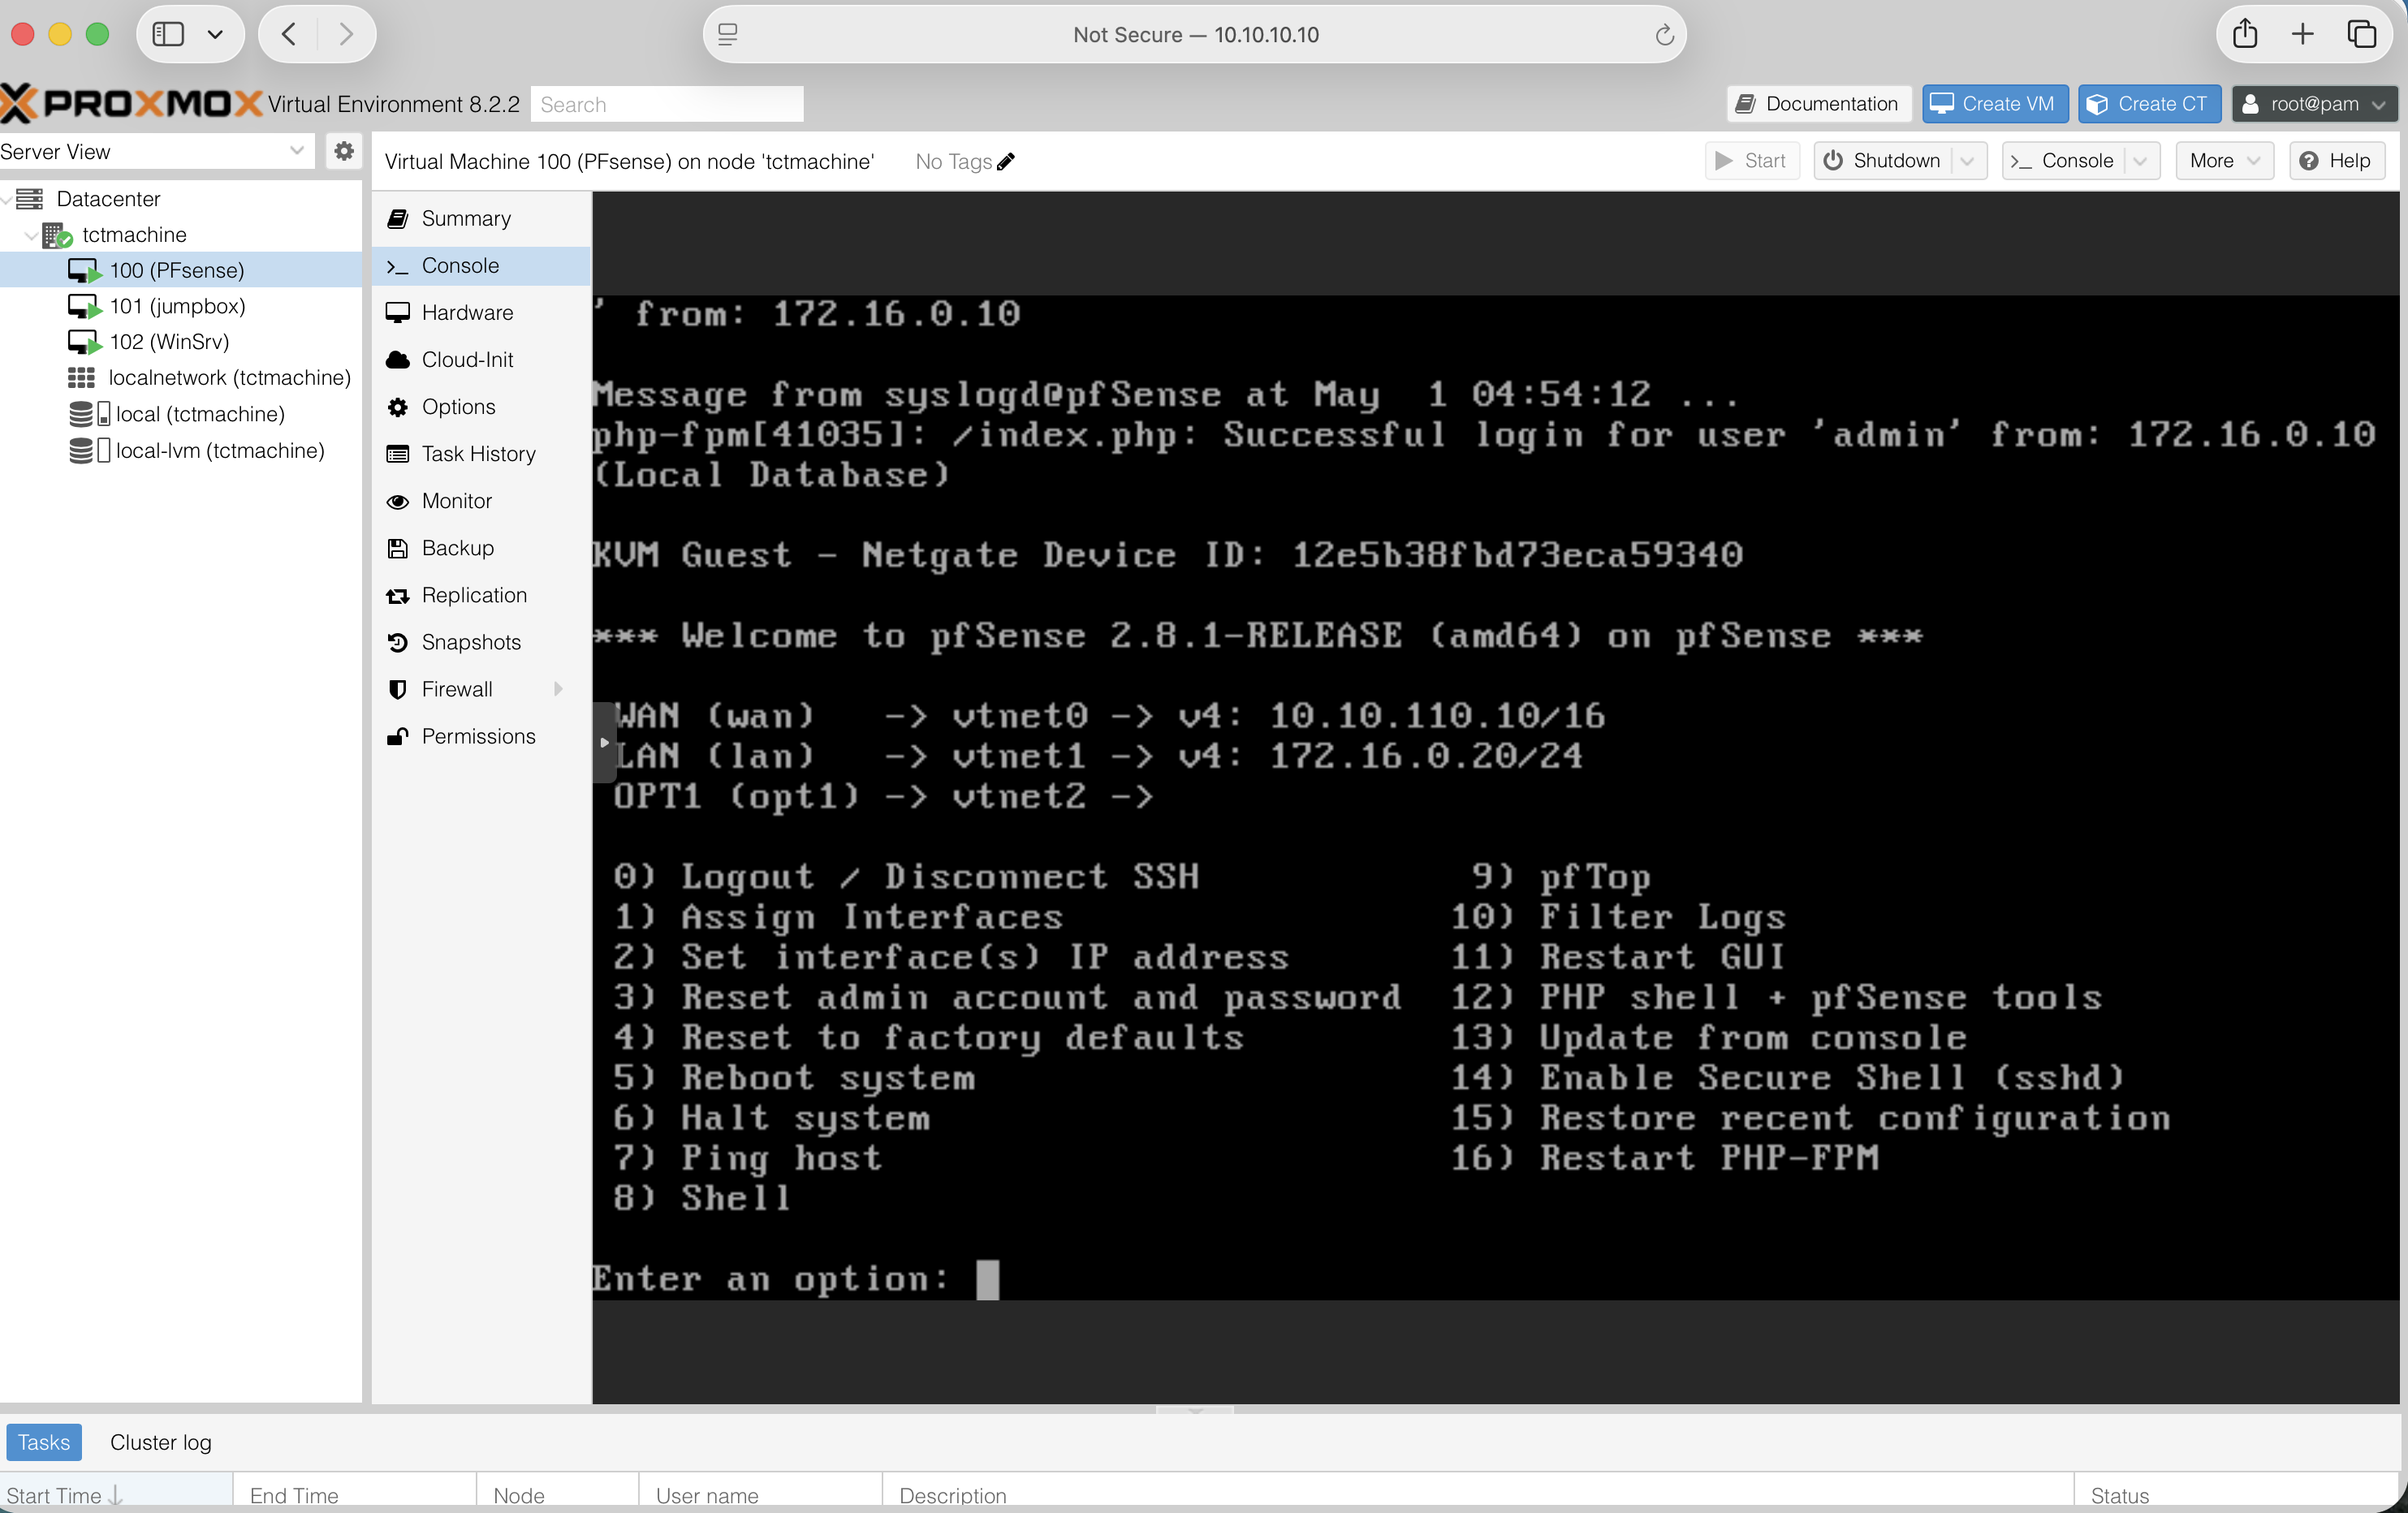
tctmachine12e5b38f…10.10.110.10/16, LAN 172.16.0.20/24, OPT1 (vtnet2) ready172.16.0.10 (Proxmox host on vmbr1)pfSense — web UI dashboard (proof of build)
Logged into the pfSense web administrator from the Proxmox host. Status / Dashboard reports a healthy system, version current, both interfaces link-up, and resources well within VM allocation.
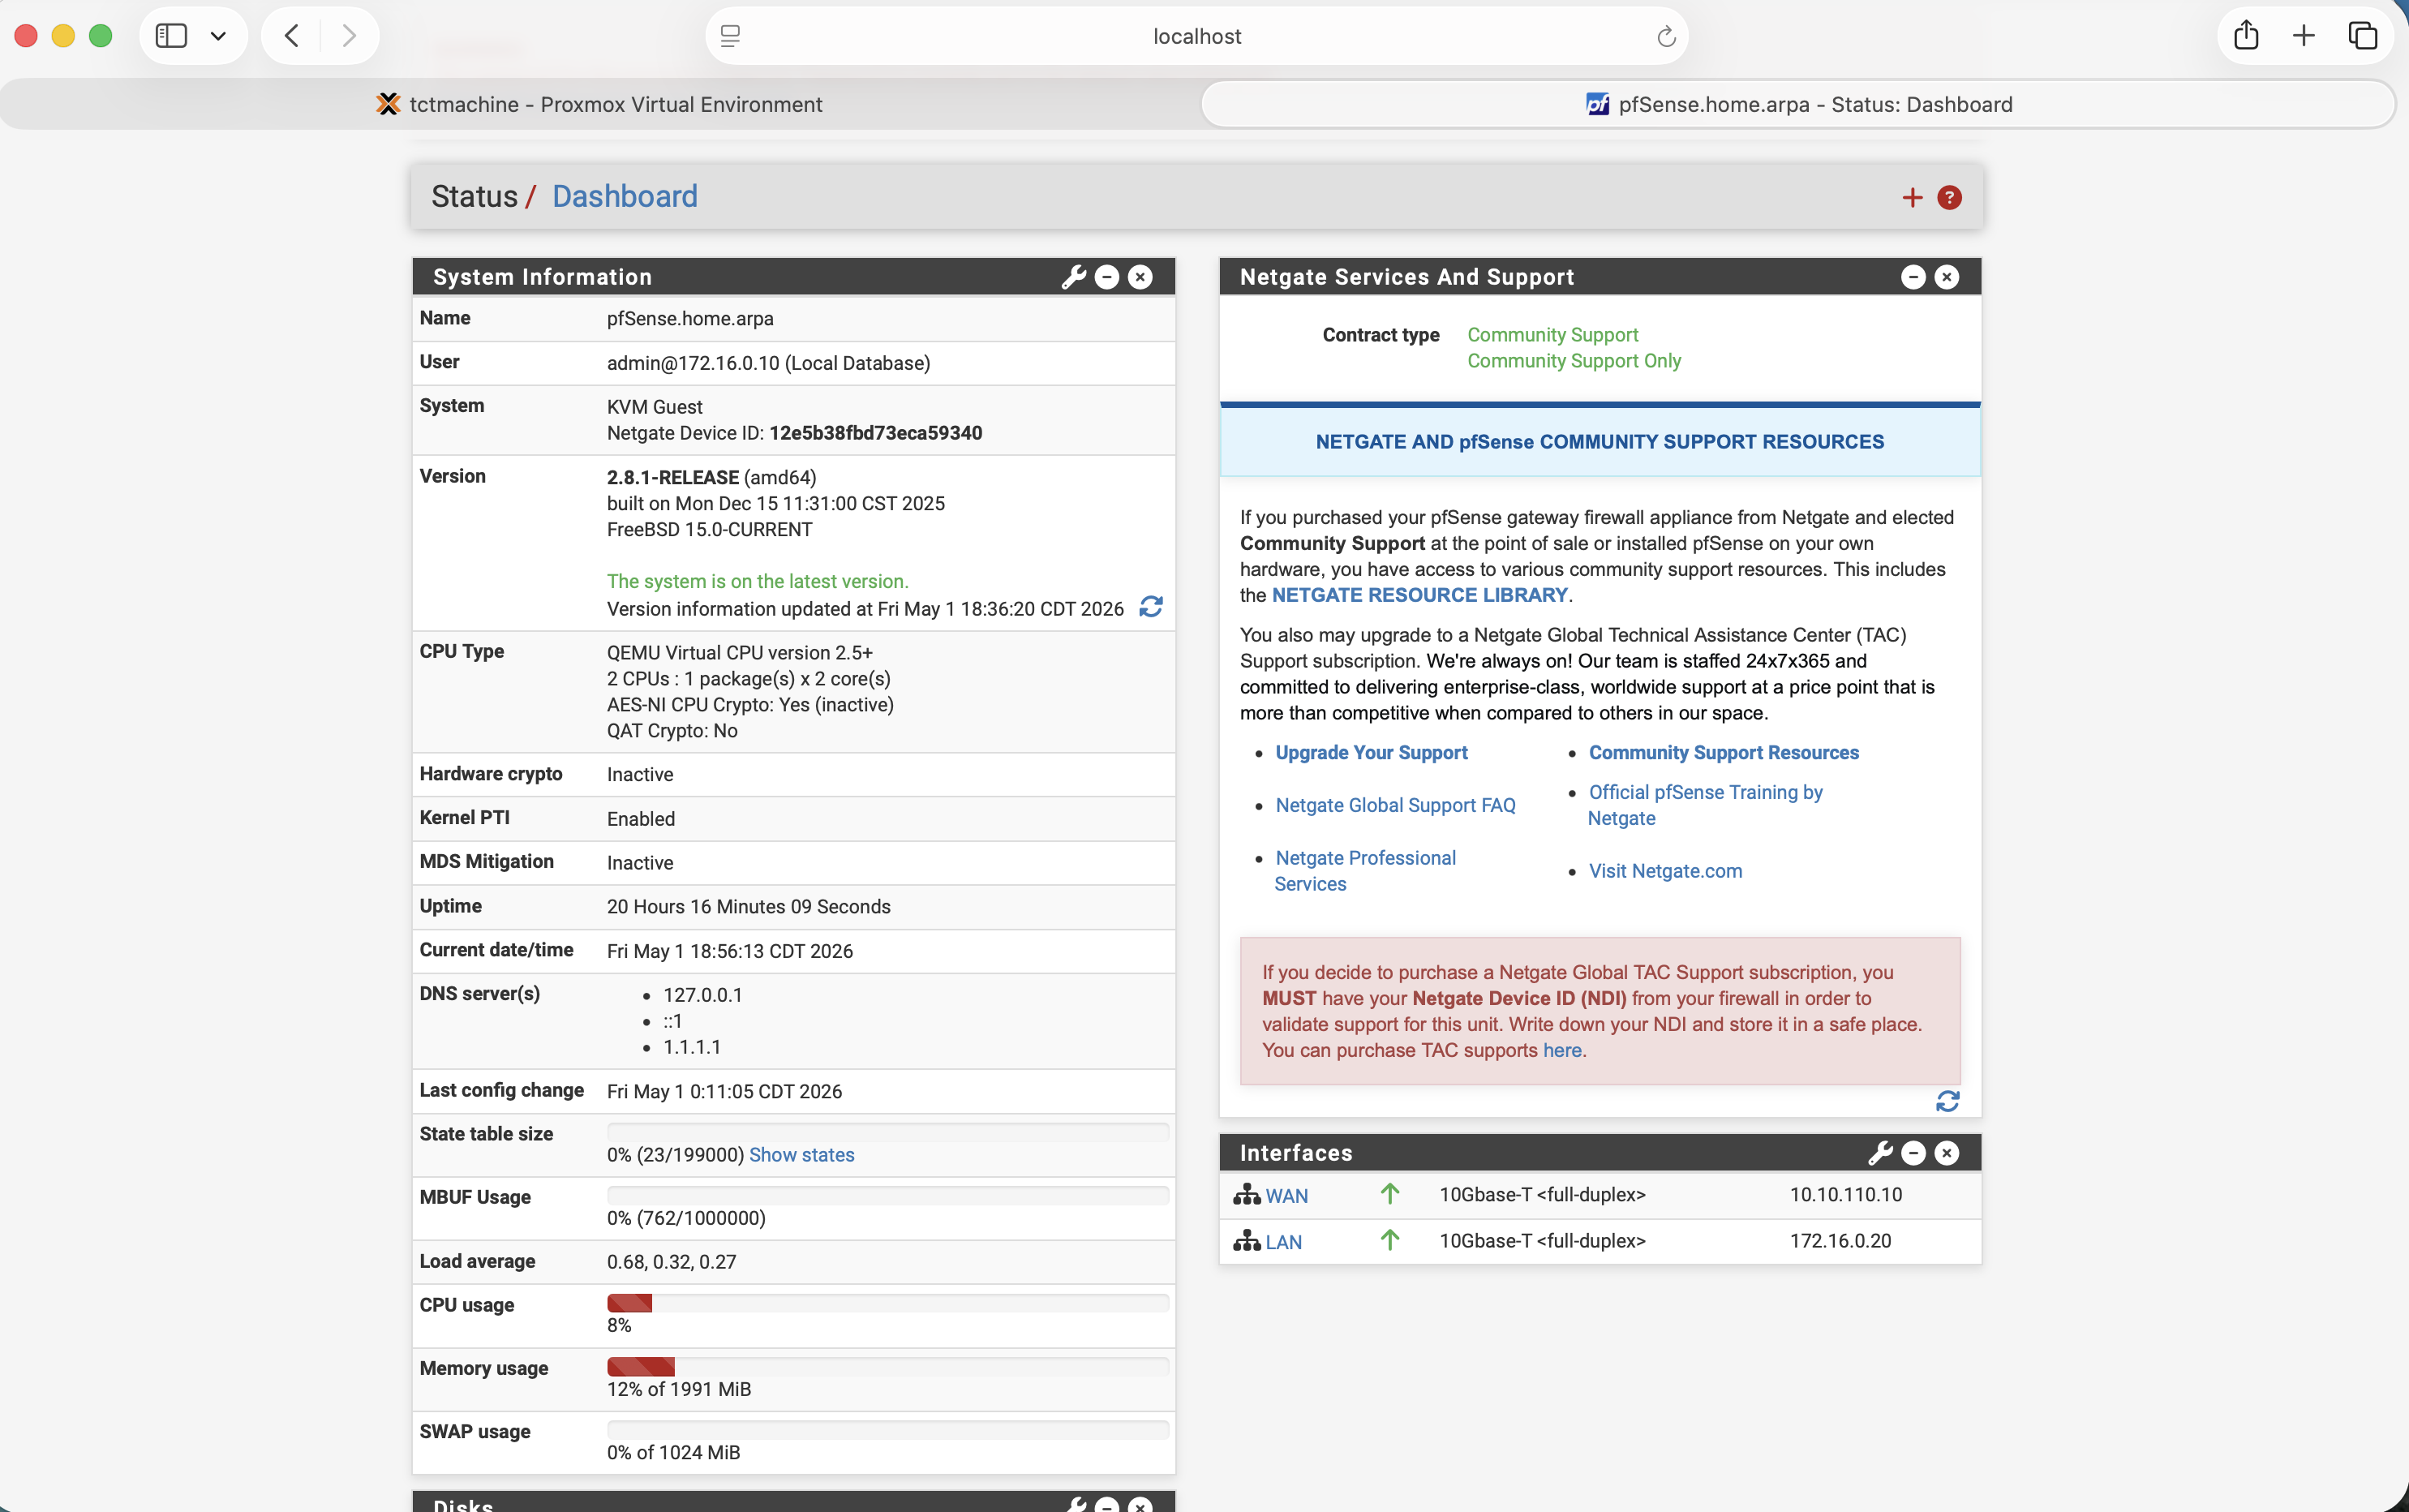
pfSense.home.arpa · admin logged in from 172.16.0.10 · Netgate Device ID 12e5b38f…10.10.110.10 ↑ · LAN 172.16.0.20 ↑ · both 10Gbase-T full-duplex127.0.0.1 · ::1 · 1.1.1.1 upstream resolver wiredpfSense — the one gotcha to remember
Out of the box, pfSense's WAN interface drops anything from RFC1918 private addresses. In a normal home network that's correct. In a lab where the WAN is a private subnet, it silently kills every packet.
In the web wizard (or later under Interfaces → WAN):
- Uncheck "Block private networks and loopback addresses"
- Uncheck "Block bogon networks"
What is RFC1918, what is a bogon
RFC1918 is Request for Comments document number 1918 — it defines the three private IP ranges (10.0.0.0/8, 172.16.0.0/12, 192.168.0.0/16) that are not routable on the public internet. A bogon is an IP range that should never appear on the public internet — unallocated space, reserved blocks, or addresses that haven't been assigned. Both checks exist to drop spoofed traffic on a real WAN. They get in the way in a lab.
Jump Box — short recap
Covered in depth in last week's deck. The shortest version, for anyone joining cold:
What it is
- Ubuntu Server 24.04 on vmbr1
- Static IP
172.16.0.5/24, gateway172.16.0.10(the host) - SSH moved to port 2222, root login disabled, key-only authentication
- UFW (Uncomplicated Firewall) allows SSH only from the management and DMZ subnets
What it gives us
- One single point of administrative entry
- Internal LAN servers never need to be reachable from outside
- Centralized SSH logging and auditability
- Smaller surface to harden, monitor, and patch
Windows Server 2022 — the DNS authority
DNS (Domain Name System) turns names like linuxsrv.capstone.local into IP addresses. Inside the lab, every VM points to this Windows Server first.
VM specs
- vCPU
- 2
- RAM
- 2 GB (4 GB if available)
- Disk
- 40 GB on local-lvm
- NIC
- VirtIO on vmbr2
- IP
- 192.168.0.2/24
- Gateway
- 192.168.0.1 (pfSense LAN)
- DNS
- 127.0.0.1 (it serves itself)
What we install
- Server Manager → Add Roles → DNS Server
- Forward lookup zone for
capstone.local - A records for each VM (jumpbox, linuxsrv, pfsense, winsrv)
- Forwarder set to
1.1.1.1for anything outsidecapstone.local
Optional: also promote it to a Domain Controller for Active Directory in a later week.
Linux Server — general workload
Same Ubuntu install as the Jump Box, but it lives on the LAN and isn't hardened down. It's the “normal” server — anything we'd put behind the firewall in a real environment.
| Field | Value |
|---|---|
| VM ID / Name | 103 / linuxsrv |
| OS | Ubuntu Server 24.04 LTS |
| vCPU / RAM / Disk | 2 / 2 GB / 25 GB |
| Bridge | vmbr2 |
| IP | 192.168.0.3/24 |
| Gateway | 192.168.0.1 (pfSense) |
| DNS | 192.168.0.2 (Windows Server) |
After install: sudo apt update && sudo apt upgrade, set hostname to linuxsrv, install net-tools, nmap, and the SSH server.
Reverse routes — the easy thing to forget
A LAN VM's gateway is pfSense. pfSense doesn't know about the DMZ, only the host does. So we tell each LAN VM "for anything in 172.16.0.0/24, ignore the default gateway and use the host directly."
Linux (one-time test)
sudo ip route add 172.16.0.0/24 via 192.168.0.1
Linux (persistent in netplan)
routes:
  - to: 172.16.0.0/24
    via: 192.168.0.1
Windows Server (admin PowerShell)
route -p add 172.16.0.0 ^
  mask 255.255.255.0 ^
  192.168.0.1
The -p makes the route persistent across reboots.
Pf Sense becomes the doorway — but the doorway also has to know which other rooms exist.
Verification — the demo runbook
Five tests in five minutes. Each one proves a specific layer is doing its job.
- Bridges are up — Proxmox UI shows vmbr0, vmbr1, vmbr2 all Active = Yes, Autostart = Yes.
- Forwarding + NAT — from the Linux Server:
ping 1.1.1.1succeeds. (Tests the host's MASQUERADE.) - DNS — from the Linux Server:
nslookup linuxsrv.capstone.local 192.168.0.2returns192.168.0.3. - pfSense web UI — from the Linux Server:
https://192.168.0.1loads. - Inbound DNAT — from a separate laptop on the school network:
ssh -p 2222 [email protected]lands on the Jump Box.
Where Week 2 leaves us
Required — done
- Three-zone segmented network on a single host
- NAT outbound on host for both internal subnets
- DNAT inbound on host for SSH to Jump Box
- Three VMs operational, named, addressed, talking
- Internal DNS authority for capstone.local
Extra credit — done
- pfSense VM stood up with WAN / DMZ / LAN interfaces
- Firewall rules, DHCP, and DNS forwarding configured
- Topology re-pointed so pfSense is the perimeter device
Coming weeks
- Promote Windows Server to a Domain Controller (Active Directory)
- Group Policy for the Linux and Windows clients
- Backup target with PBS (Proxmox Backup Server)
- Monitoring — uptime, disk, traffic graphs in pfSense
- Documentation pass — IT asset sheet, network diagram in Cisco Packet Tracer