Building a 3-Zone Lab on a Single Server
What to build, how to build it, and how to teach someone else.
Mental model — what we're actually building
Before any hardware or software, get the picture in your head. Everything that follows is one of seven moving parts; if you can sketch all seven on a napkin, you can teach this.
One sentence
We are taking one physical server and turning it into a small enterprise network with three security zones, one perimeter firewall, and three internal servers — all virtual, all on the same box.
The seven parts
- The server — an HPE ProLiant ML350p Gen8, with a hardware RAID controller, ECC memory, redundant power supplies. The "iron."
- The hypervisor — Proxmox VE (Virtual Environment) 8.2, a Debian-based operating system that runs other operating systems as virtual machines (VMs).
- Three virtual bridges — software switches inside Proxmox that act like three separate physical networks: management (vmbr0 — virtual machine bridge 0), DMZ (Demilitarized Zone, on vmbr1), and private LAN (Local Area Network, on vmbr2).
- Routing rules — either iptables on the Proxmox host (required path) or pfSense (extra credit) — to control which traffic can cross which zone. pfSense (roughly “packet filter sense”) is a free firewall built on FreeBSD.
- Jump Box — a hardened Ubuntu Server in the DMZ; the only door an administrator uses.
- Windows Server — a domain-style server in the LAN providing DNS (Domain Name System) for the internal hostnames.
- Linux Server — a general-purpose Ubuntu Server in the LAN, the workload host.
Three zones, three jobs
| Zone | Subnet | Job | Lives there |
|---|---|---|---|
| Management | 10.10.10.10/16 | How admins reach the host. Bridged to the school network. | Proxmox web UI |
| DMZ | 172.16.0.0/24 | Buffer zone. Only the Jump Box lives here. | Jump Box |
| LAN | 192.168.0.0/24 | Trusted internal. Cannot be reached directly from outside. | Win Server, Linux Server |
Why we build it this way
- Segmentation. If a workstation is compromised, attackers don't automatically get the database. Three zones means three firewalls between attacker and crown jewels.
- One way in. Administrative access flows through the Jump Box. One host to monitor, one place to log, one auth path to harden.
- Virtualization. One physical server can host every component. Cheaper, faster to rebuild, easy to snapshot.
- Realism. This is roughly what a small business with one server room looks like. The pattern scales up — the school's real network is the same idea with more boxes.
If you can draw the seven parts and describe each zone's job, you can teach this. Every step in the walkthrough below maps to one of the seven. When something breaks, ask: which of the seven am I in, and what's it not doing?
Hardware setup — HPE ProLiant ML350p Gen8
A physical server is just a quiet computer with weird keystrokes and a different BIOS. The work in this phase is: power it on, configure RAID, and confirm the hardware is healthy before you install anything.
Goal
Hardware-validated, RAID (Redundant Array of Independent Disks) level 5 logical drive present, ready to boot a Proxmox installer.
Why it matters
Everything from this phase forward sits on top of the disks you configure here. If the array is built wrong, every snapshot, every VM (Virtual Machine), every config file lives on a structure you have to redo from scratch. Get this right, get it once.
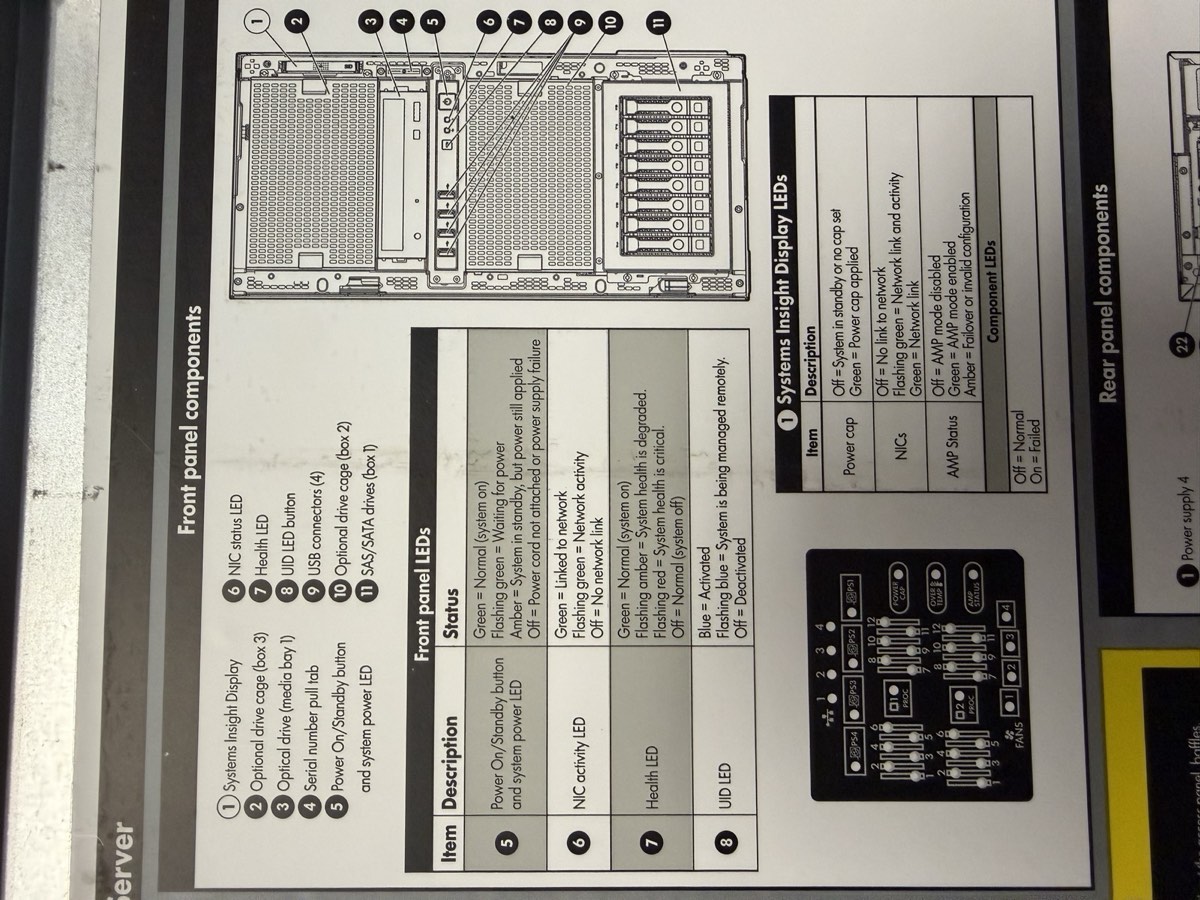
Know your hardware
Before pressing any buttons, learn the parts. Three reference labels live inside the chassis itself — open the side panel and they're printed on the underside.
The drives, RAM, and PSUs are the parts you most often replace or upgrade.
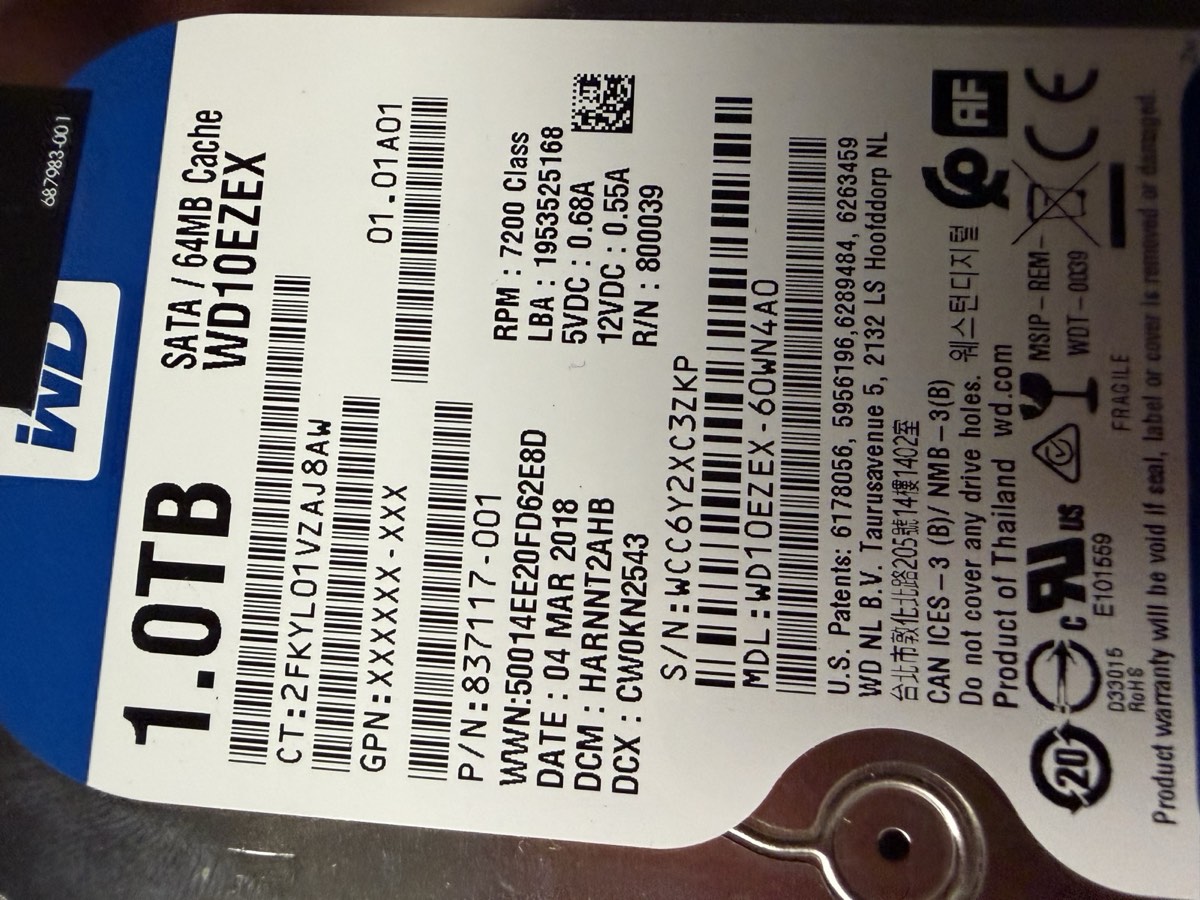
WD10EZEX, the SATA connector, the 3.5" form factor.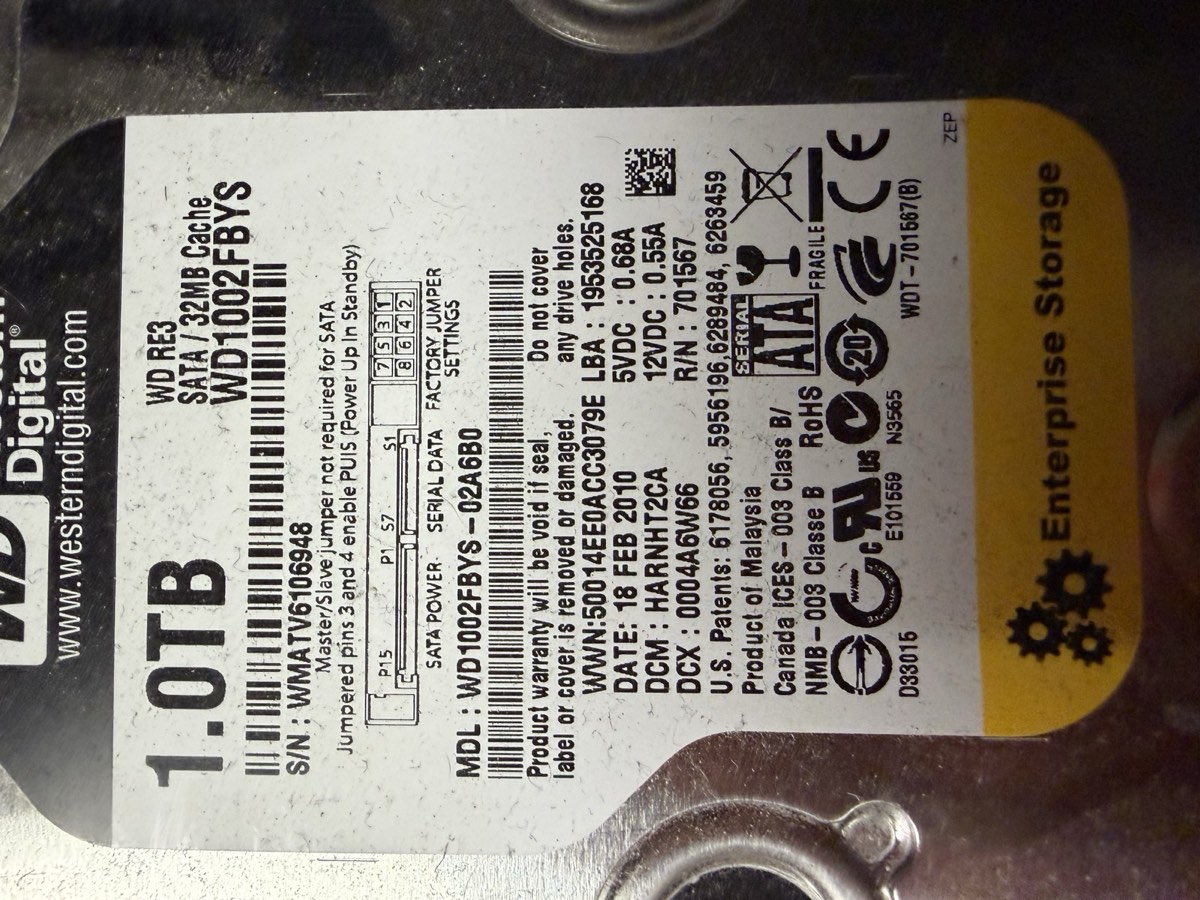
WD1002FBYS, “RE3” sticker.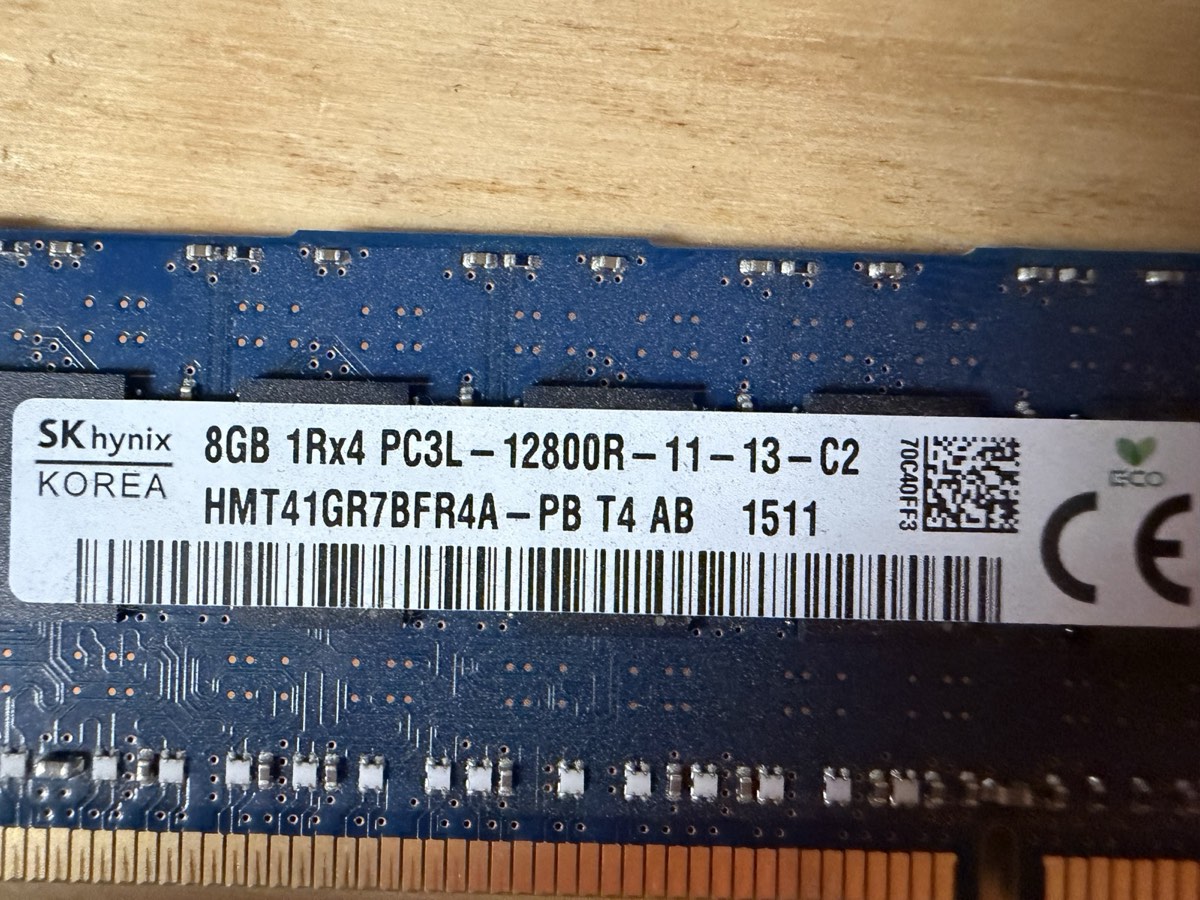
HMT41GR7BFR4A on the label and the gold contact pins along the bottom edge.
HSTNS-PL14) in 1+1 configuration — pull either one and the server keeps running. Look for: the green LED on the back when seated and powered. No green = bad PSU or no AC (Alternating Current — wall power).Function keys you need to know
POST = Power-On Self Test, the firmware health check that runs immediately after power-on. The function-key prompts appear during POST.
| Key (at POST) | What it opens |
|---|---|
| F8 | ORCA — Option ROM Configuration for Arrays. The Smart Array P420i RAID utility. |
| F9 | System Utilities (BIOS — Basic Input/Output System; HPE calls theirs RBSU, ROM-Based Setup Utility, on Gen8). NOT F2. |
| F10 | Intelligent Provisioning — HPE's (Hewlett Packard Enterprise) all-in-one setup tool, includes Smart Storage Administrator. |
| F11 | One-time boot menu. |
Steps
-
Power on and watch POST.
Press the front power button. Watch for the HP splash screen. The white text at the bottom shows the function-key options as they become available — POST is fast, so don't blink.
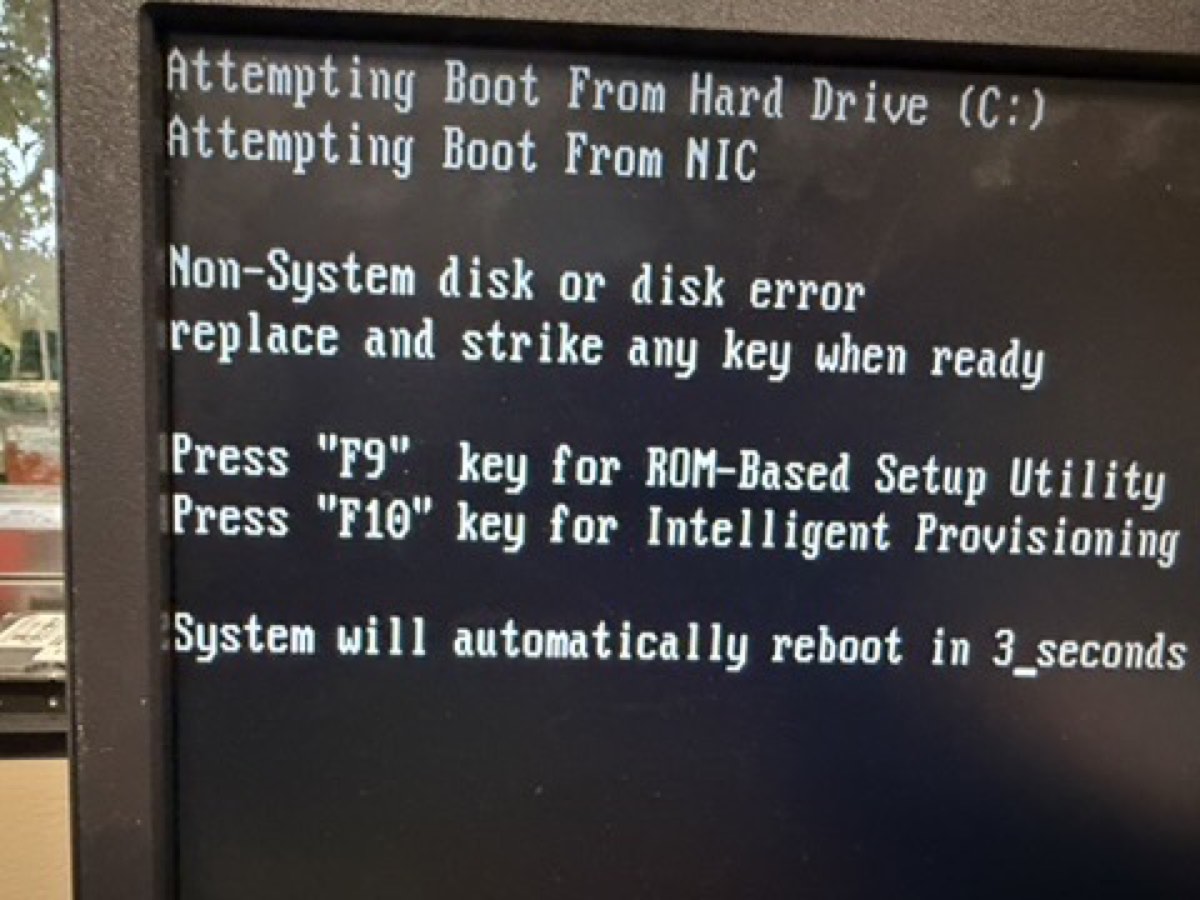
What POST looks like. Hardware inventory scrolling: memory, processors, RAID controller. Look for: the line that prints total RAM and the “Slot 0 Drive Array Not Configured” warning — that's expected on first boot. 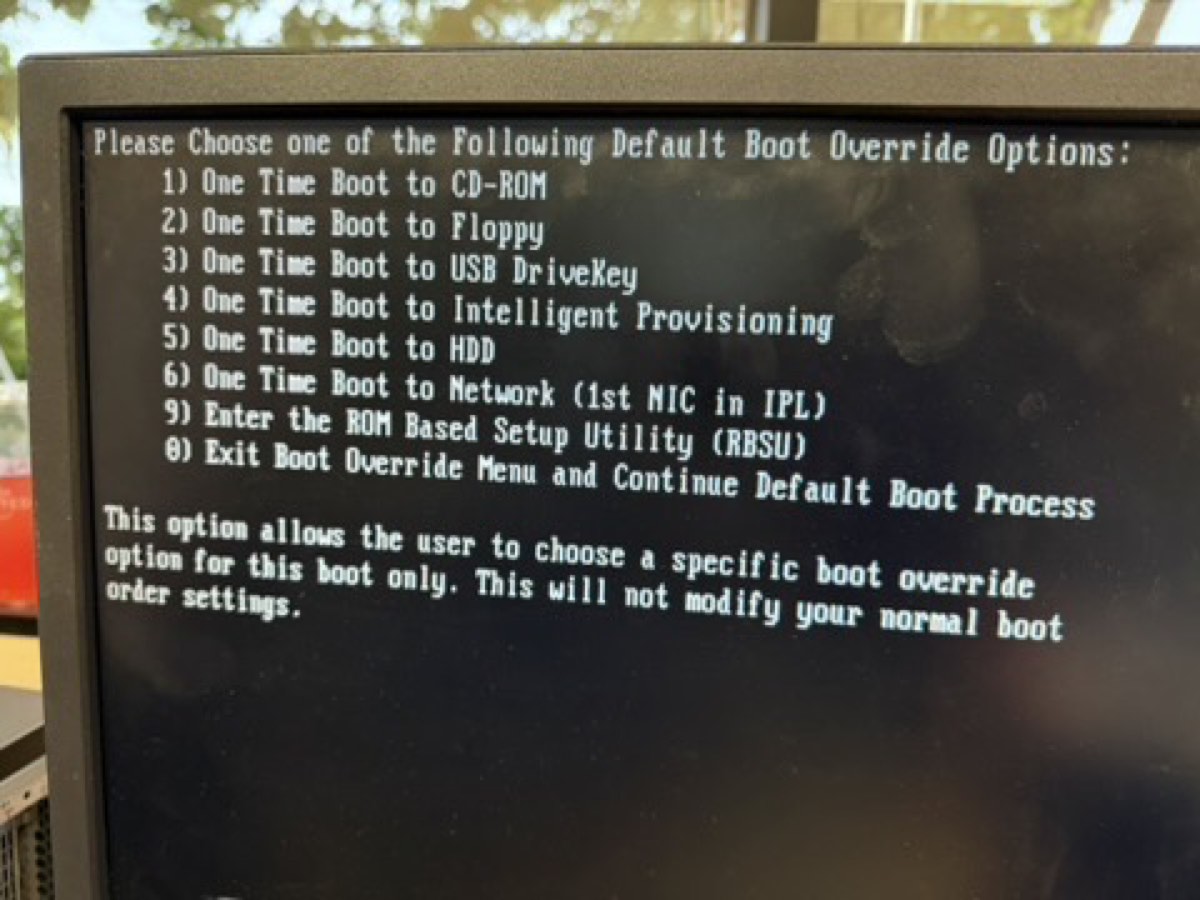
F11 boot menu. One-time picker for booting from USB / DVD / network without changing BIOS order. Look for: your USB stick listed once you've inserted it for Phase 2 (Proxmox install). -
Confirm the hardware inventory at POST.
Look for these lines and write them down:
- Memory: total installed (the screen prints e.g. "32768 MB")
- Processors: Proc 1 and whether Proc 2 is installed
- Smart Array P420i: "Slot 0" should be detected
- "
1785-Slot 0 Drive Array Not Configured" message — this is normal on first boot, not a fault
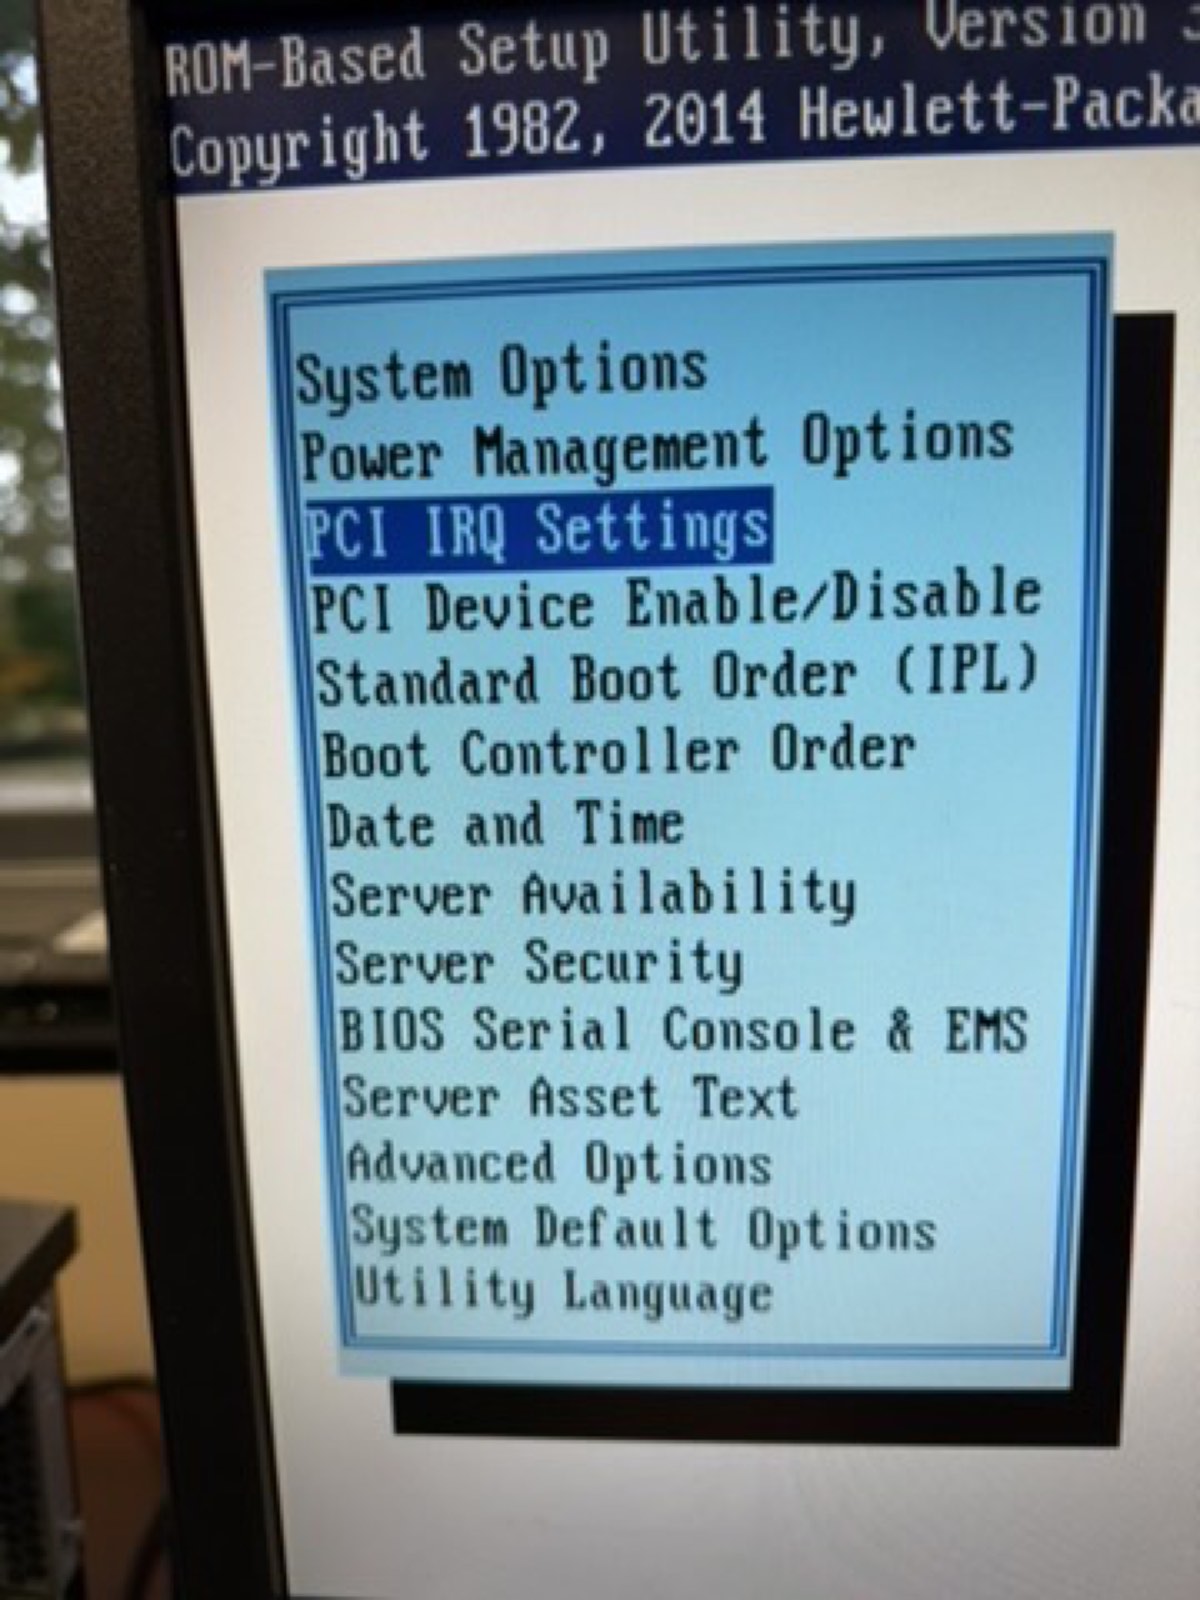
F9 = RBSU (BIOS). If you need to change boot order or check the BIOS version, this is the screen. Look for: System Information → Product ID and BIOS date in the top banner. -
Press F8 to enter ORCA.
You'll land on the Smart Array Main Menu.
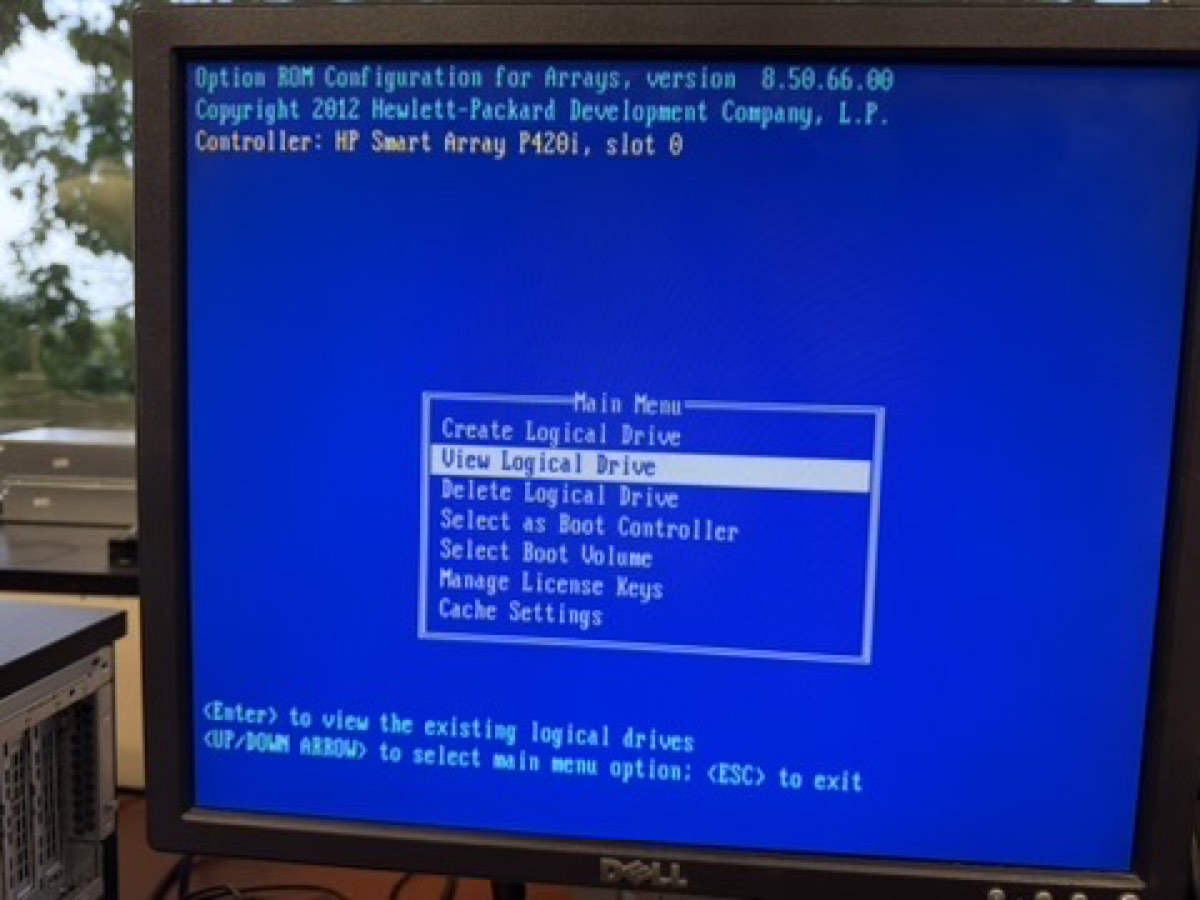
ORCA Main Menu. Smart Array P420i's built-in configurator. Six options — the only one you need on first boot is Create Logical Drive. Look for: the firmware version in the bottom corner — note it for the asset sheet. -
Create a logical drive.
Main Menu → Create Logical Drive. Select all three physical drives. Choose RAID 5. Accept the defaults: Max Boot Partition Disable (4 GB cap), no hot spare, write cache enabled.
RAID 5 with three 1 TB drives gives you ~2 TB of usable space and survives one drive failure.
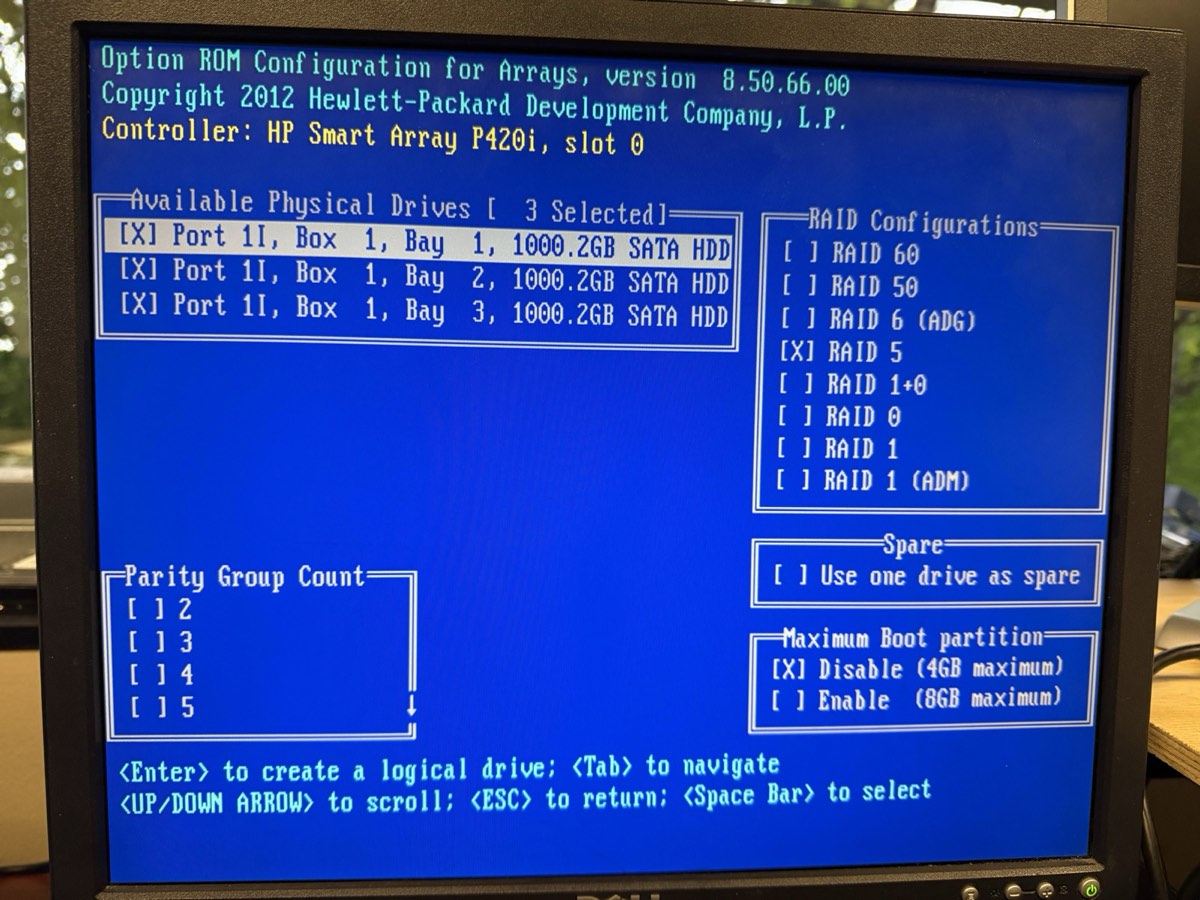
Selecting RAID 5 in ORCA. All three 1 TB drives ticked, RAID 5 highlighted. Look for: the “Size: ~1862 GB” calculation that appears once you select RAID 5 — that's your usable capacity. -
Save and exit.
Confirm the array creation. The Main Menu now shows a "View Logical Drive" entry — that's your proof. Press Esc to exit; the system reboots.
-
(Optional but worth doing) Configure iLO 4.
iLO (Integrated Lights-Out) is the dedicated remote-management chip on the back of the server — own RJ-45 jack, own power, runs even if the OS (operating system) is off. At POST press F8 when prompted for iLO (different F8 prompt than ORCA), or press F9 → iLO 4 Configuration. Set: hostname, static IP (Internet Protocol) address on the management subnet, admin password. After that, point a browser at the iLO IP and you have remote KVM (keyboard-video-mouse) console forever.
Verify
Reboot. At POST you should see:
- The "
1785-...Not Configured" message is gone - POST detects "Logical Drive 1, RAID 5, ~1862 GB" or similar
- The OS install media (when present) sees a single ~2 TB disk, not three separate ones
- Pressing F2 instead of F9 — Dell uses F2 for BIOS. HP Gen8 uses F9. Different vendor, different keys.
- Mixing drive sizes — RAID 5 will use the smallest drive's capacity for every member. Three 1 TB drives is fine; one 2 TB and two 1 TB drives gives you 2 TB usable instead of 3 TB.
- RAID 0 by accident — RAID 0 stripes for speed but gives zero redundancy. Always confirm you selected RAID 5 (or RAID 1/10 for two-drive scenarios).
- Forgetting to save — ORCA does not auto-save. If you exit without confirming, the array isn't created.
The story to tell here is "we just turned three loose hard drives into one big resilient drive." Show ORCA's Logical Drive view. Then explain RAID 5 in plain English: "Three drives, two hold data, one holds parity. Lose any one drive, the math reconstructs it. We pay one drive's worth of space for the safety net."
Install Proxmox VE 8.2
Proxmox VE (Virtual Environment) is a Debian server with a virtualization layer — KVM (Kernel-based Virtual Machine) for full virtual machines and LXC (Linux Containers) for lightweight ones — and a clean web UI (User Interface) bolted on. Installing it replaces whatever's on the disk; you'll boot it from USB (Universal Serial Bus).
Goal
Proxmox installed on the RAID 5 logical drive, reachable at https://10.10.10.10:8006 from a laptop on the school network.
Why it matters
The hypervisor is the foundation of every later phase. Get the hostname, network, and root password right now — changing them later is doable but annoying.
Steps
-
Get the ISO.
An ISO file (named after the ISO 9660 optical-disc filesystem standard) is a single-file image of an installer disk. Download
proxmox-ve_8.2-x.isofromproxmox.com/downloadson your laptop. -
Write the ISO to a USB stick.
Use Balena Etcher or
dd. On a Mac:# Find the USB device (be careful — wrong path will erase the wrong disk) diskutil list # Unmount it (replace diskN with the actual identifier) diskutil unmountDisk /dev/diskN # Write the ISO (uses raw disk for speed) sudo dd if=~/Downloads/proxmox-ve_8.2-x.iso of=/dev/rdiskN bs=1m # Eject when done diskutil eject /dev/diskN
-
Boot the server from USB.
Insert the USB stick into the server. Power on, press F11 at POST for the one-time boot menu, select the USB device.
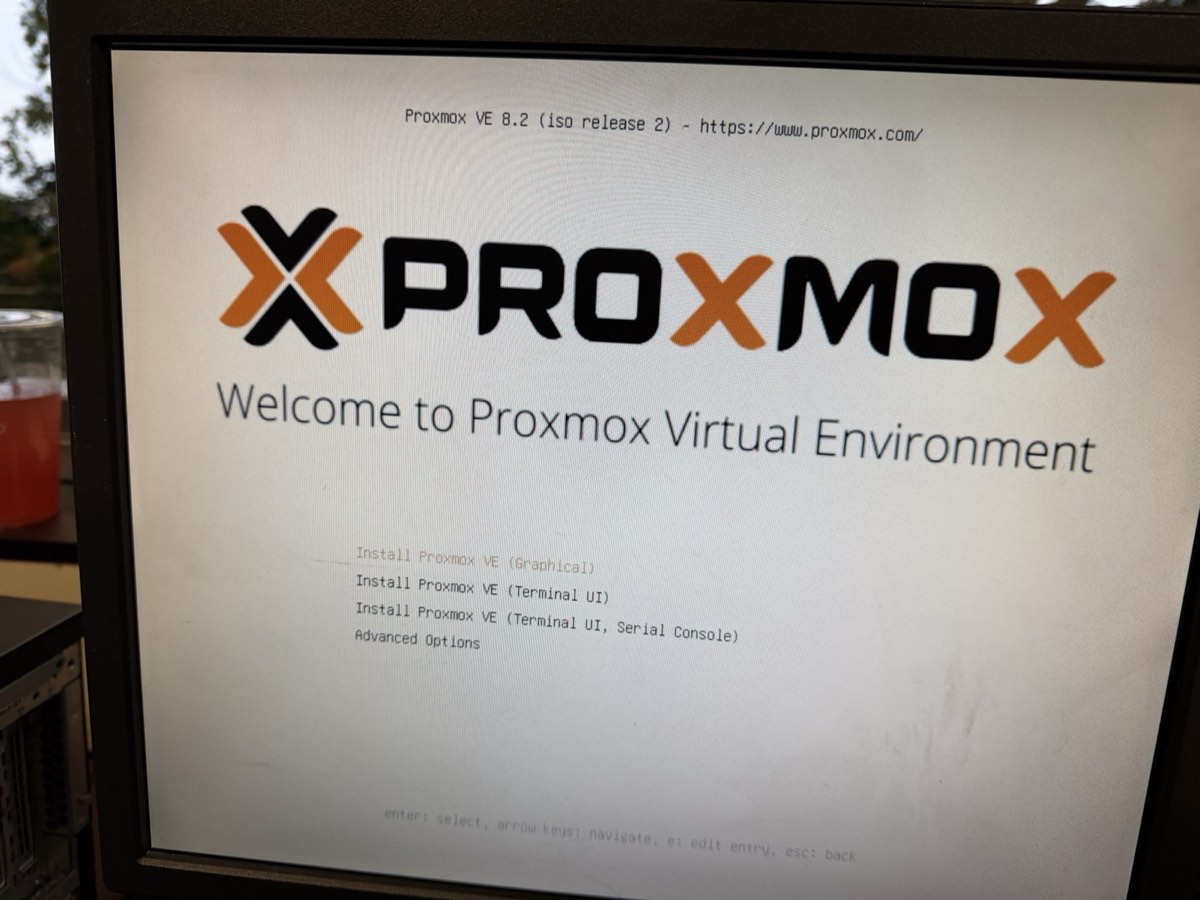
Proxmox installer boot menu. The first screen the USB shows. Pick “Install Proxmox VE (Graphical)” for the friendly GUI installer. Look for: the version banner — confirm you're on 8.2 or newer before installing. -
Choose "Install Proxmox VE (Graphical)".
The installer GUI loads. Accept the EULA.
-
Pick the disk.
The RAID 5 logical drive shows up as a single ~2 TB disk. Select it. Filesystem: ext4 is fine for our needs (ZFS — Zettabyte File System — is overkill on a hardware RAID). Hit Next.
-
Location, time zone, keyboard.
Country: United States. Time zone: America/Chicago. Keyboard: U.S. English.
-
Set the root password and admin email.
Pick a password you can actually type and remember — you'll use it constantly. Email goes to alerts; use a real one.
-
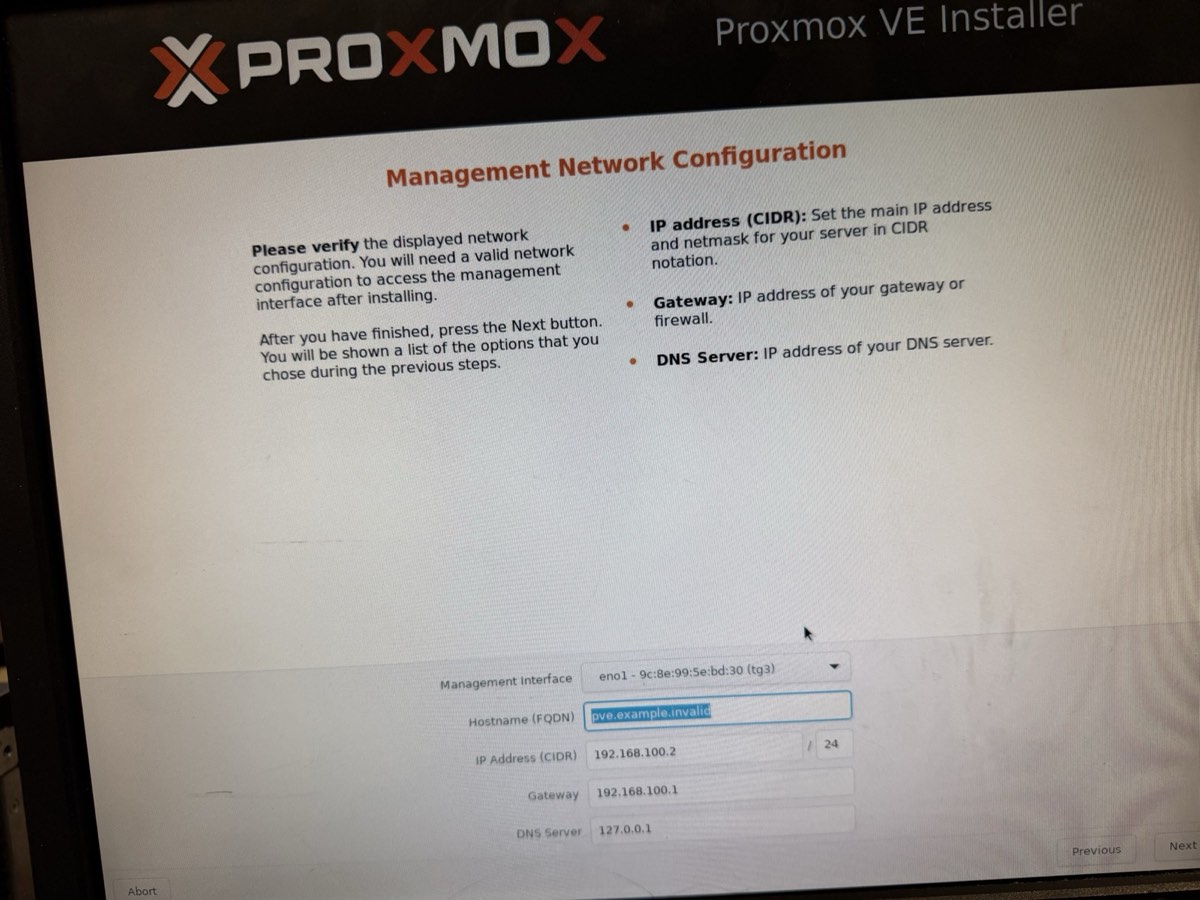
Network configuration.
- Management interface:
eno1(the first onboard NIC — Network Interface Card) - Hostname (FQDN — Fully Qualified Domain Name):
tctmachine.capstone.local - IP / CIDR (Classless Inter-Domain Routing — the
/16-style notation for subnet masks):10.10.10.10/16(use /16 because the school LAN is a /16, not /24) - Gateway:
10.10.10.1 - DNS (Domain Name System):
1.1.1.1
- Management interface:
-
Review and install.
The installer wipes the disk and installs. Takes about 10 minutes. When done, remove the USB and reboot.
-
Log in to the web UI.
From your laptop on the school network, browse to
https://10.10.10.10:8006. Accept the self-signed cert warning. Log in as root with realm Linux PAM (Pluggable Authentication Modules — Linux's standard authentication framework).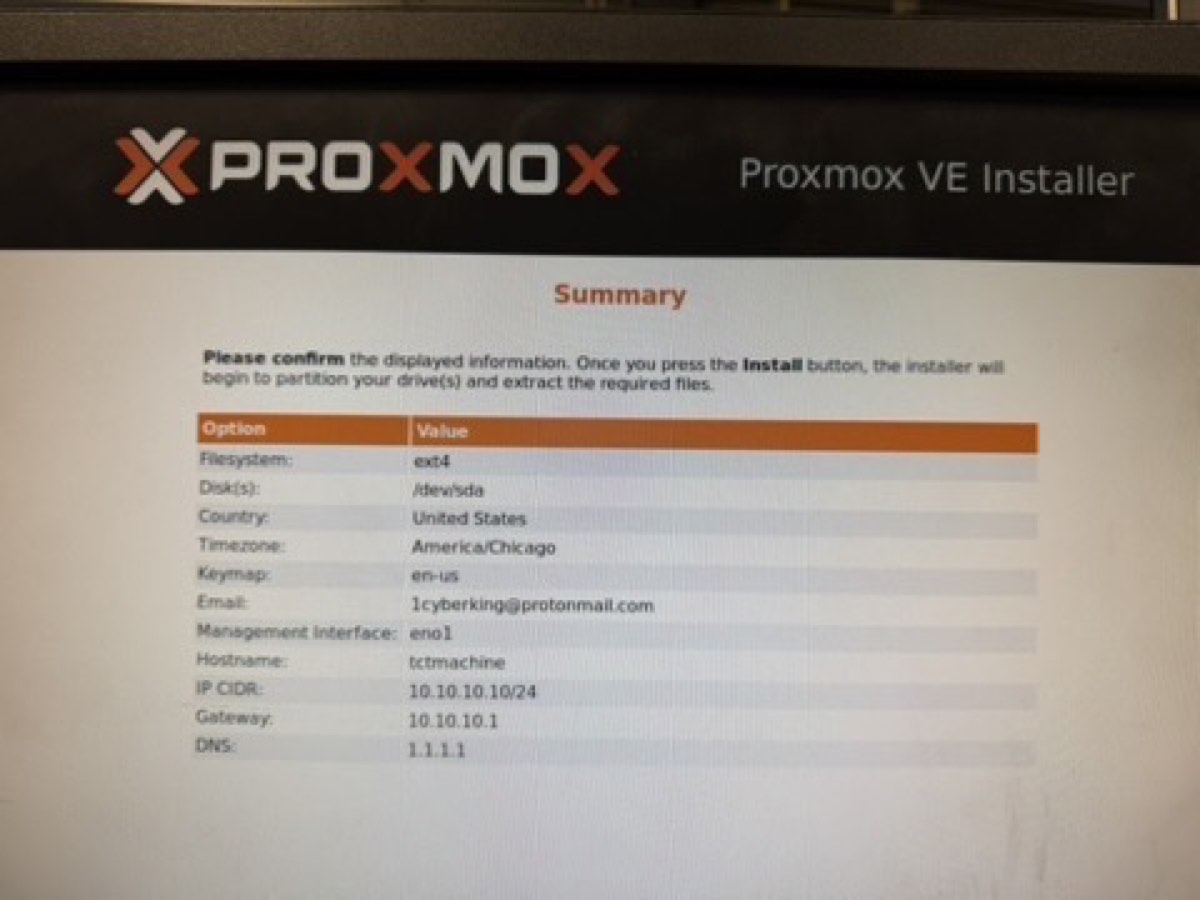
Node Summary tab. First page after login. Confirms the install worked. Look for: CPU model, RAM total, uptime, kernel version, repository status. Screenshot this for the Week 1 report. 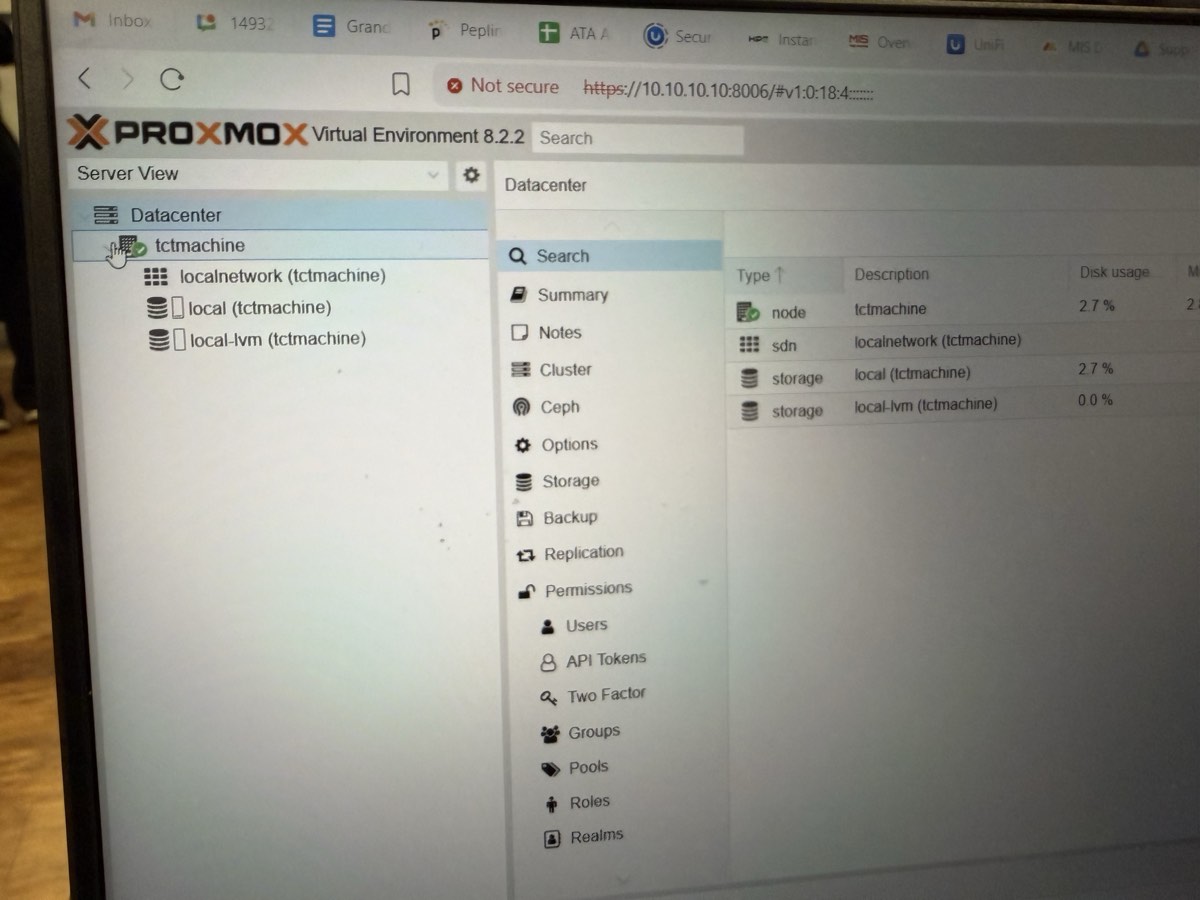
Main dashboard. Server tree on the left, node details on the right. Look for: a single node (yours) with no VMs yet. The VMs come in Phase 5+.
Verify
# From the host's Shell tab in the web UI:
hostnamectl
  Static hostname: tctmachine
  ...

pveversion
pve-manager/8.2.x/...

ip -br addr show eno1
eno1   UP   10.10.10.10/16

ping -c 2 10.10.10.1
2 received, 0% packet loss
- Wrong CIDR — typing
/24instead of/16means the host can only see10.10.10.0–.255, not the whole school subnet. Symptoms: can ping the gateway but nothing else. Fix in/etc/network/interfacesafter install. - Wrong NIC selected — picking
eno2oreno3if eno1 wasn't plugged in. Confirm cable goes to the leftmost (eno1) port. - Browser refuses self-signed cert — most modern browsers let you click through "Advanced → Proceed to site." Safari sometimes hides this; use Chrome or Firefox.
Show the Summary page: uptime, CPU, RAM, the version banner. Open the Shell tab and run hostnamectl + pveversion for credibility — proves it's a real Linux box and not a wizard. The line that lands with non-technical audiences: "This computer can now run other computers."
Network bridges and NAT
A virtual bridge is a software switch. We need three of them, plus a few iptables rules to let traffic flow between zones in a controlled way. This phase is the heart of the build.
Goal
Three bridges (vmbr0, vmbr1, vmbr2 — virtual machine bridges 0, 1, 2) up and active, IP forwarding enabled, source-NAT (Network Address Translation) outbound for both internal subnets, and inbound port-forward for SSH (Secure Shell — encrypted remote login) to the Jump Box. All persistent across reboots.
Why it matters
Without bridges, VMs can't talk to each other or to the network. Without NAT, internal VMs can't reach the internet. Without DNAT (Destination Network Address Translation), you can't SSH in from your laptop without first being on the management subnet. Each piece is small; together they make the lab a real network.
Step 3a — Create the bridges
From the Proxmox web UI: tctmachine → System → Network → Create → Linux Bridge. Or edit /etc/network/interfaces directly:
vmbr0 with eno1 attached and the school IP, vmbr1 on 172.16/24, vmbr2 on 192.168/24. All three should show Active = Yes and Autostart = Yes.# In the host Shell tab
sudo nano /etc/network/interfaces
The file should look like this (yours may already have vmbr0; just add vmbr1 and vmbr2):
auto lo
iface lo inet loopback

auto eno1
iface eno1 inet manual

# vmbr0 — management, bridges to physical NIC eno1
auto vmbr0
iface vmbr0 inet static
    address  10.10.10.10/16
    gateway  10.10.10.1
    bridge-ports eno1
    bridge-stp off
    bridge-fd  0
    # NAT for the internal subnets (added in step 3c)
    post-up   iptables -t nat -A POSTROUTING -s 172.16.0.0/24  -o vmbr0 -j MASQUERADE
    post-up   iptables -t nat -A POSTROUTING -s 192.168.0.0/24 -o vmbr0 -j MASQUERADE
    post-down iptables -t nat -D POSTROUTING -s 172.16.0.0/24  -o vmbr0 -j MASQUERADE
    post-down iptables -t nat -D POSTROUTING -s 192.168.0.0/24 -o vmbr0 -j MASQUERADE

# vmbr1 — DMZ, no physical port
auto vmbr1
iface vmbr1 inet static
    address  172.16.0.10/24
    bridge-ports none
    bridge-stp off
    bridge-fd  0

# vmbr2 — LAN, no physical port
auto vmbr2
iface vmbr2 inet static
    address  192.168.0.10/24
    bridge-ports none
    bridge-stp off
    bridge-fd  0
Save (Ctrl+O, Enter, Ctrl+X). Apply without rebooting:
sudo ifreload -a

# Confirm the bridges came up
ip -br addr show vmbr0
ip -br addr show vmbr1
ip -br addr show vmbr2

vmbr0 exists, created by the Proxmox installer. Look for: the single bridge stanza pointing at eno1.
post-up / post-down iptables NAT rules wired into vmbr0. Look for: addresses 10.10.10.10/16, 172.16.0.10/24, 192.168.0.10/24 and the four MASQUERADE lines.Step 3b — Enable IP forwarding
Linux's default is to not route packets between interfaces. We need it to.
sudo nano /etc/sysctl.conf
Find and uncomment this line (delete the #):
net.ipv4.ip_forward=1
Apply now without rebooting:
sudo sysctl -p

# Verify — should print "1"
cat /proc/sys/net/ipv4/ip_forward
Step 3c — Outbound NAT (MASQUERADE)
MASQUERADE is a flavor of source NAT that uses whatever address the outgoing interface (vmbr0) has at the moment, so we don't have to hard-code 10.10.10.10. Already added inline to vmbr0 above via post-up. To verify the rules are loaded:
sudo iptables -t nat -L POSTROUTING -nv --line-numbers
# You should see two MASQUERADE rules, one for 172.16/24, one for 192.168/24
Step 3d — Inbound DNAT for SSH to the Jump Box
This rule says: “anything hitting the host's school-side IP on TCP (Transmission Control Protocol — the reliable transport layer) port 2222, forward to the Jump Box.”
sudo iptables -t nat -A PREROUTING -i vmbr0 -p tcp --dport 2222 \
   -j DNAT --to-destination 172.16.0.5:2222

sudo iptables -A FORWARD -p tcp -d 172.16.0.5 --dport 2222 -j ACCEPT
Step 3e — Persist iptables across reboots
sudo apt update
sudo apt install iptables-persistent
# Answer "Yes" to save current rules to /etc/iptables/rules.v4

# Or save manually any time you change rules:
sudo netfilter-persistent save
Verify
# 1. All three bridges up
ip -br link show type bridge
vmbr0 UP ...
vmbr1 UP ...
vmbr2 UP ...

# 2. IP forwarding on
sysctl net.ipv4.ip_forward
net.ipv4.ip_forward = 1

# 3. NAT rules present
sudo iptables -t nat -L -nv | grep MASQUERADE
2 rules listed for 172.16.0.0/24 and 192.168.0.0/24

# 4. Smoke test from the host (ping out, then ping each bridge IP)
ping -c 2 1.1.1.1
ping -c 2 172.16.0.10
ping -c 2 192.168.0.10
- Forgot
ifreload -a— the bridges show in the file but not inip a. - YAML-style indentation in
/etc/network/interfaces— that file uses spaces but is forgiving; the real foot-gun is puttingaddressat column 0 instead of indented underiface. - Forgot to install iptables-persistent — rules vanish on reboot. You'll wonder why the lab worked yesterday and not today.
- Order of
ifacestanzas —iface eno1 inet manualmust exist beforevmbr0references it as a bridge port.
This is the most jargon-heavy phase. Slow down. Show the file in nano, scroll through it, then run ip -br addr to show the bridges came up. The mental model: "Three software cables. Each one its own room. The host stands in all three rooms with one foot in each and decides who passes between them."
Upload installer ISOs
Before any VM, the installer image has to be staged in Proxmox storage. Quick phase, but skip it and the next four phases stall.
Goal
Three ISOs visible in Proxmox under local → ISO Images: Ubuntu Server, Windows Server, pfSense.
Steps
-
Download the ISOs to your laptop.
- Ubuntu Server 24.04 LTS —
ubuntu.com/download/server - Windows Server 2022 Evaluation —
microsoft.com/en-us/evalcenter - pfSense CE 2.8.1 —
netgate.com/downloads/pfsense-ce(Architecture: AMD64, Installer: USB Memstick Installer or ISO)
- Ubuntu Server 24.04 LTS —
-
Verify the SHA-256 checksums.
Each download page lists a checksum. Run
shasum -a 256 ~/Downloads/the-iso.isoon your laptop and confirm the hex matches. Belt-and-suspenders, but a corrupt ISO is the most miserable bug. -
Upload to Proxmox.
Web UI →
local (tctmachine)in the left tree → ISO Images tab → Upload → pick the file. Repeat for each.
Verify
The ISO Images tab should list all three files with their sizes. They live under /var/lib/vz/template/iso/ on the host.
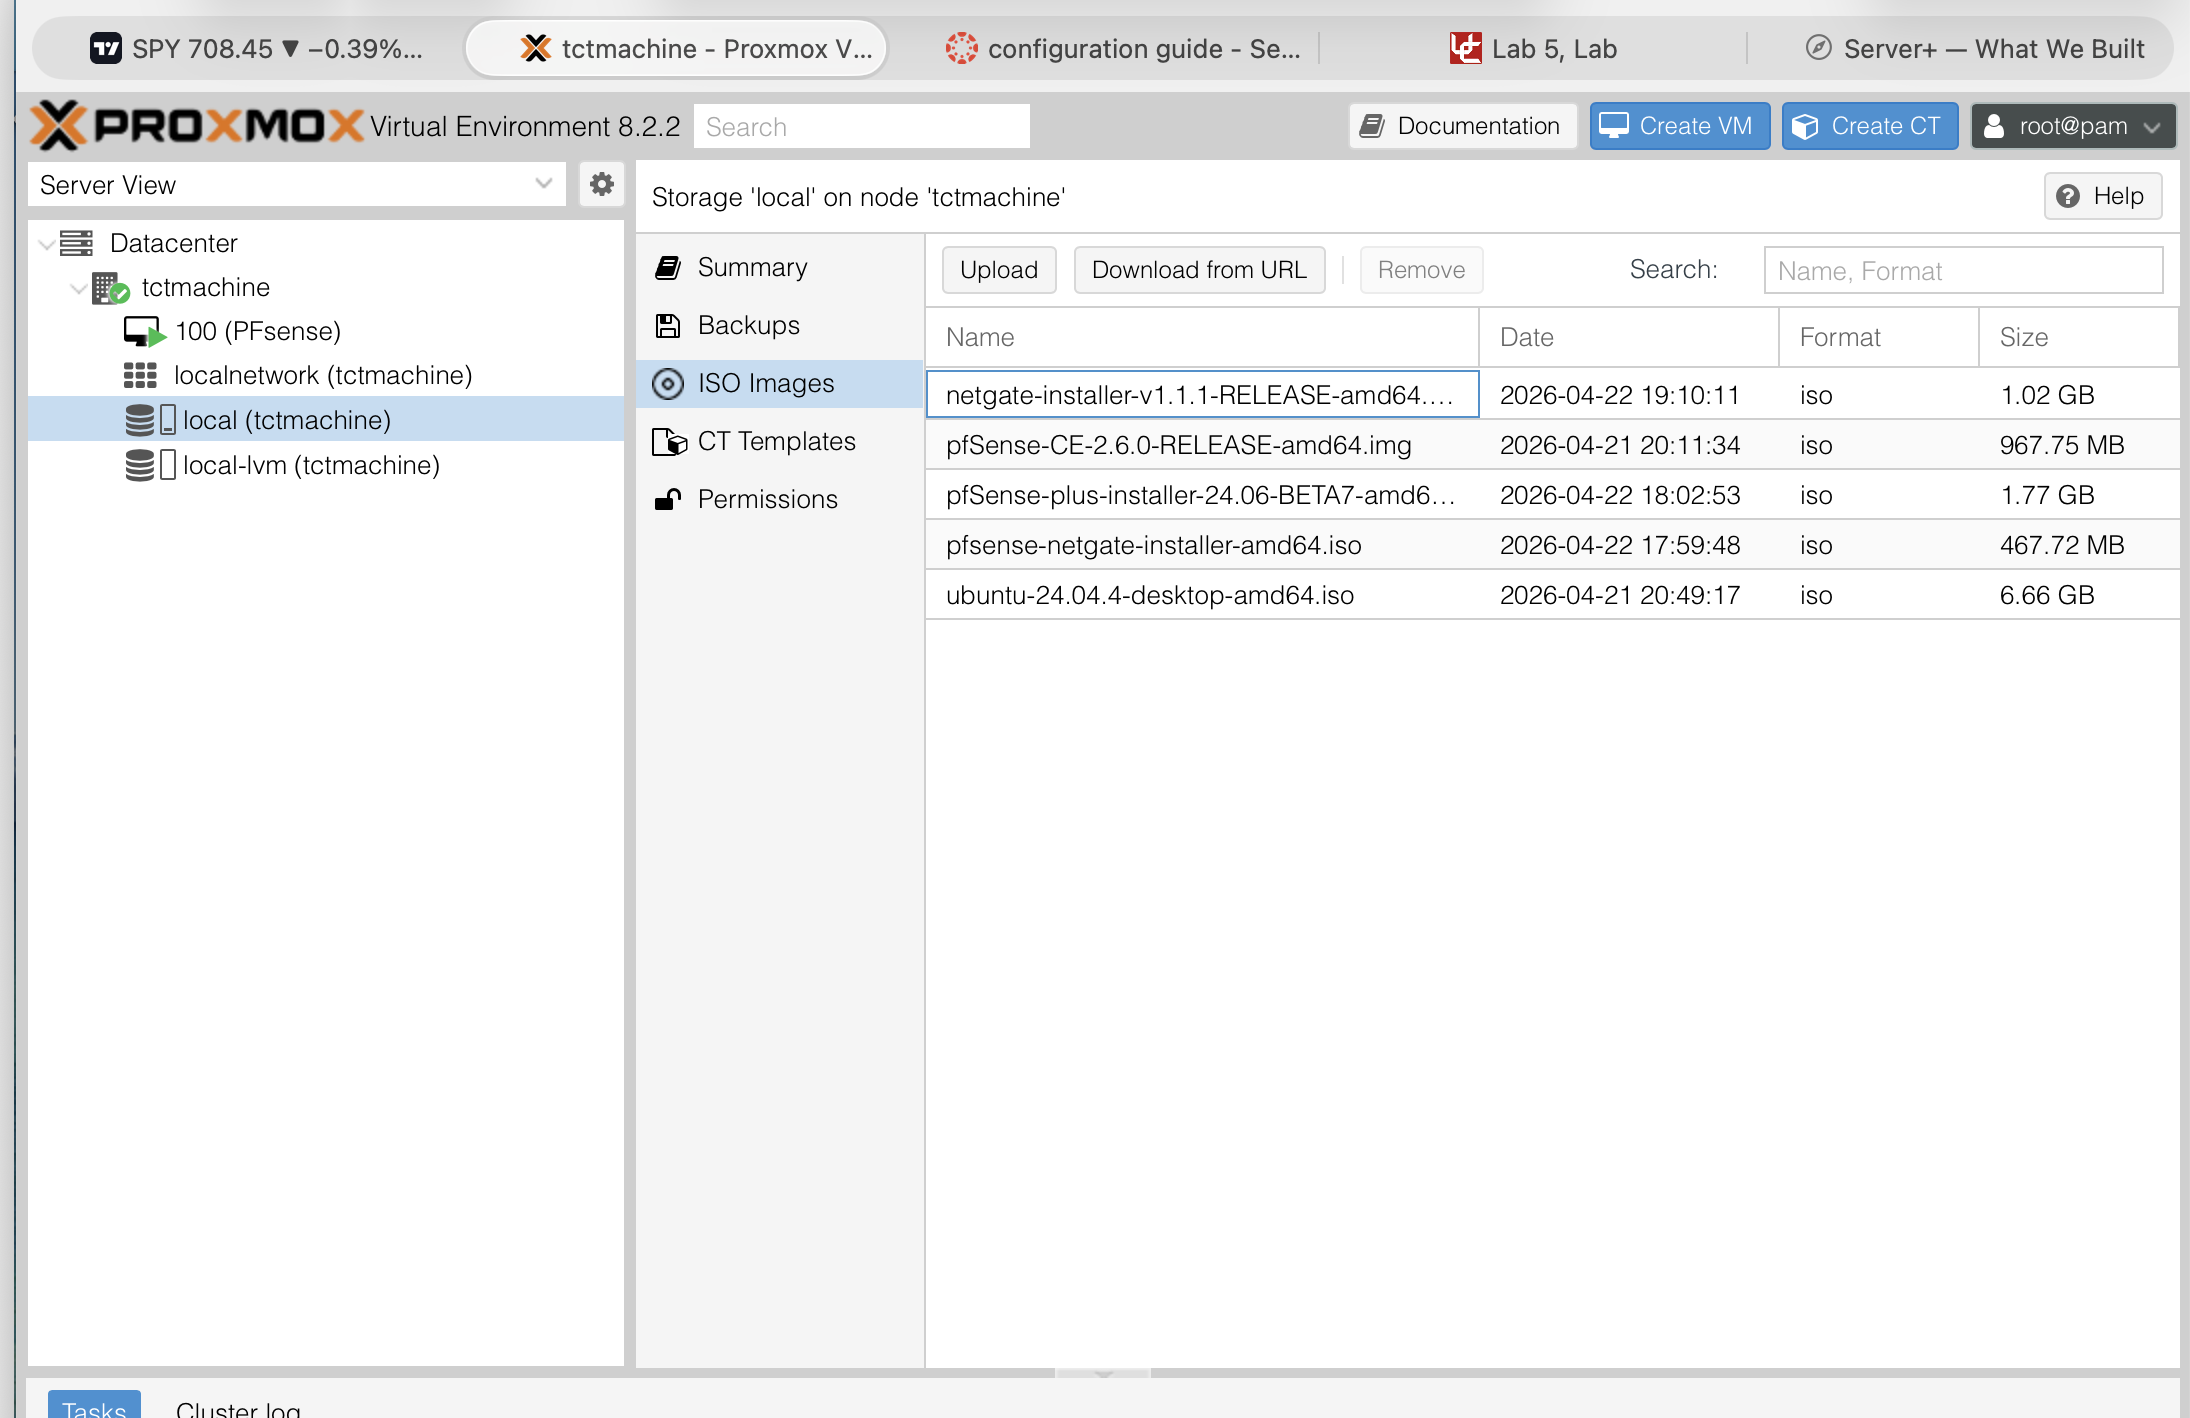
local storage's ISO Images tab after uploading. Look for: filenames matching what you downloaded, sizes that match the source, and the date column showing today.If the upload is slow over the school network, an alternative is scp from your laptop straight into /var/lib/vz/template/iso/. Same destination, often faster.
Build the Jump Box (VM 101)
A Jump Box is a small, deliberately boring server whose only job is to be the one place an administrator logs in from. We build it first because it shapes how every other VM is reached.
Goal
Ubuntu Server 24.04 LTS (Long Term Support) on vmbr1, static 172.16.0.5, SSH on port 2222, root login disabled, key-only auth, UFW (Uncomplicated Firewall — Ubuntu's friendly wrapper around iptables) allowing 22/2222 only from approved subnets.
Why it matters
The DNAT rule from Phase 3 sends external SSH to this VM. Internal LAN servers will reject SSH from anywhere except this Jump Box. It's the single point of entry — make it small, hard, and watched.
Step 5a — Create the VM in Proxmox
- Top right → Create VM.
- General: Node
tctmachine, VM ID101, Namejumpbox, Start at boot ✓. - OS: Storage
local, ISOubuntu-24.04-live-server-amd64.iso. TypeLinux, Version6.x - 2.6 Kernel. - System: Machine
q35, BIOSSeaBIOS, SCSI (Small Computer System Interface) ControllerVirtIO SCSI single, QEMU (Quick EMUlator) Agent ✓. - Disks: Bus
SCSI, Storagelocal-lvm(Logical Volume Manager — Linux's flexible disk-partitioning system), Disk size25GB, Discard ✓, SSD (Solid State Drive) emulation off (it's on real spinning disks). - CPU: Sockets 1, Cores 2, Type
host(we want exact CPU features passed through). - Memory: 2048 MB. Ballooning off.
- Network: Bridge
vmbr1, ModelVirtIO (paravirtualized — “virtual I/O”, the high-performance driver standard QEMU uses), Firewall off. - Confirm: Start after created — leave unchecked. Click Finish.
Step 5b — Install Ubuntu Server
- Start the VM, open the noVNC console.
- Boot → "Try or Install Ubuntu Server".
- Language: English. Keyboard: US.
- Type of install: Ubuntu Server (full), not Minimized.
-
Network — set static now.
Highlight
ens18→ Edit IPv4 → Method: Manual:- Subnet:
172.16.0.0/24 - Address:
172.16.0.5 - Gateway:
172.16.0.10(the Proxmox host vmbr1 IP — required-path build) - Name servers:
1.1.1.1, 8.8.8.8 - Search domains: blank
- Subnet:
- Proxy: blank. Mirror: default.
- Storage: entire disk, no LVM needed (this VM is small and won't grow).
-
Profile.
- Real name: anything
- Server name:
jumpbox - Username:
haktang(never root, admin, or ubuntu) - Password: 16+ characters
- SSH: Install OpenSSH server ✓. Import SSH identity from GitHub ✓ → user
UbuntoGod. - Snaps: skip everything.
- Wait for install. Reboot now. Detach the ISO from the VM hardware first.
Step 5c — Harden SSH
From your laptop:
ssh [email protected]  # first login uses default port 22
sudo nano /etc/ssh/sshd_config.d/hardening.conf
Paste:
Port 2222
PermitRootLogin no
PasswordAuthentication no
PubkeyAuthentication yes
AllowUsers haktang
MaxAuthTries 3
MaxSessions 3
LoginGraceTime 20
ClientAliveInterval 300
ClientAliveCountMax 2
Save, then reload SSH. Open a second terminal first — if your config is broken you still need a way back in.
sudo systemctl reload ssh
# From the second terminal:
ssh -p 2222 [email protected]
Step 5d — Host firewall (UFW)
sudo ufw default deny incoming
sudo ufw default allow outgoing
sudo ufw allow from 10.10.10.0/24 to any port 2222 proto tcp
sudo ufw allow from 172.16.0.0/24 to any port 2222 proto tcp
sudo ufw enable
sudo ufw status verbose
Verify
# 1. Right address
ip -br addr show ens18
ens18 UP 172.16.0.5/24

# 2. SSH listening on the new port only
sudo ss -tlnp | grep -E ":22|:2222"
sshd on 0.0.0.0:2222

# 3. UFW status correct
sudo ufw status numbered
2222/tcp ALLOW from 10.10.10.0/24
2222/tcp ALLOW from 172.16.0.0/24

# 4. Login works from outside via the host's DNAT rule
# From your laptop on the school network:
ssh -p 2222 [email protected]
# lands on the Jump Box, not the host
- Reloaded sshd before testing in a second terminal — config error locks you out. Always have a second terminal already authenticated.
- UFW enabled before allow rules — instantly drops your active SSH session. Add the rules, then enable.
- Imported a wrong GitHub SSH key — make sure
UbuntoGodon github.com has the keys you actually own.
The talking point: "This box does almost nothing. That's the feature, not a bug. Less software, fewer ports, fewer ways to be wrong." Demo: SSH from your laptop on port 2222 — show that DNAT carries you through the host into the Jump Box transparently. The audience sees one command, you explain three layers underneath it.
Build the Windows Server (VM 102) — DNS authority
Inside the lab, every machine should be able to type a hostname and get back an IP. The Windows Server's first job is to be that authority.
Goal
Windows Server 2022 on vmbr2 at 192.168.0.2, DNS Server role installed, forward zone capstone.local with A records for every VM, forwarder set to 1.1.1.1.
Step 6a — Create the VM
- Create VM → ID
102, NameWinSrv. - OS: ISO
en-us_windows_server_2022.... TypeMicrosoft Windows, Version11/2022. - System: Machine
q35, BIOSOVMF (UEFI)— OVMF is Open Virtual Machine Firmware, an open-source UEFI (Unified Extensible Firmware Interface — the modern replacement for legacy BIOS); add an EFI (Extensible Firmware Interface) disk onlocal-lvm, SCSI ControllerVirtIO SCSI single, QEMU Agent ✓. - Disks: SCSI,
local-lvm, 60 GB. - CPU: 2 cores, type
host. - Memory: 4096 MB.
- Network: bridge
vmbr2, modelVirtIO. - Before starting: Hardware tab → add a second CD/DVD drive with the VirtIO drivers ISO (download from fedorapeople.org/groups/virt/virtio-win/) so you can load the storage driver during install.
Step 6b — Install Windows Server
- Boot, install Windows Server 2022 Standard (Desktop Experience).
- When the disk picker shows no drives: Load Driver → pick the VirtIO drivers ISO →
vioscsi\2k22\amd64. Disk appears. - Install on the empty disk. Reboot. Set Administrator password.
- After login: install QEMU guest agent from the VirtIO ISO (
guest-agent\qemu-ga-x86_64.msi).
Step 6c — Static IP
Server Manager → Local Server → Ethernet → right-click adapter → Properties → IPv4:
- IP:
192.168.0.2Subnet:255.255.255.0Gateway:192.168.0.1(or192.168.0.10if not running pfSense) - Preferred DNS:
127.0.0.1(it serves itself once the role is added) - Alternate DNS:
1.1.1.1
Step 6d — Add the DNS Server role
- Server Manager → Manage → Add Roles and Features.
- Role-based install → this server → check DNS Server → Add features → Next, Next, Install.
- When done: Tools menu → DNS.
Step 6e — Create the forward zone
- In DNS Manager: expand the server → right-click Forward Lookup Zones → New Zone.
- Type: Primary zone. Zone name:
capstone.local. - Create new file. Allow non-secure dynamic updates (lab convenience; production would say no).
- Right-click the new zone → New Host (A) for each VM:
| Name | IP |
|---|---|
tctmachine | 10.10.10.10 |
jumpbox | 172.16.0.5 |
winsrv | 192.168.0.2 |
linuxsrv | 192.168.0.3 |
pfsense | 192.168.0.1 (or 10.10.110.10 if pfSense WAN) |
Step 6f — Add a forwarder
So lookups for anything outside capstone.local go upstream:
- DNS Manager → right-click the server name → Properties → Forwarders tab.
- Edit → add
1.1.1.1→ OK.
Verify
# From the Windows Server itself:
nslookup linuxsrv.capstone.local
Server: localhost
Address: 127.0.0.1
Name: linuxsrv.capstone.local
Address: 192.168.0.3

nslookup google.com
Server: localhost
non-authoritative answer (forwarder worked)
- Forgot to load the VirtIO storage driver during install — the installer can't see any disk. Drop a CD with the VirtIO ISO and load
vioscsi. - Using IDE/SATA controller instead of VirtIO — works but slow. Stick with VirtIO and load the driver.
- Pointed itself at
1.1.1.1first — it should be127.0.0.1first so internal lookups stay internal.
Talking point: "DNS is the phone book. Every internal hostname now resolves through this Windows Server. Outside lookups go upstream to 1.1.1.1. The whole lab gets a consistent name space." Demo: from any LAN VM, run nslookup jumpbox.capstone.local. The reply proves the directory works.
Build the Linux Server (VM 103)
A general-purpose Ubuntu Server in the LAN. Same install as the Jump Box, less hardening — this one is meant to host work, not stand guard.
Goal
Ubuntu Server 24.04 on vmbr2 at 192.168.0.3, DNS pointing at the Windows Server, fully patched.
Steps
- Create VM 103 named
linuxsrv: 2 vCPU / 2 GB RAM / 25 GB disk / VirtIO NIC onvmbr2. -
Install Ubuntu Server 24.04 (same flow as the Jump Box) but with this network config:
- Address:
192.168.0.3/24 - Gateway:
192.168.0.1(pfSense LAN) or192.168.0.10(host vmbr2) depending on which path you took - Name servers:
192.168.0.2(Windows Server) - Search domains:
capstone.local
- Address:
- SSH: install OpenSSH, import keys from GitHub.
- After install:
sudo apt update && sudo apt -y full-upgrade. - Install handy tools:
sudo apt install net-tools nmap dnsutils tcpdump. - Set hostname:
sudo hostnamectl set-hostname linuxsrv.
Verify
# From the Linux Server
hostname
linuxsrv

ip -br addr show ens18
ens18 UP 192.168.0.3/24

ping -c 2 192.168.0.2          # reach Win Server
ping -c 2 192.168.0.1          # reach default gateway
ping -c 2 1.1.1.1              # reach internet via NAT
nslookup winsrv.capstone.local # DNS resolves names
nslookup google.com            # DNS forwards external
Build pfSense (VM 100) — perimeter firewall
In the required path, the Proxmox host's iptables rules do all routing. In the extra-credit path, pfSense replaces those rules with a real firewall appliance — same end behavior, much more realistic.
Goal
pfSense 2.8.1 with three NICs (VirtIO): WAN (Wide Area Network — the “outside”) on vmbr0, LAN (Local Area Network) on vmbr1 (DMZ in our naming), OPT1 (Optional 1, pfSense's default name for a third interface) on vmbr2 (private LAN). Web UI reachable, NAT working, DHCP (Dynamic Host Configuration Protocol — assigns IP addresses automatically) serving the LAN, default password changed.
Step 8a — Create the VM
- Create VM → ID
100, NamePFsense. - OS: ISO
pfSense-CE-2.8.1-RELEASE-amd64.iso. TypeOther. - System: Machine
q35, BIOSSeaBIOS, SCSIVirtIO SCSI single. - Disks: 20 GB on
local-lvm. - CPU: 2 cores, type
host. - Memory: 2048 MB.
-
Network: VirtIO on
vmbr0. Confirm.
After creation, Hardware tab → Add → Network Device twice more:- net1 — VirtIO on
vmbr1 - net2 — VirtIO on
vmbr2
vtnet0,vtnet1,vtnet2. - net1 — VirtIO on
Step 8b — Install pfSense
- Start the VM, accept copyright, choose Install.
- Keymap: default. Partitioning: Auto (ZFS — Zettabyte File System) → stripe → select the only disk → confirm wipe.
- Wait for install. Decline manual config shell. Reboot.
- Detach the ISO before reboot completes (Hardware → CD/DVD → Do not use any media).
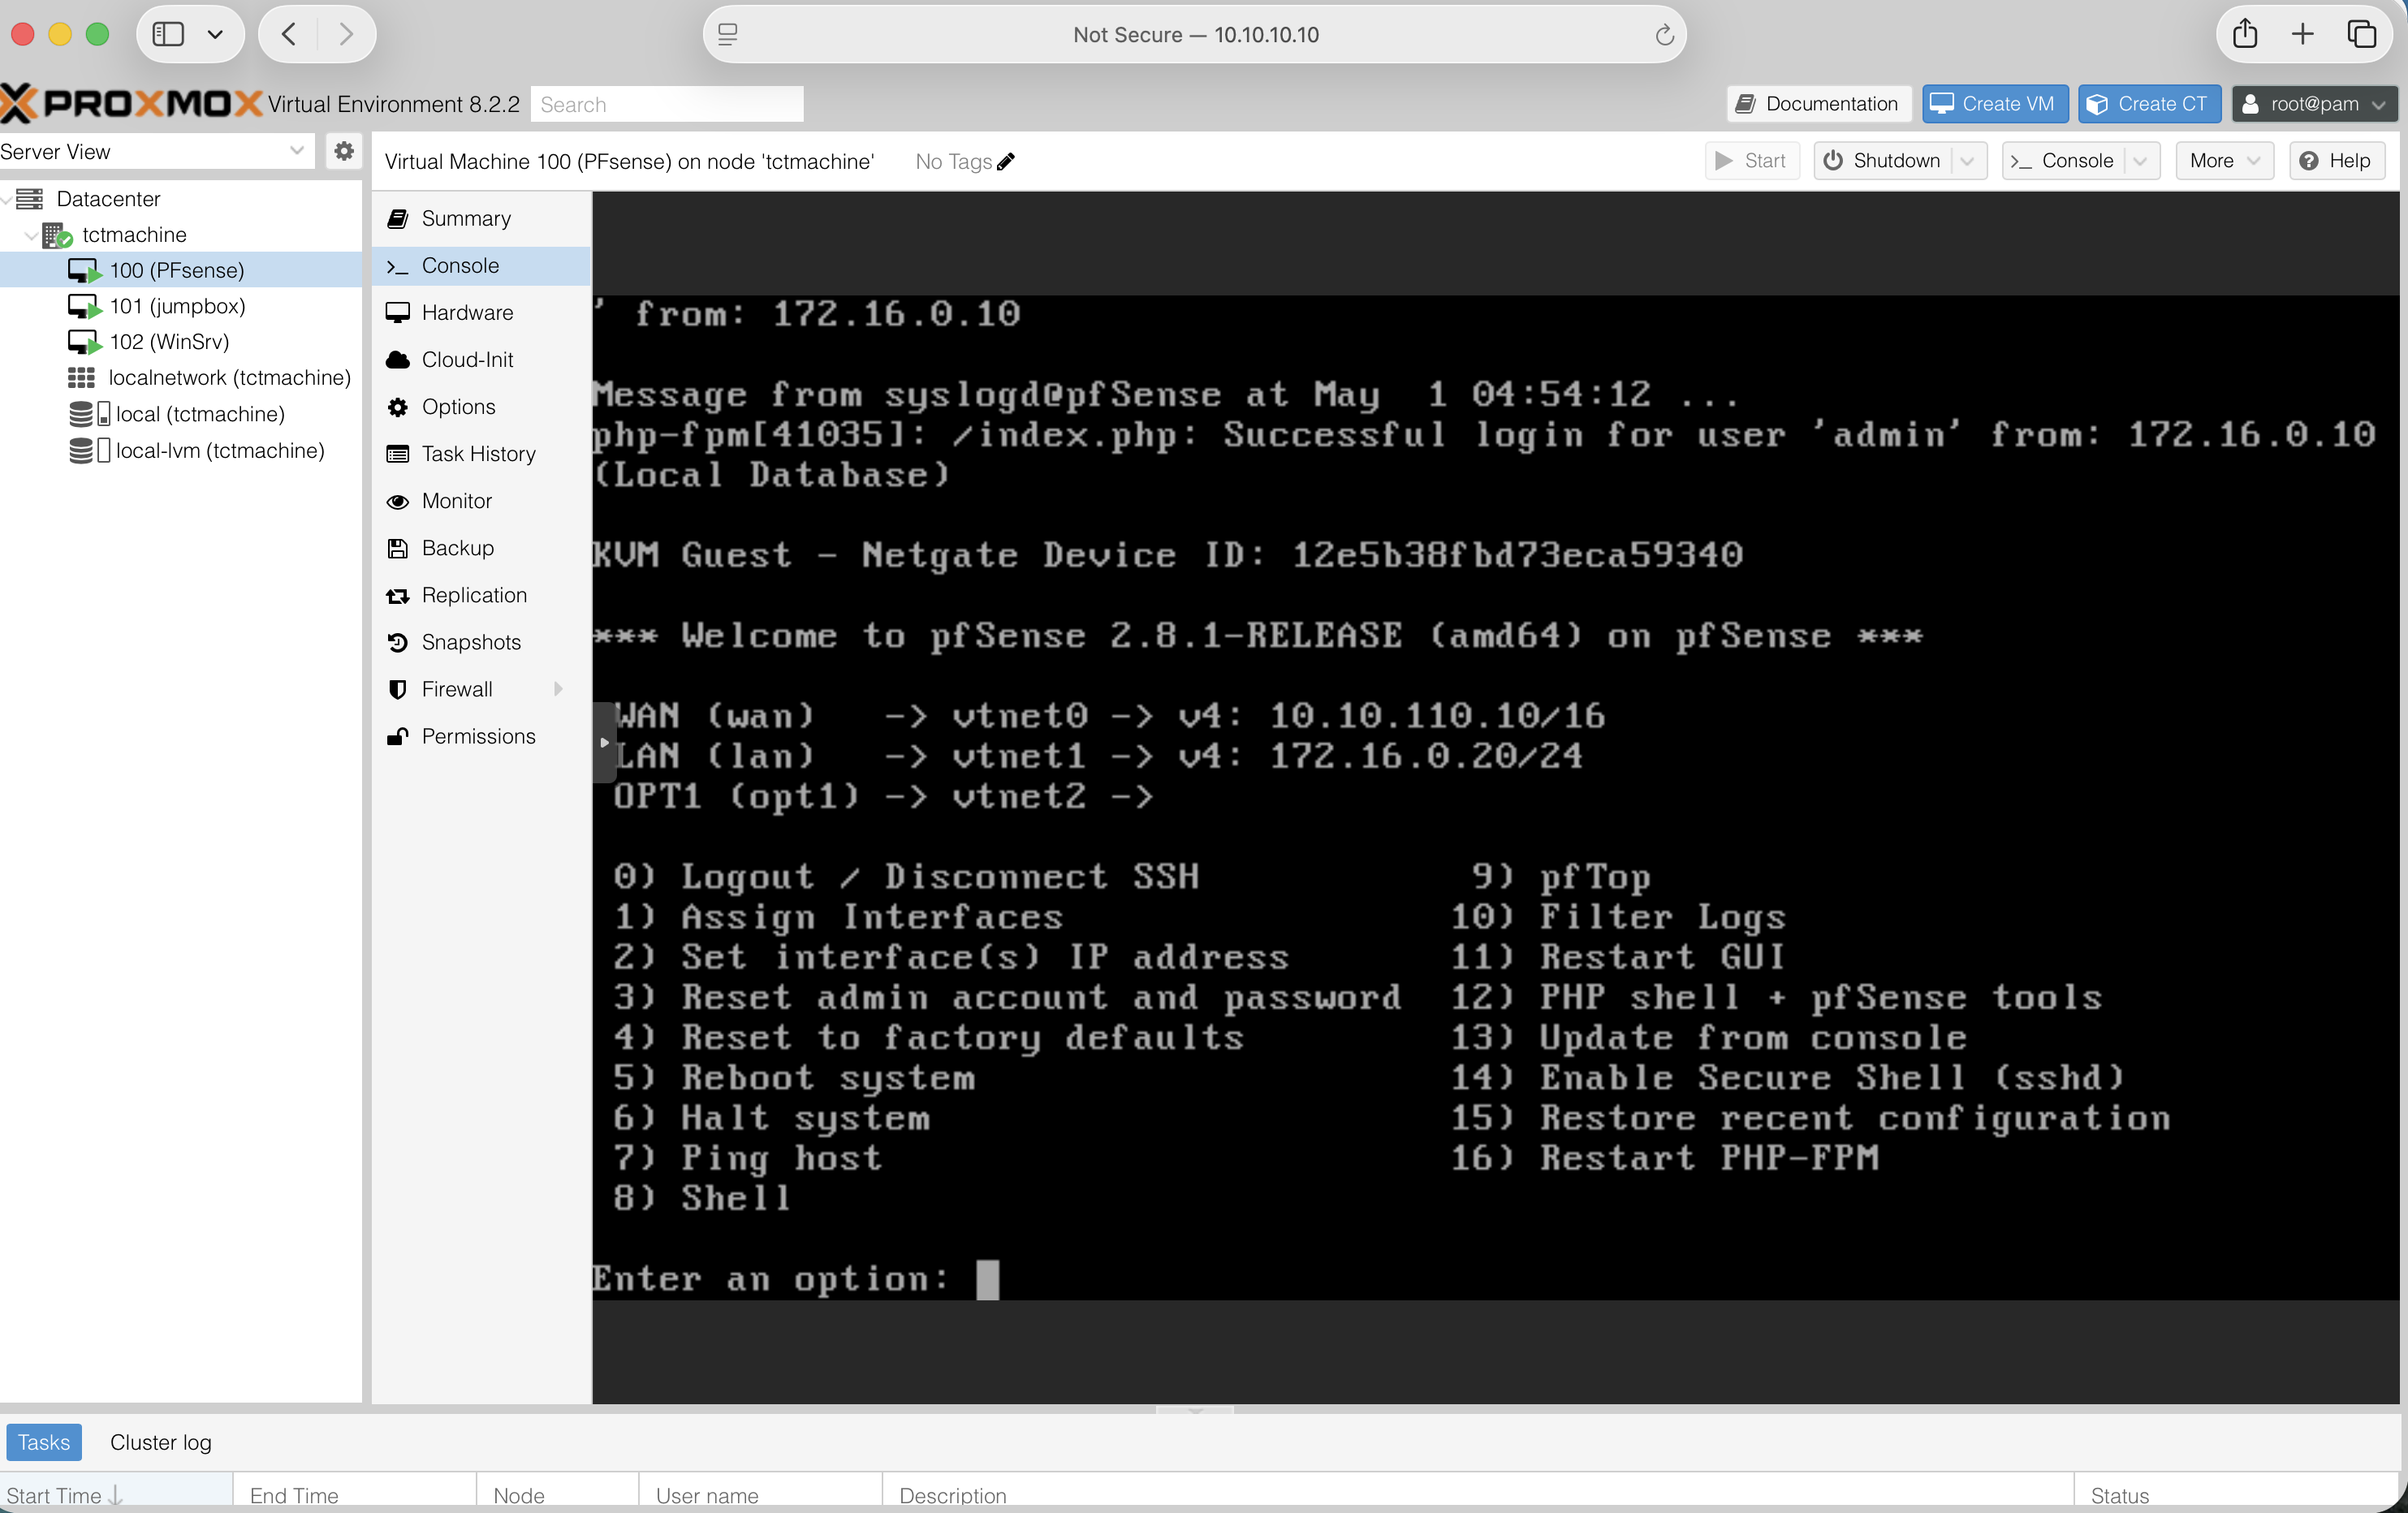
Step 8c — Console interface assignment
From the Proxmox console tab, at the pfSense menu choose 1:
Should VLANs be set up now [y|n]?           n
Enter the WAN interface name:               vtnet0
Enter the LAN interface name:               vtnet1
Enter the Optional 1 interface name:        vtnet2
Do you want to proceed [y|n]?               y
Step 8d — Set IP addresses
From the menu choose 2, then for each interface:
WAN (vtnet0)
  Configure via DHCP?  n
  IPv4 address:        10.10.110.10
  Subnet bit count:    16
  Upstream gateway:    10.10.10.1
  Default gateway:     y
  Configure IPv6:      n

LAN (vtnet1)  ← serves the DMZ
  IPv4 address:        172.16.0.20
  Subnet bit count:    24
  Upstream gateway:    (blank)
  Configure IPv6:      n
  Enable DHCP server:  n  # Jump Box is static

OPT1 (vtnet2)  ← serves the private LAN
  IPv4 address:        192.168.0.1
  Subnet bit count:    24
  Configure IPv6:      n
  Enable DHCP server:  y
    Start address:     192.168.0.100
    End address:       192.168.0.200

Revert to HTTP for webConfigurator?  n
Step 8e — Web UI initial setup
From a LAN VM (or from the Proxmox host with a temporary route added), browse to https://192.168.0.1. Default creds admin / pfsense.
- Wizard → General: hostname
pfsense, domaincapstone.local, primary DNS192.168.0.2. - Time server
pool.ntp.org(NTP = Network Time Protocol), time zoneAmerica/Chicago. - WAN: Static IPv4 (Internet Protocol version 4 — the
10.10.10.10-style addresses)10.10.110.10/16, gateway10.10.10.1. Uncheck “Block private networks” and “Block bogon networks” — both, every time, no exceptions. - LAN: confirm
172.16.0.20/24. - Set a strong admin password. Record it.
- Reload, finish.
“Block private networks” drops anything from RFC1918 — the document (Request for Comments number 1918) that defines the three private IP ranges (10.0.0.0/8, 172.16.0.0/12, 192.168.0.0/16). “Block bogon networks” drops anything from never-allocated IP ranges (a bogon is an IP that should never appear on the public internet). On a real WAN both are correct. In a lab where the WAN itself is RFC1918, both checkboxes silently murder your traffic. Uncheck them.
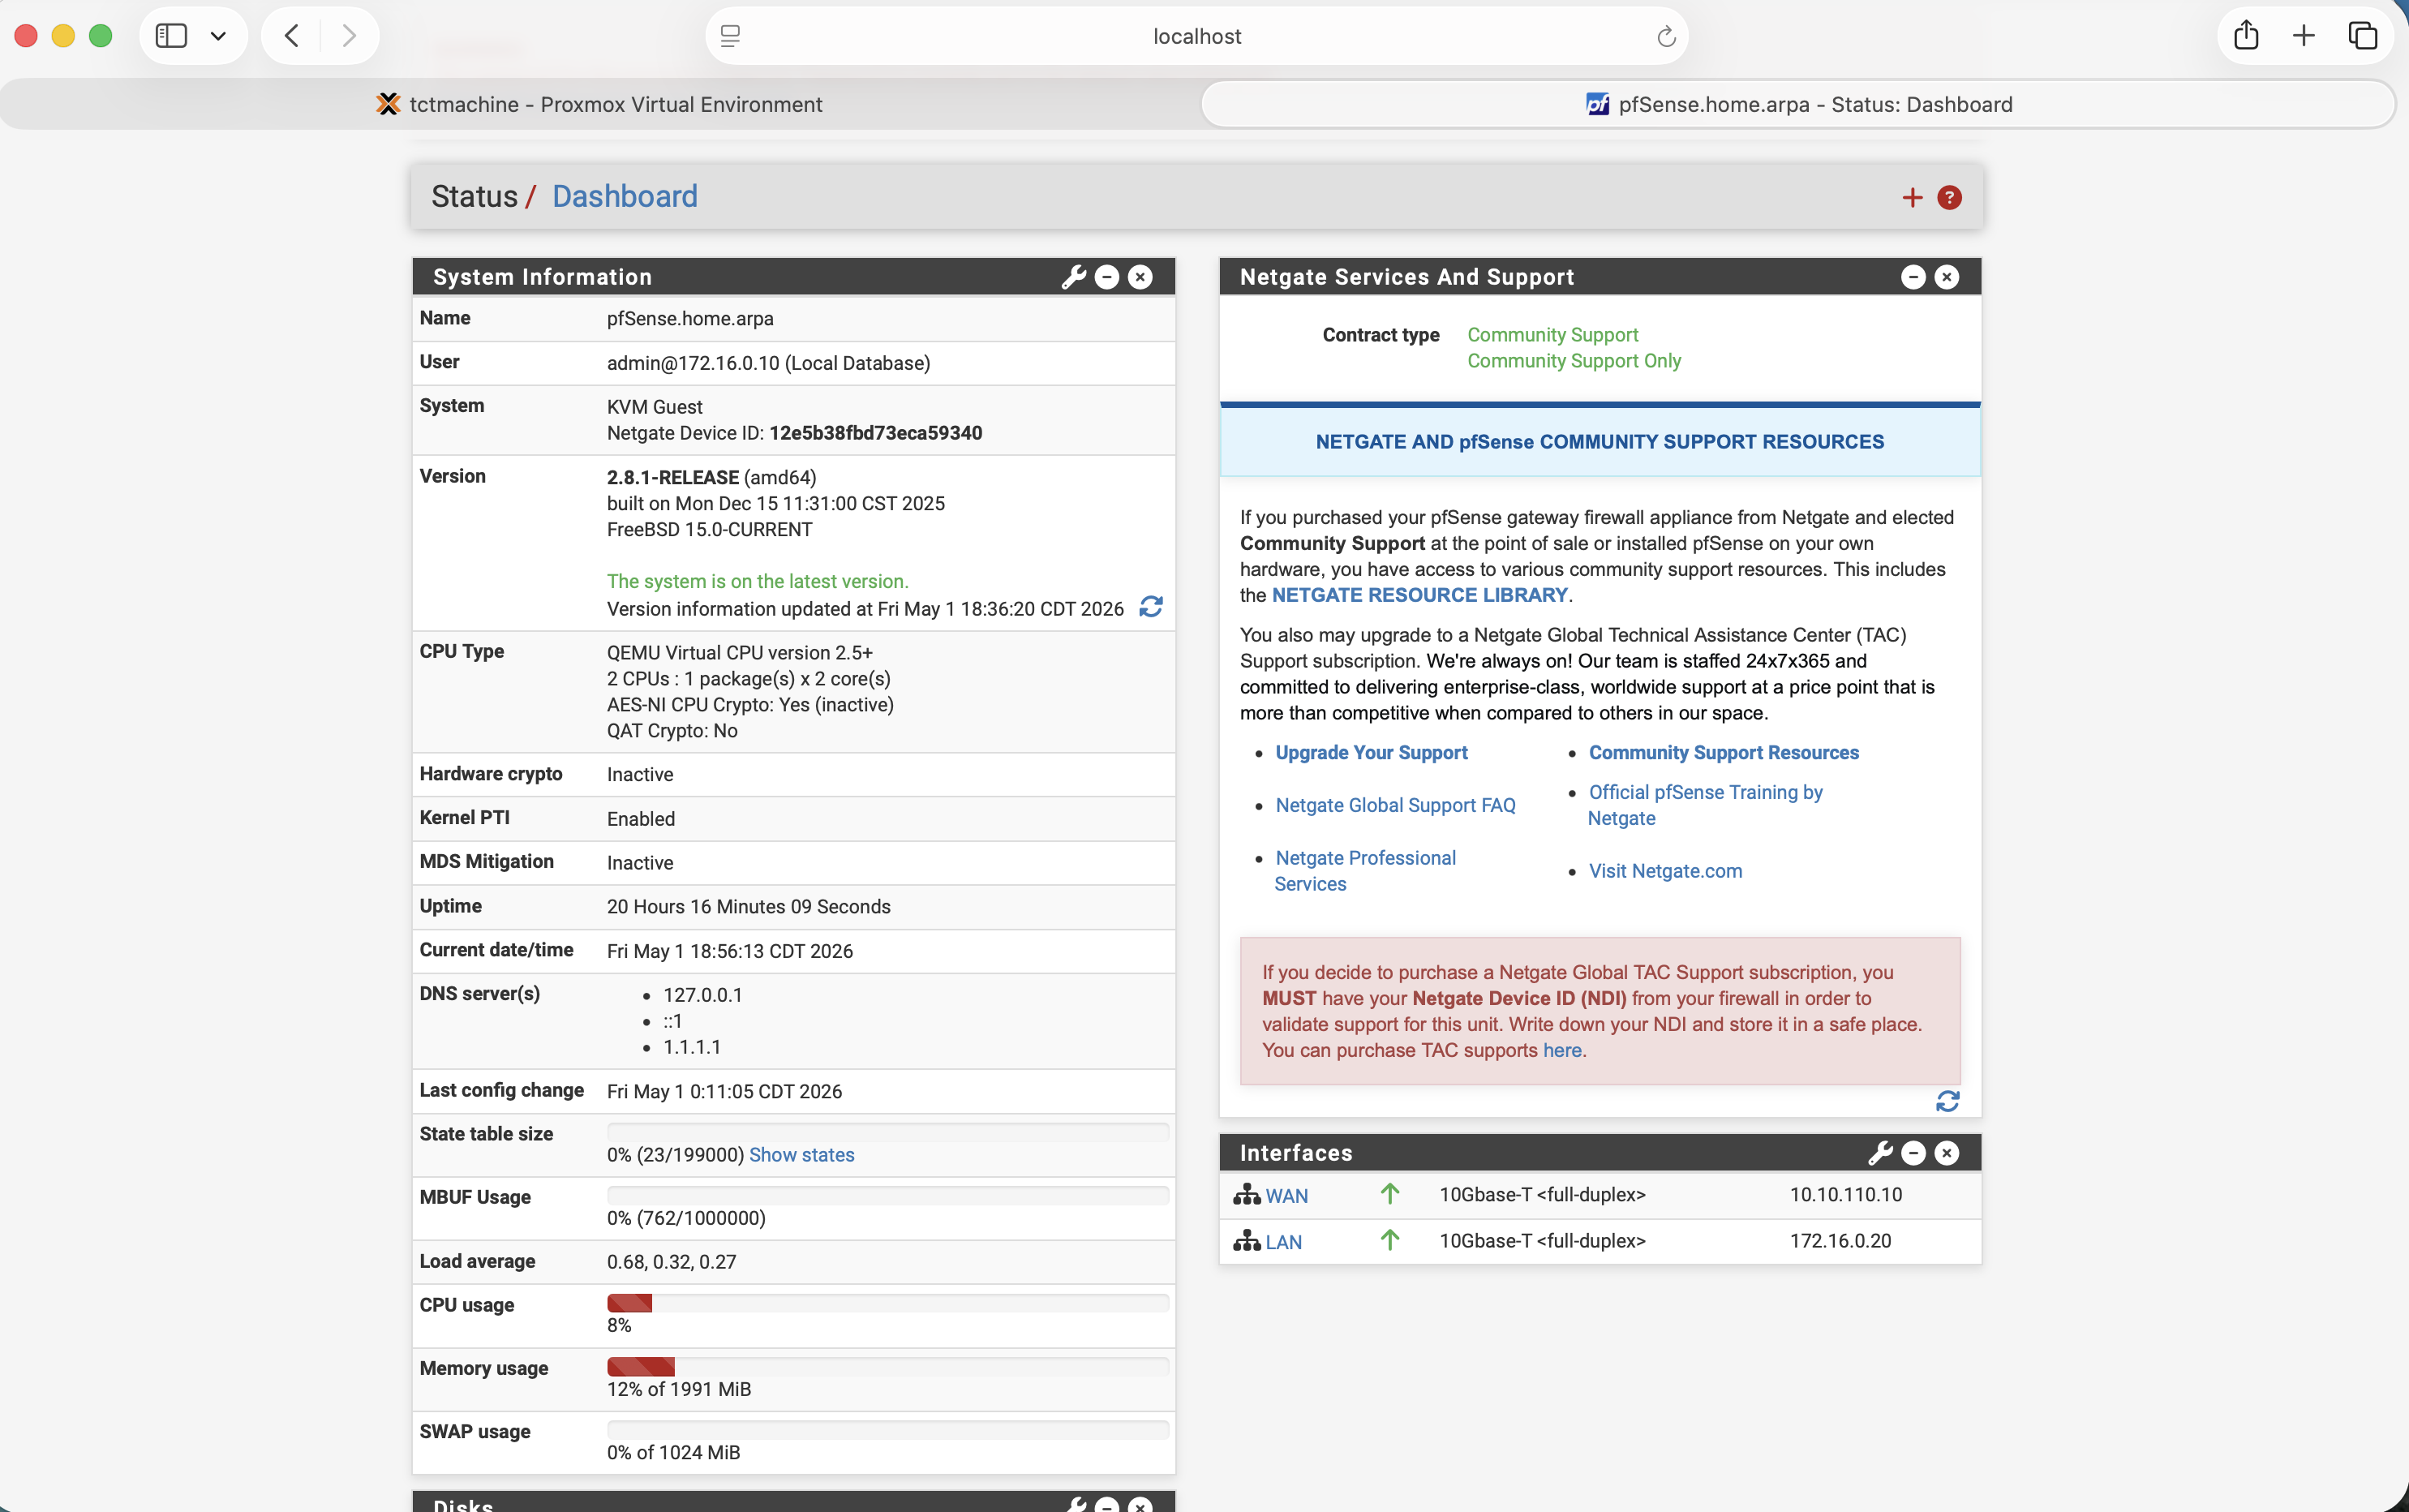
pfSense.home.arpa, version 2.8.1-RELEASE on FreeBSD 15.0, uptime climbing, Interfaces panel with green up arrows on WAN and LAN, memory under 20% — that's a healthy install. The pink “default password” banner at the top is your reminder to change it before the demo.Step 8f — Configure outbound NAT and basic firewall rules
This is also where SNAT (Source Network Address Translation, the inverse of DNAT) shows up: pfSense rewrites the source address of outbound packets so replies come back to it. PAT (Port Address Translation) is the same idea but rewriting port numbers too — usually bundled together as “NAT.”
- Firewall → NAT → Outbound. Mode: Automatic outbound NAT (default in 2.8.1). Confirm WAN auto-rules cover both
172.16.0.0/24and192.168.0.0/24. - Firewall → Rules → LAN → verify a default "any-any" allow rule exists. Same for OPT1 — by default it has none, so add: pass IPv4, source
OPT1 net, destinationany. - Firewall → Rules → WAN → add a port forward / NAT rule for SSH to Jump Box: Firewall → NAT → Port Forward → Add. Interface WAN, Protocol TCP, Destination
WAN address, Destination port2222, Redirect target IP172.16.0.5, Redirect target port2222. pfSense auto-creates the matching firewall rule.
Verify
# From the Linux Server (192.168.0.3)
ping -c 2 192.168.0.1          # pfSense LAN side
ping -c 2 1.1.1.1              # internet via pfSense NAT
nslookup google.com 192.168.0.2 # DNS still works

# From your laptop on the school LAN
ssh -p 2222 [email protected]
# lands on the Jump Box via pfSense port-forward
The frame: "In the required path, the host had three jobs — bridges, NAT, port-forward. Here we extracted the second and third into a real firewall. Same outcome, more realistic, all rules in one web interface." Live demo: open Status → Dashboard, point at the Interfaces panel showing WAN/LAN both green-up. That's the whole story in one screen.
Verification & demo runbook
A demo is two things: proof and story. The proof is a checklist; the story ties them together. Run the checklist before every presentation, even if you ran it yesterday.
The five-test runbook
- Bridges up. Proxmox → tctmachine → System → Network. All three bridges show Active = Yes, Autostart = Yes. Time: 10 seconds.
-
NAT outbound. From the Linux Server:
ping -c 2 1.1.1.1. Reply confirms the host's MASQUERADE (or pfSense outbound NAT) is doing its job. Time: 5 seconds. -
DNS internal + external. From the Linux Server:
nslookup linuxsrv.capstone.local 192.168.0.2
nslookup google.com 192.168.0.2
The first proves the Windows Server's zone is loaded, the second proves the forwarder works. -
Web UI for pfSense. Browse to
https://192.168.0.1from the Linux Server. Dashboard loads; Interfaces panel shows green up arrows on WAN and LAN. -
Inbound DNAT. From your laptop on the school network:
ssh -p 2222 [email protected]
Lands on the Jump Box. Runhostname— should printjumpbox.
What to capture for the binder
- Screenshots: Proxmox Summary, Network table, Disks, each VM Summary, pfSense Dashboard, pfSense Interfaces, the SSH session showing
jumpboxhostname after a port-2222 login. - Shell output:
ip -br addr,ip route,iptables -t nat -L -nv,qm list. - Photos of the physical hardware (front, back, drive bays, RAM with serials).
- The IT Asset spreadsheet filled out.
- A printed copy of this walkthrough for the demo binder.
Run the runbook the night before the demo, then again the morning of. Anything that drifts (DHCP lease expired, snapshot rolled back, password changed) shows up before the audience does.
How to teach this — presentation guide
Building it once is half the work. Explaining it well — so a beginner could replicate it — is the other half. Here's the structure that works.
The 30-minute presentation arc
| Min | Section | What you say |
|---|---|---|
| 0–3 | Mental model | "One server, three zones, four VMs. Everything else is detail." |
| 3–6 | Hardware | Show the box, RAID 5 logical drive, BIOS function keys. |
| 6–10 | Proxmox install | Web UI, Summary, Shell, Network tab. |
| 10–15 | Bridges + NAT | Walk through /etc/network/interfaces, then iptables -t nat -L -nv. |
| 15–18 | Jump Box | SSH from your laptop on port 2222 — explain what that traversed. |
| 18–21 | Win Server & DNS | nslookup demo. |
| 21–24 | pfSense (extra credit) | Dashboard + interfaces — single web UI replaces three host pieces. |
| 24–28 | Run the 5-test runbook | Live, as a smoke test. |
| 28–30 | Q & A | Stay in the seven-parts framing. If a question sounds outside, rephrase to one of the seven. |
The lines that land
- RAID 5 — "Three drives, two hold data, one holds parity. Lose any one drive and the math fills it back in. We pay a third of our space for the safety net."
- Hypervisor — "This computer can now run other computers."
- Bridges — "Three software cables, three rooms. The host stands in all three with one foot in each."
- NAT — "The internal address gets rewritten to the host's address on the way out, then put back on the way in. Like switching badges at a security desk."
- Jump Box — "One door, watched by one camera. If you don't come through this door, you don't come in."
- DNS — "It's the phone book. Type the name, get the number."
- pfSense — "We took the routing rules out of a Linux file and put them in a real firewall with a real interface. Same end result; more like a real company's setup."
Common audience questions and short answers
| Question | Short answer |
|---|---|
| "Why three networks instead of one?" | Segmentation. If one zone is breached the others are still defended. Industry standard. |
| "What's the difference between the host doing NAT and pfSense doing NAT?" | Same end behavior. pfSense has a web interface, logging, and runs the same kind of code that real firewalls run. The host's iptables works but everything is on the command line. |
| "Why RAID 5 and not RAID 1 or 10?" | RAID 5 with three drives gives more space than RAID 1, while still surviving a single drive failure. RAID 10 needs four drives. |
| "What if a VM hangs?" | Proxmox web UI → the VM → Console → Stop → Start. We can also roll back to a snapshot in seconds. |
| "What if the whole host dies?" | Restore from PBS (Proxmox Backup Server — companion product, future weeks). Replace hardware, reinstall Proxmox, restore all four VMs from backup. |
| "Could you secure this further?" | Yes — fail2ban on the Jump Box, MFA (Multi-Factor Authentication) on the web UIs, IDS (Intrusion Detection System) on pfSense, signed and audited firewall rules, host hardening (CIS — Center for Internet Security — benchmark), encrypted backups, off-site replication. We're at a teaching depth, not a production depth. |
The fallback story (when something breaks live)
Everything in this lab is virtual. If a VM won't start, that's a feature. The story: "In a physical-only build, that would be a service truck. Here, we restore from snapshot in three clicks." Take the snapshot before every demo. Use it.
Don't read from notes. The seven parts (Phase 0) are your spine. If you can sketch them on the board and explain each one in one sentence, you're 90% of the way there. Everything else — ports, IPs, command syntax — can sit in this guide as a reference. Walk into the room with the seven parts in your head, not the addresses.
Glossary — every acronym, spelled out
Anchor reference for the whole walkthrough. If a term in any phase isn't familiar, it's defined here.
Hardware & firmware
BIOS — Basic Input/Output System. Firmware that boots a PC and hands control to the operating system.
CPU — Central Processing Unit. The main processor.
DDR3 — Double Data Rate 3. Generation of memory technology used by the ML350p Gen8.
DIMM — Dual In-line Memory Module. The physical memory stick that plugs into a motherboard slot.
ECC — Error-Correcting Code. Memory feature that detects and corrects single-bit errors. Standard for servers.
EFI — Extensible Firmware Interface. Newer firmware standard, replaced by UEFI.
HPE — Hewlett Packard Enterprise. Server manufacturer.
iLO — Integrated Lights-Out. HPE's dedicated remote-management chip with its own NIC and power.
LED — Light-Emitting Diode. Indicator lights on the chassis.
LFF — Large Form Factor. The 3.5-inch drive bays on the front.
NIC — Network Interface Card. The physical Ethernet port (or its virtual equivalent in a VM).
OVMF — Open Virtual Machine Firmware. The UEFI implementation Proxmox uses for VMs that need UEFI boot.
POST — Power-On Self Test. The firmware health check that runs immediately after power-on.
PSU — Power Supply Unit. Converts wall AC to the DC the server uses internally.
RAID — Redundant Array of Independent Disks. Combines multiple drives into one logical volume for performance, redundancy, or both.
RAM — Random Access Memory. Working memory.
RBSU — ROM-Based Setup Utility. HPE's name for their BIOS configuration screen (F9 at POST).
RDIMM — Registered Dual In-line Memory Module. ECC memory with a register chip; required by most server boards.
RJ-45 — Registered Jack 45. The eight-pin Ethernet port connector.
ROM — Read-Only Memory. Non-volatile firmware storage.
SATA — Serial Advanced Technology Attachment. The cable and protocol most consumer hard drives use.
SCSI — Small Computer System Interface. Older enterprise-grade storage protocol; the modern descendant is SAS.
SSD — Solid State Drive. Storage with no moving parts.
TLER — Time-Limited Error Recovery. WD's branding for an enterprise-drive feature that prevents long retry timeouts in RAID arrays.
UEFI — Unified Extensible Firmware Interface. Modern firmware standard; supersedes legacy BIOS.
Networking
CIDR — Classless Inter-Domain Routing. The /24-style notation for subnet masks.
DHCP — Dynamic Host Configuration Protocol. Assigns IP addresses automatically.
DMZ — Demilitarized Zone. A network segment between trusted and untrusted zones.
DNAT — Destination Network Address Translation. Rewrites where a packet is going. Used for inbound port forwarding.
DNS — Domain Name System. Translates names into IP addresses.
FQDN — Fully Qualified Domain Name. A complete hostname including domain (e.g. tctmachine.capstone.local).
HTTP / HTTPS — HyperText Transfer Protocol (Secure). The web's request-response protocol.
IP — Internet Protocol. The addressing layer of the internet.
IPv4 — Internet Protocol version 4. 32-bit addressing (the 10.10.10.10 kind).
LAN — Local Area Network. Trusted internal network.
MASQUERADE — A flavor of source NAT that uses the outgoing interface's current IP. Convenient when that IP can change.
NAT — Network Address Translation. Rewriting IP addresses on packets as they cross a router.
PAT — Port Address Translation. NAT that also rewrites port numbers.
RFC — Request for Comments. The published standards documents that define internet protocols.
RFC1918 — Request for Comments document 1918, which defines the three private IP ranges (10.0.0.0/8, 172.16.0.0/12, 192.168.0.0/16).
SNAT — Source Network Address Translation. Rewrites where a packet came from.
SSH — Secure Shell. Encrypted remote-login protocol.
TCP — Transmission Control Protocol. Reliable, connection-oriented transport.
UDP — User Datagram Protocol. Best-effort, connectionless transport.
UFW — Uncomplicated Firewall. Ubuntu's friendly wrapper around iptables.
VLAN — Virtual Local Area Network. Logical separation of a physical network.
VPN — Virtual Private Network. Encrypted tunnel that places you on a remote network as if you were physically there.
vmbr — Virtual Machine Bridge. Proxmox's term for a software switch on the host.
WAN — Wide Area Network. The "outside" relative to a firewall.
Software & protocols
AD — Active Directory. Microsoft's directory service.
API — Application Programming Interface.
CE — Community Edition. The free, open-source version of pfSense.
CLI — Command-Line Interface.
CIS — Center for Internet Security. Publishes hardening benchmarks.
DVD — Digital Versatile Disc.
EULA — End User License Agreement.
GUI — Graphical User Interface.
IDE — Integrated Drive Electronics. Older disk interface; in Proxmox it's also a VM disk bus type.
IDS — Intrusion Detection System.
ISO — Named after ISO 9660, the filesystem standard for optical disc images. Used as a generic term for installer disk images.
IT — Information Technology.
KVM — Kernel-based Virtual Machine. The Linux kernel's built-in hypervisor that Proxmox uses.
LTS — Long Term Support. Software releases with extended security maintenance.
LVM — Logical Volume Manager. Linux's flexible disk-partitioning system.
LXC — Linux Containers. Lightweight virtualization that shares the host kernel.
MFA — Multi-Factor Authentication.
OPT1 — Optional 1. pfSense's default name for the third interface (after WAN and LAN).
ORCA — Option ROM Configuration for Arrays. The Smart Array RAID configuration tool reachable with F8 at POST.
OS — Operating System.
PAM — Pluggable Authentication Modules. Linux's authentication framework. Proxmox uses PAM for the standard root login.
PBS — Proxmox Backup Server. Companion product for VM backups.
pfSense — Roughly “packet filter sense.” A free firewall and router built on FreeBSD; based on the OpenBSD pf packet filter engine.
PR — Pull Request. A code change proposed for review.
PVE — Proxmox Virtual Environment. The full product name of the Proxmox hypervisor.
PWA — Progressive Web App.
QEMU — Quick EMUlator. Open-source machine emulator and virtualizer that powers Proxmox VMs.
UI — User Interface.
USB — Universal Serial Bus.
VM — Virtual Machine. A software-emulated computer.
vCPU — Virtual CPU. A CPU thread allocated to a VM.
VirtIO — “Virtual I/O.” The paravirtualized driver standard QEMU and Proxmox prefer for disks and NICs because it's faster than emulating real hardware.
YAML — “YAML Ain't Markup Language” (recursive). A human-readable config-file format.
ZFS — Zettabyte File System. Advanced filesystem with built-in volume management and checksums.
Educational walkthrough for a Server+ capstone build. Not a security recommendation for production environments. Always validate firewall rules in a lab before applying them anywhere real.